CS50's Web Programming with Python and JavaScript
Lecture 0 - Git, HTML, CSS
Git
Git is a version control system that can be used to synchronize codes between people and enable people to collaborate on the same project.
Another useful feature that Git is used for is testing and imprementing with code without losing the original.
Git can also be used to revert back older version of code. Say if we have been working on a piece of code realise that the latest version of the code isn’t working, we will need to revert to the older working version of the code.
GitHub is a website that stores Git repositories on the internet to faciliate the collaboration that Git allows for. A repo is simply a place to keep track of code and all changes to code. We can think of a repository as a centralized storage.
Some simple Git commands:
git clone <url>: Take a repo stored on a remote server (like github) and download it.git add <filename(s)>: add files to the staging area to be included in the next commit. This command tells Git that we want to add some files to be included in our next commit. This enables Git to track the file for any saved changes.git commit -m "message": take a snapshot of the repository and save it with a message about the changes.git commit -am <filename(s)> "message": add files and commit changes in one single step.git status: print what is currently going on with the repository at any given moment.git push: push any local changes (commits) to a remote server.git pull: pull any remote changes from a remote server to a local computer.git log: print a history of all the commits that have been made.git reflog: print a list of all the different references to commits.git reset --hard <commit>: reset a repository to a given commit.git reset --hard origin/master: reset the repository to its original state e.g the version that is cloned from GitHub.
When we combine different versions of code using git pull for example, a merge conflict may occur if the different versions have different data in the same location, which is like the same lines in the same file(s). Git will try to take care of the merging automatically however if two users edit the same line, a merge conflict will have to be manually resolved.
To resolve a merge conflict, simply locally remove all lines and code that are not wanted and push the reuslts.
HTML
HTML stands for HyperText MarkUp Language. It is used to lay out the structure of a web page.
<!DOCTYPE html> is placed at the start of a HTML file to indicate to the browser that HTML5 is being used.
HTML is made up of tags. Tag generally come in pairs with data being wrapped inbetween the two tages. Tags are indented to help visualize hierarchy but any indentation is purely stylistic. Tags can also have attributes which are called data fields. Some of these attributes are optional, that simply provide addititonal information to the browser how to render the content and some can be required.
Some common HTML tags:
<html></html>: contents of website<head></head>: metadata about the page that is useful for the browser when displaying the page<title></title>: title of the page<body></body>: body of the page<h1></h1>: header (h1 is the largest header, h6 is the smallest header)<ul></ul>: unordered list<ol></ol>: ordered list<li></li>: list item (must be inside either <ul></ul>` or <ol></ol>)
<img src="path/to/img.jpg" height="200" width="300">: image stored at src attribute, which can also be a URL note that this is a single tag without an end tag both height and width are optional (if one is omitted, the browser will auto-size the image), and can also take a percentage: height=50% to automatically scale the image to a certain portion of the page<table></table>: table<th></th>: table header<tr></tr>: table row<td></td>: table data (cell)
<form></form>: form that can be filled out and submitted by the user<input type="text" placeholder="Full Name" name="name">: input field type indicates the type of data placeholder is the greyed-out text shown before the field is filled name is an identifier for the input field<button></button>: button used to submit form
Document Object Model
DOM is a way to conceptualize web pages by representing them as an interconnected hierarchy of nodes. In HTML the nodes of DOM would be the different tags and their contained data, with the <html></html> tag being at the very top of the tree. This is a very useful feature.
DOM is basically an abstract way to represent a web page HTML file as a big tree structure.
Having an understanding of DOM is helpful especially for later when we start to implement fancy things like Javascript in our web pages. It is also good for styling our webpages with CSS.
[[./images/DOM.png]]
CSS
Cascading Style Sheet (CSS) is a language that is used to interact with and style HTML, changing the way it looks accroding to a series of rules set by us. CSS is what make websites look nice.
CSS can be applied in a number of ways:
- The
styleattribute within the HTML tag like<h5 style="color:blue;text-align:center;":></h5>. The semicolon is used to separate different CSS properties that are passed to style. - The
<style></style>tags. This is useful to use when reusing the same styling many times throughout a page. The listed properties will apply to all of the tags that are listed. For example, we can add this in the middle of our HTML page: ```html
 The above styling basically tells everything with `<h3></h3>` content to be blue and center-aligned. This way we don't need to repeat this thing a million time: `<h3 style="color:blue;text-align:center;">`. The styling applies to the whole HTML file.

 - A separate `.css` file. To use this stylesheet, we need to add a reference to it on our HTML page like this: `<link rel="stylesheet" href="path/to/style.css">`.  This is a better paradigm to use because it separates two distinct different functions: structure (HTML) and style (CSS). This makes the codes easier to read and maintain.

 Some common CSS properties are:
 /The ones that take arguments in pixels often can also take a percentage or simply `auto`./

 - `color: blue`, `color: #0c8e05` : can be 1 of `140 named colors, or a hexadecimal value that represents an RGB value
 - `text-align: left` : aligns text to left; other possible arguments are center, right, or justify
 - `background-color: teal` : sets the background to a color, which is the same format as the color property
 - `height: 150px` : sets the height of an area
 - `width: 150px` : sets the width of an area
 - `margin: 30px` : sets the margin around all four sides of an area
 -    can also be broken up into margin-left, margin-right, margin-top, and margin-bottom
 - `padding: 20px` : sets the padding around text inside an area
 -    can be broken up the same way as margin
 - `font-family: Arial, sans-serif` : sets the font family to be used
	- a comma-separated list provides alternatives in case a browser doesn’t support a specific font
	-  generic families such as `sans-serif` will use browser defaults
 What happens is when a web browser sees this, it will try to accomodate the first argument (`Arial`). If the browser does not have this it will resort to using the `sans-serif` font which is a generic family.

 This is why if you want to use some fancy uncommon fonts, it's better to have the font with the html page.
 - `font-size: 28px` : sets the font size
 - `font-weight: bold`: sets the font weight to quality, a relative measure (lighter), or a number (200)
 - `border: 3px solid blue`: sets a border around an area

 There are a lot CSS properties that can be used in different ways. [[https://developer.mozilla.org/en-US/docs/Web/CSS][Check out this doco]].

### Sectioning with HTML and CSS

 We can also divide our code into different sections for styling purposes. There are two special tags that allow us to break up our page into sections:
 - `<div></div>`: *Vertical* division of a webpage.
 - `<span></span>`: Section of a webpage inside an element, for example text.

 Both of these don't really do much by themselves. However they allow us to label different sections of our webpage.

 Different sections of a webpage can be referenced with `id` and `class` attributes, which are inside `div` or `span`. `id` identifies unique elements whereas there can be any number of an element with a given `class`.

 `id` tags can be referenced in CSS with `#id` and `class` tags can be referenced with `.class`.

 For example.. if we do `<div id="hello">`  in our HTML page, we can then use `#id {..}` in the CSS stylesheet to target all those `div` elements with `id="hello"`..
# Lecture 1 - Git, HTML, CSS Extended
## More on Git

[[./images/gitmerge.png]]

'Branching' is a feature of Git that allows a project to move in multiple different directions simultaneously. There is one *master* branch that is always usable but any number of branches can be created to develop new features. Once these changes are ready, they can be merged in to *master*.

When we are working in a Git repository, the `HEAD` refers to the current branch being worked on. When a different branch is 'checked out', the `HEAD` changes to indicate the new working branch.

When we merge a branch back into `master`, there is a possibility for merge conflict. These can be resolved in the same way that was discussed in Lecture 0.

When we have worked on a local branch and that branch does not exist on the remote branch. If we do a simple `git push`, Git will throw a fatal error because the current branch that we are working on has no upstream branch. In order to push the current branch and set the remote as upstream, we have to use: `git push --set-upstream origin <branch name>`.

Some of the commands that are related to branching:
- `git branch`: list all the branches currently in the repository.
- `git branch <name>`: create a new branch called `name`.
- `git checkout <name>`: switch current working branch to `name`
- `git merge <name>`: merge branch `name` *into current working branch* (normally `master`).

Any version of a Git repository that is not stored locally on a device is called a *remote*. *Origin* is used to refer to the remote from which the local repository was originally downloaded from.

Some of the git commands that are related to remotes:
- `git fetch`: download all of the latest commits from a remote to local device.
- `git merge origin/master`: merge `origin/master`, which is the remote version of a repository normally downloaded with `git fetch`, into the local existing `master` branch.
- `git pull` is equivalent to `git fetch && git merge origin/master`.

A *fork* of a repository is an entirely separate repository which is a copy of the original repository. A forked repository can be managed and modified like any other, all without affecting the local copy.

Open source projects are often developed using forks. There will be one central version of the software which contributors will fork and improve on. When they want these changes to be merged into the central repo, they submit a *pull request*. A Pull request can be made to merge a branch of a repository with another branch of the same repository or even a different repository.

Pull requests are a good way to get feedback on changes from collaborators on the same project.

## More on HTML

The `<a href="link/to/page"></a>` can be used for a hyperlink text. It can also be used to link to a local content marked by `#id`.

`<input type="radio"> Option 1` radio-button option for a form, where only 1 out of all the options may be selected.

There are a lot of new useful tags with HTML5, however not all browsers especially older ones will support these features. However, these new features can be used with increasing confidence that they will be rendered appropriately for a significant portion of the users.

For example, in HTML4 we may have seen something like this: `<div class="header">` whereas with HTML5 your syntax can look like this: `<header>`.


## More on CSS

[[./images/CSSSelectors.png]]

CSS Selectors can be used to select different parts of a website to style in particular ways. Some example below:

- Select `h1` and `h2`:
```css
h1, h2 {
	color: green;
}
- Select all
lithat are descendent ofol. Note that these are not necessary immediate descendants. In order to to do this we just use the space separator.ol li { color:red; } - Select all
lithat are immediate children ofolby using the > separator.ol > li { color:darkgreen; } - Select all
inputfields with attributetype=text:input[type=text] { background-color:whitesmoke; } - Select all
buttonswith the pseudoclasshover:button:hover { background-color: orange; }(/A pseudo-class is a special state of an HTML element. In the example below, the
hoverstate is whether or not the cursor is hovering over a button. Pseudoclasses are generally used to style our pages according to use activities and interaction with the page./) - Select all
beforepseudoelements of the elementa:a::before { content: "\21d2 Click here: "; font-weight: bold; }(/A pseudoelement is a way to affect certain parts of an HTML element. In the above example, the
beforeselector appliescontentwith its included styling before the content of allaelement.With that style, any<a>block will have “.. Click here: “ appended before the content of the block./)
(/21d2 is a hexidecimal value of a Unicode icon which can represent symbol like an emoji./)
- Select all
selectionpseudoelement of the elementp:p::selection { color:red; background-color: brown; }
Responsive design
Responsive design is the idea that a website should look good regardless of the platform it is viewed on (computer vs mobile phone).
One way we can do this is by using a ‘media query’:
<style>
	@media print {
		.screen-only {
			display:none;
		}
	}
</style>
<body>
	<p class="screen-only"> This content will not appear when printed </p>
</body>
The @media is a media query that means the following CSS will be only applied in certain situations. For example in the above example, the display:none is applied to .screen-only which means that when the page is printed, that line will not appear.
Another example is:
@media (min-width: 500px) {
body {
	background-color: green;
}
}
@media (max-width: 499px) {
body {
	background-color: yellow;
}
}
The above means: when the width of the screen is at least 500 pixel, the background of body will be green. If it’s less than 499px, the background of body will be yellow instead.
In order to interact with the screen size, the following must be included in the <head></head>: <meta name="viewport" content="width=device-width", initial-scale=1.0">. viewport is the visible area on the which the screen is being displayed. content refers to the entire webpage the width of which is being set to device-width.
Another tool that is regularly used is flexbox. Flexbox allows for the reorganization of content based on the size of the viewport.
.container {
	display: flex;
	flex-wrap: wrap;
}
By applying the two settings above, content will wrap vertically if necessary so no content is lost when the width of the screen is shrunk.
A grid of content can be achieved in a similar fashion:
.grid {
	display: grid;
	grid-column-gap: 20px;
	grid-row-gap: 10px;
	grid-template-columns: 200px 200px auto;
}
By setting display: grid, all the different characteristics of a grid layout can be used to format content. When defining grid-template-columns, for example, the last column can be set to auto which fills up however much the screen space there may be left. If multiple columns are set to auto they will equally share the remaining space.
Bootstrap
Bootstrap is a CSS Library written to help make clean and responsive and nice-looking websites without having to remember all the gritty details about flexboxes or grids everytime a layout needs to be created.
To use Bootstrap, we only need to add a single line which links Bootstrap’s CSS stylesheet:
<link rel="stylesheet" href="https://stackpath.bootstrapcdn.com/bootstrap/4.1.1/css/bootstrap.min.css" integrity="sha384-WskhaSGFgHYWDcbwN70/dfYBj47jz9qbsMId/iRN3ewGhXQFZCSftd1LZCfmhktB" crossorigin="anonymous">
By adding the above line, Bootstrap’s CSS will make everything look a little cleaner and more modern. However its real power comes out with its layout system. Bootstrap uses a column-based model where every row in a website is divided into 12 individual columns and different elements can be alloted a different number of columns to fill.
Bootstrap’s columns and rows are referenced in HTML with class="row" and class="col-3" attributes where the number after col- is the number of columns the elements should use.
Elements can take up a different number of columns based on the size of the screen with attributes like class="col-lg-3 col-sm-6" which means on a small screen, 6 columns will be used but in large screen, 3 columns will be used. If another rows needs to be added, Bootstrap will do it automatically. This is a much easier alternative to Flexbox because Bootstrap does this behind the scene.
Bootstrap has a whole host of other pretty components which can easily be applied by simply adding the appropriate class attribute to an element. We can visit the [[https://getbootstrap.com/docs/4.1/components/alerts/][Bootstrap’s documentation]] for an extensive list.
Sass
Sass is an entirely new language built on top of CSS which gives it a little more power and flexibility when designing CSS stylesheets and allow for the generalization of stylesheets in a programmatic way.
Ultimately, Sass makes writing CSS easier.
In ordet to use Sass, we have to [[https://sass-lang.com/install][install it]]. Once we have installed this we can execute sass style.scss style.css to compile our Sass file style.scss into sass.css which can be linked to and intepreted by out HTML file.
If we are sick of recompiling, we can do sass --watch style.scss:style.css to automatically recompile style.scss as style.css whenever style.scss is modified. Additionally, many website deployment systems like GitHub pages have built-in support ofr Sass. Say, if we push a .scss file to Github, GitHub pages will render it for us.
Sass allows many features, one of which is the use of variables which are defined like this: $color:red;. Anywhere $color is passed as a vlue for a CSS property e.g color: $color, red will be used.
Another features of sass is nesting which is a more concise way to style elements which are related to other elements in a certain way:
div {
	font-size: 18px;
	p {
		color: blue;
	}
	ul {
		color:green;
	}
}
In the above example, all the p elements inside div will have the color:blue but also font-size : 18px while all ul inside div will have color: green but also font-size : 18px.
A very useful feature is inheritance which is simialr to object-oriented concept. Sass’s inheritance allows for slight tweaking of a general style for different components.
%message {
	font-family: sans-serif;
	font-size: 18px;
	font-weight: bold;
}

.specificMessage{
	@extend %message;
	background-color: purple;
}
%message defines a general pattern than can be inherited in other style definitions using extend %message syntax. In addition to the inheritance, other different styling can also be applied.
Lecture 2
Python..
Lecture 3 - Django
Django is a Python web framework that is used to generate dynamic web pages using Python. Together with HTML and CSS, Django allows us to build a dynamic web application. Django contains a set of tools that are already built for us that makes it easy to make a fully fledged web application. It deals with the boring stuff for us so we can deal with the interesting web page content.
Create a django project:
django-admin startproject PROJECT_NAME
After a folder with PROJECT_NAME will be created in the current working directory. When we look into this folder there are a few important but boring files:
- manage.py: this file is used to execute Django command to interact with our project.
- settings.py: contains important configuration settings. It comes with default config but we can change them
- urls.py: This is like a table of content for our Django web application. It contains the URLs that can be visited.
We can run the web app by interacting with manage.py like this: python manage.py runserver.
Apps
The way that Django is structured is that each Django project generally contains one or more Django applications. One project may have multiple apps within it. For example, on Google webpage we have multiple distinct apps like Google Search, Google Image, Google Map.
In Django we create an app by python manage.py startapp APP_NAME.
After this, a directory called APP_NAME will be created in our project directory. Within this app directory there are a few files.
After we have created the app, we’ll need to install the app into our project. We do it by going into the project’s settings.py file. In the list variable INSTALLED_APPS we need to add the name of our new app into the list.
views
We can set up the page the our users see when visiting an app. To do this we take a look at the views.py file in the app folder.
Each view is something the user might want to see.
To create a basic view can do this:
from django.shortcuts import render
from django.http import HttpResponse

def home(request):
    return HttpResponse('Hello world!')
urls
Now we need to tell the app when to respond or what particular URL should be visited to display the view/ HTTP Response. We need to do this by creating a urls.py in our particular app.
For separation purpose, we mostly want to create a urls.py file in each individual app, in addition to the urls.py in the project folder.
What urls.py need is a list variable urlspattern which is a list of URLs that are accessible for this particular app.
from django.urls import path
from . import views

urlpatterns = [
	path("", views.index, name="index")
]
In the above example, the name argument is optional. The idea is that this name can be used later to reference this url in other parts of our application.
After we do this within the individual app urls.py file, we’d also need to add the route to this app in the main project’s urls.py file. We can add this to the urlpatterns variable:
urlpatterns = [
	path('hello/', include("hello.urls"))
]
The above basically means, if we go to /hello/, use or “include” the route from hello/urls.py.
views with params
We can also create view function that takes additional parameter like name:
def greet(request, name):
	return HttpResponse(f"Hello, {name.capitalize()}!")
Then add this in urls.py:
urlpatterns = [
	path("<str:name>", views.greet, name="greet")
]
What’s going is that we have a dynamic path that takes a name parameter and returns a dynamic view page that uses the name variable to return the view.
templates
In Django, we can separate the HTML response from the Python code. Instead of putting the entire HTTP response in the return statement of the view function in the views.py file, we can have distinct HTML file. This file is called a template.
def index(request):
	return render(request, "hello/index.html")
Now we need to create the template. We do it by creating a folder templates within our app, then create another folder called “hello” to store our HTML template in. We could have done without the hello/ bit and just sit our template in the templates/ folder, however we want to have namespaces in our templates. For example if we have 10 different apps each with their own index.html, we wouldn’t want to conflict them.
So, in our hello app we would have the index.html like this:
hello > templates > hello > index.html
context
Let’s change our greet function, which is currently just:
def greet(request, name):
	return HttpResponse(f"Hello, {name.capitalize()}!")
Let’s say we want to render an entire page. We can do:
def greet(request, name):
	return render(request, "hello/greet.html", {
		"name" : name.capitalize(),

})
- The third argument in the render function is called a context. A context is all of the information that we’d like to provide to the template.
- When we render the template greet.html, that template is provided with information in the format of a dictionary with some a key name and its (dynamic) value. Within the template, we can then use the variable name.
Then, our template can access the name variable, using the double curly braces, like this:
hello > templates > hello > greet.html:
There is a lot of different things happening across different files. The main purpose for this is to have each of them with separate purposes, or act as a separate component of our web application.
Django template language - other functions.
In the above example, we learnt how to access a variable within our template. The Django template language offers other functionalities.
Using conditions in templates
One very simple example that we can look at is https://isitchristmas.com.
Using Django, we can implement Python conditions to create a very similar web page.
Let’s say if we want to create something like “is it new years?”.
python manage.py startapp newyear
then, add 'newyear' into INSTALLED_APPS within the project’s settings.py.
then, go to project’s urls.py and add a new path:
urlpattterns = [
	path('newyear/', include("newyear.urls"))
]
then
touch newyear/urls.py
then within the newyear/urls.py:
from django.urls import path
from . import views

urlpattern = [
	path("", views.index, name="index")
]
/(only one single view index when the routed URL is /newyear.)/
then in newyear/views.py:
from django.shortcuts import render
import datetime


def index(request):
	now = datetime.datetime.now()
	return render(request, "newyear/index.html", {
		"newyear": now.month == 1 and now.day == 1
	})
)
/(The newyear variable will be a boolean variable, equating to True if it’s Jan 01 and False otherwise.)/
then in newyear/templates/newyear, we create index.html.
Note that in the Django template language, we need to end our if statement with an endif.
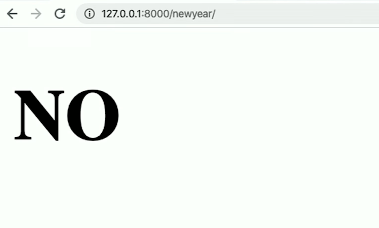
If a client decide to inspect the source of our HTML, they would only see the final product of the template because the conditioning happens server-side, i.e all they see is “No”.
Styling
Django has a special system to deal with unchanged CSS stylesheets, so-called static files.
The way that we can add static files is to add a folder static/ inside our app that will be used to contain all the static files that we will be using for our Django app (not project). Inside this static/ folder we’d also need a folder APP_NAME, like this:
newyear > static > newyear > styles.css
h1 {
	font-family: sans-serif;
	font-size: 90px;
	text-align:center;
}
Then, in our newyear/index.html, we’d need to load our static then reference the actual stylesheet, like this:
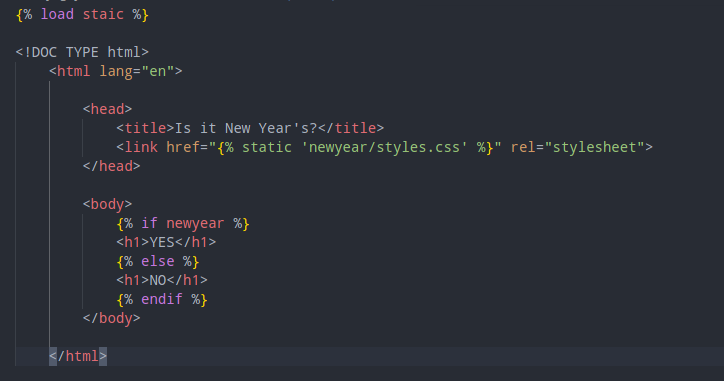
We could have hard-code the URL of our stylesheet instead of using Django dynamic language and the ‘static’ keyword. However, doing it this way is better, especially if we have large web application.
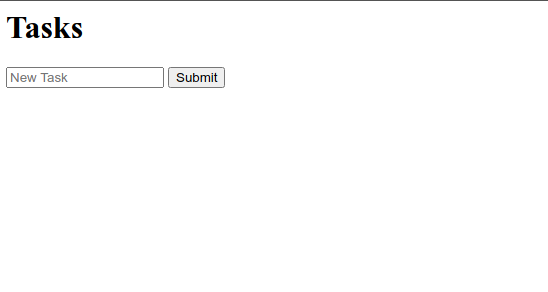
Building a to do list
Start the app
$ django-admin startapp tasks
Install the app and include the url routing of tasks
hello/hello/settings.py:
INSTALLED_APPS = [
    'tasks'
...
]
hello/hello/urls.py:
from django.contrib import admin
from django.urls import path, include

urlpatterns = [
    path('admin/', admin.site.urls),
    path('tasks/', include("tasks.urls"))
]
Configure the routing, view and index template of tasks
apps/tasks/urls.py:
from django.urls import path
from. import views

urlpatterns = [
    path('', views.index, name="index")
]
then the view: apps/tasks/views.py:
from django.shortcuts import render
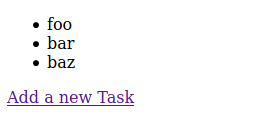
tasks = ['foo', 'bar', 'baz'] # Some placeholder used for MVP
# Create your views here.
def index(request):
return render(request, 'tasks/index.html', {
"tasks": tasks
})
and finally the template which will be using the tasks context variable: /tasks/templates/tasks/index.html:


Task Add function
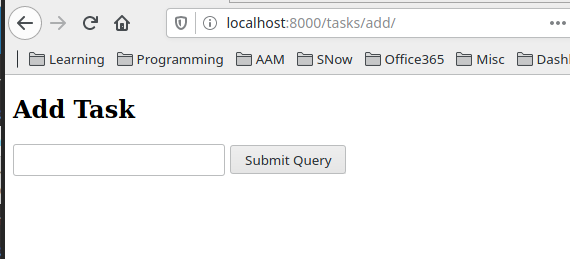
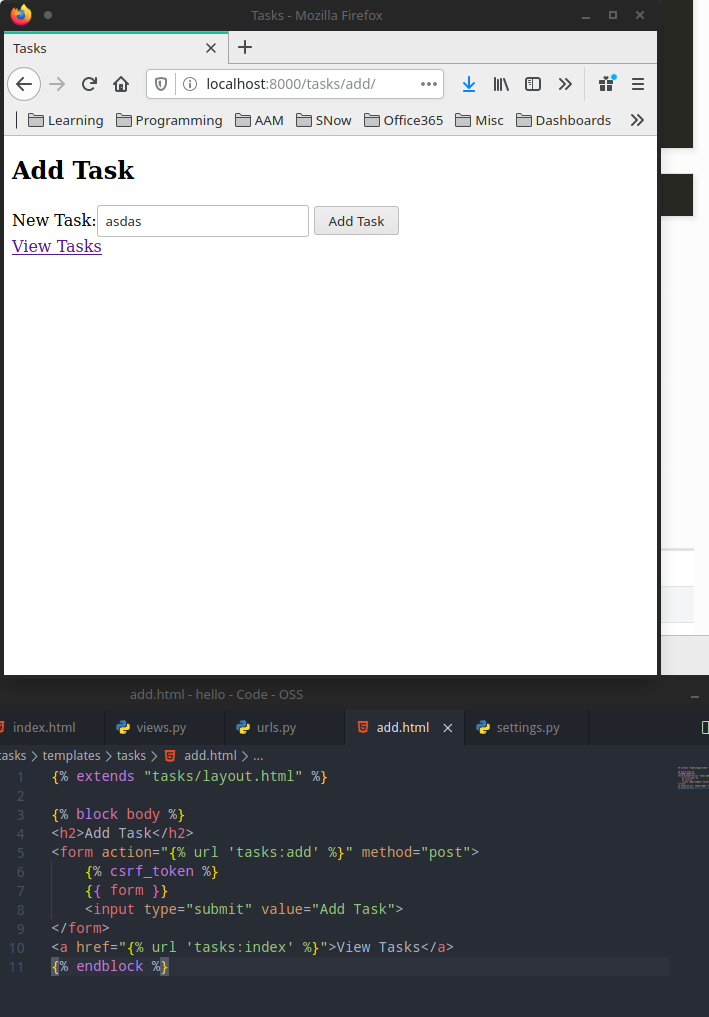
In the views module we create a new function add():
def add(request):
    return render(request, "tasks/add.html")
then configure the urs:
from django.urls import path
from. import views

urlpatterns = [
    path('', views.index, name='index'),
    path('add/', views.add, name='add')
]
the template templates/tasks/add.html:
template inheritance
In the above example what we did was copying the layout of the HTML file from index.html to add.html. Whenever we find ourselves doing copy-pasting like this it’s a good example to stop and pause to think if there is any more efficient way of doing things.
With pure HTML, there isn’t. However with Django we can implement template inheritance. What we are doing is to set up a layout template that will be used by both index.html and add.html.
tasks/templates/tasks/layout.html:
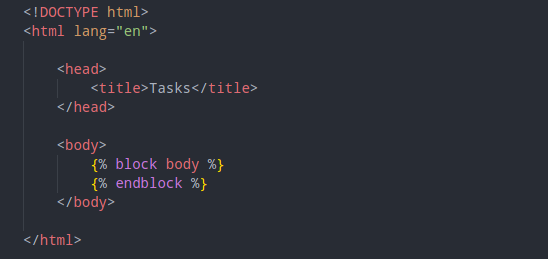
The block bit is the dynamic element.
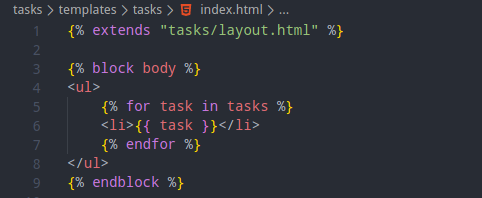
We can then go back to index.html and only leave the unique elements in index template and include an extends statement and state the block body.
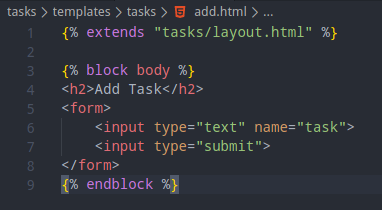
same thing with the add.html file:
We may want to implement a link to navigate from one page to the other. Let’s do this by ultilizing Django feature which is to use the name of the page, not hardcode it: index.html:
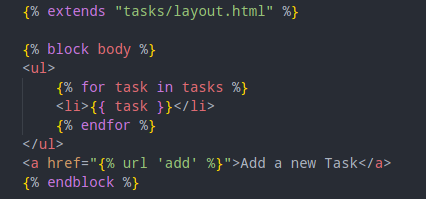
This is made possible by specifying a name for each url path in the urls.py file.
We can avoid namespace collision by doing these two things:
- First, add app_name variable in the urls.py file: ```python from django.urls import path from. import views
app_name = tasks urlpatterns = [ path(‘’, views.index, name=’index’), path(‘add/’, views.add, name=’add’) ]
- Then, reference the url like this in the *add.html* file, with the app_name, followed by colon, then the template name:
<img class="mx-auto w-1/2" src="/assets/img/orgNotesImages/CS50's Web Programming with Python and Javascript.org_20200709_171435_QUP4jb.png">
as well as the *index.html* file:
<img class="mx-auto w-1/2" src="/assets/img/orgNotesImages/CS50's Web Programming with Python and Javascript.org_20200709_171458_TXXuGe.png">
#### configure form submission and POST method
We first need to configure the form element on our template to 1) send the submission to the right view `tasks:add` and use *POST* method. This method should be used for any action that changes the state of any component in our application.
<img class="mx-auto w-1/2" src="/assets/img/orgNotesImages/CS50's Web Programming with Python and Javascript.org_20200709_172627_fvkNqi.png">
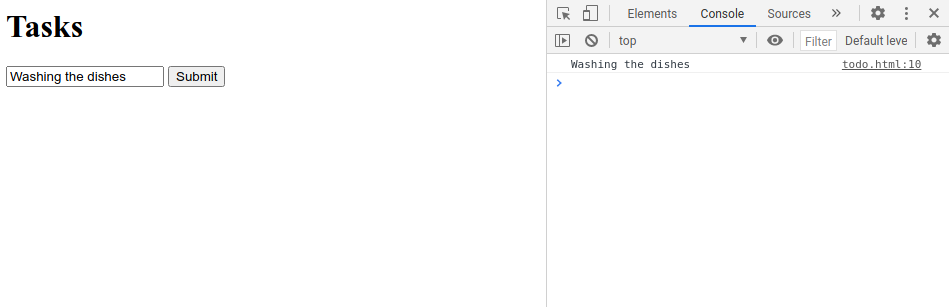
after this, let's try to add a random task and hit submit..
<img class="mx-auto w-1/2" src="/assets/img/orgNotesImages/CS50's Web Programming with Python and Javascript.org_20200709_172702_akij69.png">
The 403 errors mean forbidden/ no permission.
What the hell is CSRF? It's "Cross-site request forgery" which means a security vulnerability that exists on a form. Theoreotically someone could trick our users into posting a form data to our application. CSRF authentication is turned on by Django on default. It's by a thing called *MiddleWare*:
<img class="mx-auto w-1/2" src="/assets/img/orgNotesImages/CS50's Web Programming with Python and Javascript.org_20200709_173151_cLv6cK.png">
What we need to do is to add a hidden csrf token into our form. This is unique and is generated every session a user opens our page. When our user submits the form, the token gets submitted with the form and is used to check to make sure that the token is indeed valid and the form submission is OK to go on.
This is very easy:
<img class="mx-auto w-1/2" src="/assets/img/orgNotesImages/CS50's Web Programming with Python and Javascript.org_20200709_173235_69YW8A.png">
If we view the source of our add page, we can see the csrf token:
<img class="mx-auto w-1/2" src="/assets/img/orgNotesImages/CS50's Web Programming with Python and Javascript.org_20200709_173316_ViJ808.png">
and now the form will submit without error.
However the submission doesn't actually do anything.
What we have done is create form ourselves and write it from scratch in our HTML template. However we can also explore an alternative which is to use the Django built-in form features.
Let's do this.. *views.py*. First we need to create a class that inherits from the Django form module. Then, we pass the class to our template.
```python
from django.shortcuts import render
from django import forms
tasks = ['foo', 'bar', 'baz'] # Some placeholder used for MVP
class NewTaskForm(forms.Form):
task = forms.CharField(label="New Task")
# Create your views here.
def index(request):
return render(request, 'tasks/index.html', {
"tasks": tasks
})
def add(request):
return render(request, "tasks/add.html", {
"form": NewTaskForm()
})
Then we can access the form in our add.html template:
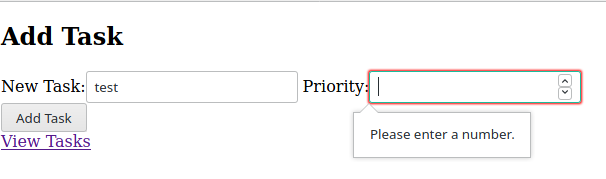
The powerful thing about this is if we need to change anything in our form, we can do it within views.py in Django instead of doing it on the template. Let’s say we want to put a priority field in:
views.py
from django.shortcuts import render
from django import forms

tasks = ['foo', 'bar', 'baz'] # Some placeholder used for MVP

class NewTaskForm(forms.Form):
    task = forms.CharField(label="New Task")
    priority = forms.IntegerField(label="Priority", min_value=1, max_value=10)


# Create your views here.
def index(request):
    return render(request, 'tasks/index.html', {
        "tasks": tasks
    })

def add(request):
    return render(request, "tasks/add.html", {
        "form": NewTaskForm()
    })
Django also does the data validation for us. This is client-side validation which is not done by the server (we can see this by viewing the source of the page).
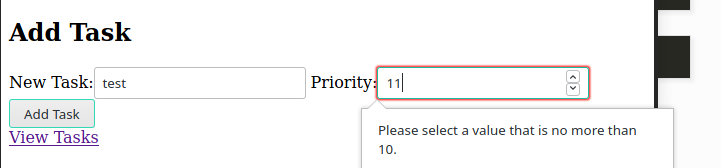
We can also do server-side validation. We can do it by editing the add() function to be able to handle a POST request. We will also change the max_value of priority to 5 on the server. Note that the client session would still have max_value=10 cached so they don’t know of this new max_value yet.
views.py
from django.shortcuts import render
from django import forms

tasks = ['foo', 'bar', 'baz'] # Some placeholder used for MVP

class NewTaskForm(forms.Form):
    task = forms.CharField(label="New Task")
    priority = forms.IntegerField(label="Priority", min_value=1, max_value=5)


# Create your views here.
def index(request):
    return render(request, 'tasks/index.html', {
        "tasks": tasks
    })

def add(request):
    if request.method == "POST":
        form = NewTaskForm(request.POST) # This variable contains all data submitted by user
        if form.is_valid():
            task = form.cleaned_data['task']
            tasks.append(task)
        else:
            # Send the form back to the user with existing details
            return render(request, "tasks/add.html",
            {
                "form": form
            })

    return render(request, "tasks/add.html", {
        "form": NewTaskForm()
    })
Then if we submitted 8 in priority, which would previously be accepted by the server, we’d see this:
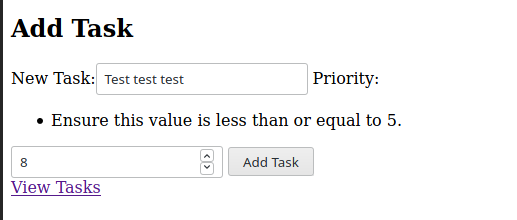
This is why we generally want both client-side and server-side validation.
What if we want to redirect users to the index page after they have added a task? We can do this:
from django.shortcuts import render
from django.http import HttpResponseRedirect
from django.urls import reverse

...

def add(request):
    if request.method == "POST":
        form = NewTaskForm(request.POST) # This variable contains all data submitted by user
        if form.is_valid():
            task = form.cleaned_data['task']
            tasks.append(task)
            return HttpResponseRedirect(reverse("tasks:index"))
        else:
            # Send the form back to the user with existing details
            return render(request, "tasks/add.html",
            {
                "form": form
            })
....
With this, after use submits a Task and hit the submit button they’d be redirected back to the index page.
Session
Now, we implement session which basically enables Django to remember session information. Each of our session should have a separate task list
views.py
from django.shortcuts import render
from django.http import HttpResponseRedirect
from django.urls import reverse
from django import forms


class NewTaskForm(forms.Form):
    task = forms.CharField(label="New Task")

# Create your views here.
def index(request):
    if "tasks" not in request.session:
        request.session["tasks"] = []
    return render(request, 'tasks/index.html', {
        "tasks": request.session["tasks"]
    })

def add(request):
    if request.method == "POST":
        form = NewTaskForm(request.POST) # This variable contains all data submitted by user
        if form.is_valid():
            task = form.cleaned_data['task']
            tasks.append(task)
            return HttpResponseRedirect(reverse("tasks:index"))
        else:
            # Send the form back to the user with existing details
            return render(request, "tasks/add.html",
            {
                "form": form
            })

    return render(request, "tasks/add.html", {
        "form": NewTaskForm()
    })
However, if we go to our tasks now, we’d see:
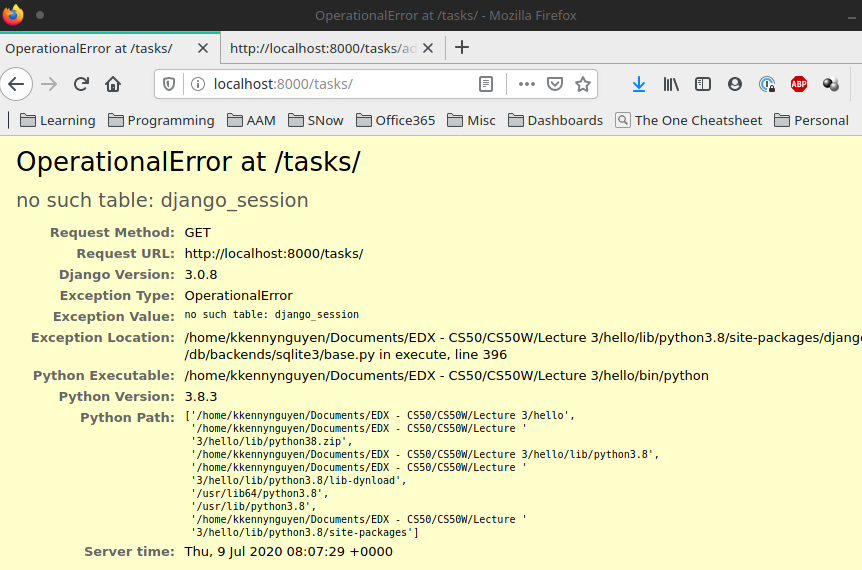
To address we’d need to create all of the default tables inside our Django database by running:
python manage.py migrate
Operations to perform:
  Apply all migrations: admin, auth, contenttypes, sessions
Running migrations:
  Applying contenttypes.0001_initial... OK
  Applying auth.0001_initial... OK
  Applying admin.0001_initial... OK
  Applying admin.0002_logentry_remove_auto_add... OK
  Applying admin.0003_logentry_add_action_flag_choices... OK
  Applying contenttypes.0002_remove_content_type_name... OK
  Applying auth.0002_alter_permission_name_max_length... OK
  Applying auth.0003_alter_user_email_max_length... OK
  Applying auth.0004_alter_user_username_opts... OK
  Applying auth.0005_alter_user_last_login_null... OK
  Applying auth.0006_require_contenttypes_0002... OK
  Applying auth.0007_alter_validators_add_error_messages... OK
  Applying auth.0008_alter_user_username_max_length... OK
  Applying auth.0009_alter_user_last_name_max_length... OK
  Applying auth.0010_alter_group_name_max_length... OK
  Applying auth.0011_update_proxy_permissions... OK
  Applying sessions.0001_initial... OK
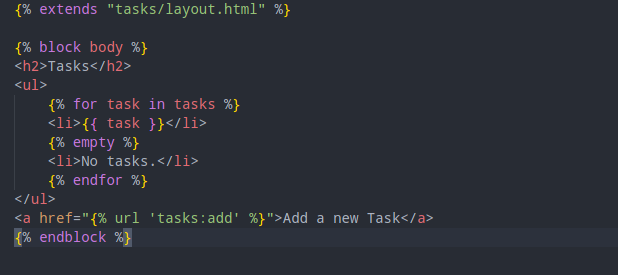
We can also update the template to check if the task list is empty:
We also need to update our views.py file to refer to request.session["tasks"] instead of the previously configured global variable.
views.py
from django.shortcuts import render
from django.http import HttpResponseRedirect
from django.urls import reverse
from django import forms


class NewTaskForm(forms.Form):
    task = forms.CharField(label="New Task")

# Create your views here.
def index(request):
    if "tasks" not in request.session:
        request.session["tasks"] = []
    return render(request, 'tasks/index.html', {
        "tasks": request.session["tasks"]
    })

def add(request):
    if request.method == "POST":
        form = NewTaskForm(request.POST) # This variable contains all data submitted by user
        if form.is_valid():
            task = form.cleaned_data['task']
            request.session["tasks"] += [task]
            return HttpResponseRedirect(reverse("tasks:index"))
        else:
            # Send the form back to the user with existing details
            return render(request, "tasks/add.html",
            {
                "form": form
            })

    return render(request, "tasks/add.html", {
        "form": NewTaskForm()
    })
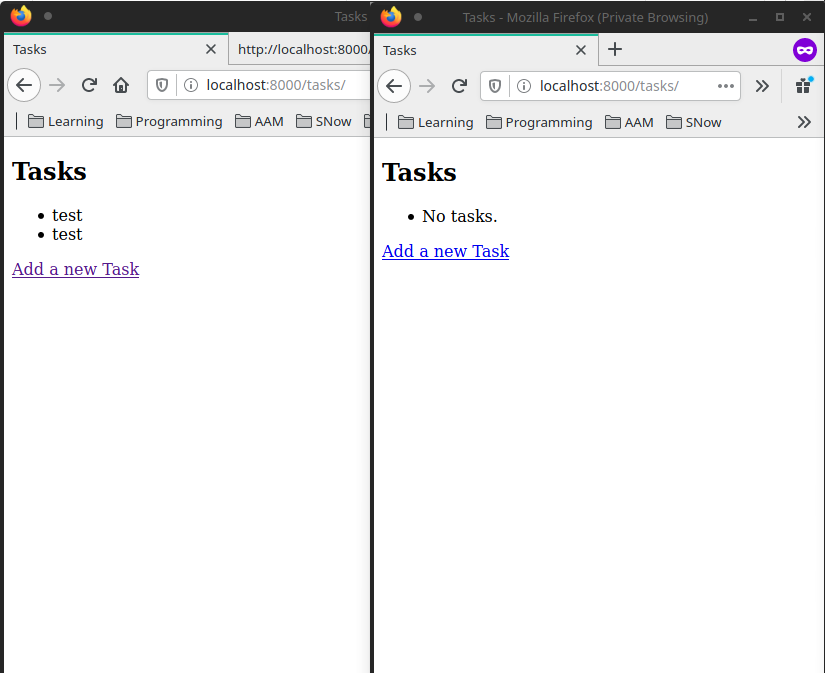
Now, the task list is individual to each session that is stored by the browser cookie. We can test this by using an in cognito browsing session:
Lecture 4 - Django SQL
Overview
What Django allows us to do is to build a dynamically generated web application, instead of just static content.
Where Django gets even more powerful is when we dive into the world of databases. Django allows us to have an abstract layer on top of the SQL database layer. With Django, we interact with the SQL database by not writing direct SQL queries but by interacting with Python Classes and Objects that we can refer to as Models. Migrations are a technique that allows us to update the ongoing changes that are made in the underlying database.
There are plenty of reasons why we want to use Django abstract layer of database instead of interacting with it by using SQL queries. One of them is that with Python, we don’t have to worry about the nuances of the SQL languages and the possible vulnerabilities that we might inadvertantly expose our program to. For example, SQL Injection, Race Condition Problem..etc.
Django Model Basic
Django Models are a way of representing SQL data inside our Django applications.
Let’s start working on an airline project with a flights app.
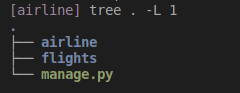
After configuring the apps and urls, let’s look into flights/models.py. We’ll start by creating a Flight model.
from django.db import models

# Create your models here.
class Flight(models.Model):
    origin = models.CharField(max_length=64)
    destination = models.CharField(max_length=64)
    duration = models.IntegerField()
This model should contain certain attributes that a Flight has. For the example above, we’ll just have the three most basic attributes that a flight would have.
models.py
from django.db import models

# Create your models here.
class Flight(models.Model):
    origin = models.CharField(max_length=64)
    destination = models.CharField(max_length=64)
    duration = models.IntegerField()
After this file is saved, nothing would have been saved on our Django application. In order to “deploy the changes” we need to tell Django update the database to update the information about the model that we just created.
This process, in Django is creating a migration. It’s a two-step processes:
- Here are some changes to the database (creating the migration).
- Take the migration steps/ instructions and apply them to the underlying database.
What we do is run these command:
python manage.py makemigrations
Migrations for 'flights':
  flights/migrations/0001_initial.py
    - Create model Flight
After this, there should be a migrations/ directory and it contains a file that contains the instructions how to manipulate the database to reflect the changes we have made.
And then we can do:
python manage.py migrate
After this, we should be able to see a database file db.sqlite3 in our Django directory.
We can query from the database with Django Shell.
python manage.py shell
We can create a database entry without any SQL query, just using Python, like this.
>>> from flights.models import Flight
>>> f = Flight(origin="New York", destination="London", duration=10)
>>> f.save()
We can query our data, like this:
>>> from flights.models import Flight
>>> print(Flight.objects.all())
<QuerySet [<Flight: Flight object (1)>]>
To make our model return a readable string, we can add the __str()__ function for our model:
flights/models.py
from django.db import models

# Create your models here.
class Flight(models.Model):
    origin = models.CharField(max_length=64)
    destination = models.CharField(max_length=64)
    duration = models.IntegerField()

    def __str__(self):
        return f"{self.id}: {self.origin} to {self.destination}"
Now, if we retry, the result looks nicer:
>>> from flights.models import Flight
>>> print(Flight.objects.all())
<QuerySet [<Flight: 1: New York to London>]>
>>> Flight.objects.first()
<Flight: 1: New York to London>
We can also delete the flight object.
>>> f = Flight.objects.first()
>>> f.delete()
(1, {'flights.Flight': 1})
Django Models - abit advanced - #related_name#
Let’s make some changes to the models.
flights/models.py
from django.db import models

# Create your models here.

class Airport(models.Model):
    code = models.CharFeild(max_length=3)
    city = models.CharField(max_length=64)
    def __str__(self):
        return f"{self.city} ({self.code})"

class Flight(models.Model):
    origin = models.ForeignKey(Airport, on_delete=models.CASCADE, related_name='departures')
    destination = models.ForeignKey(Airport, on_delete=models.CASCADE, related_name='arrivals')
    duration = models.IntegerField()

    def __str__(self):
        return f"{self.id}: {self.origin} to {self.destination}"
- The
on_delete=models.CASCADEsays that if an Airport is deleted, Django should also delete all the corresponding Flights. - The related_name is useful for when we have an airport, and want to see all Flights entry that correspond to that airport. In this example, if we have an airport, we can call “departure” to see all flights leaving that airport. Same with the destination and “arrival” field.
[airline] python manage.py makemigrations
Migrations for 'flights':
  flights/migrations/0002_auto_20200728_1245.py
    - Create model Airport
    - Alter field destination on flight
    - Alter field origin on flight

[airline] python manage.py migrate
Operations to perform:
  Apply all migrations: admin, auth, contenttypes, flights, sessions
Running migrations:
  Applying flights.0002_auto_20200728_1245... OK
Now, we can enter Django shell and create some Airport objects.
>>> from flights.models import Airport
>>> jfk = Airport(code='JFK', city='New York')
>>> lhr = Airport(code='LHR', city='London')
>>> cdg = Airport(code='CDG', city='Paris')
>>> nrt = Airport(code='NRT', city='Tokia')
>>> jfk.save()
>>> lhr.save()
>>> cdg.save()
>>> nrt.save()
Then, we can create a Flight object.
>>> from flights.models import Flight
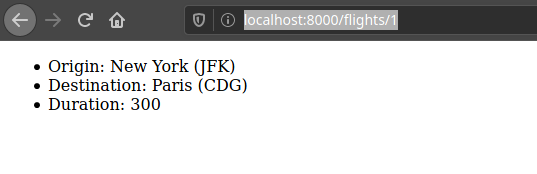
>>> f = Flight(origin=jfk, destination=cdg, duration=300)
>>> f.origin
<Airport: New York (JFK)>
>>> f.destination
<Airport: Paris (CDG)>
>>> f.destination.code
'CDG'
Then, we can use the related_name to see all flight leaving JFK:
>>> jfk.departures.all()
<QuerySet [<Flight: 1: New York (JFK) to Paris (CDG)>]>
Django Models - Show all objects in a view
First, the urls
from django.contrib import admin
from django.urls import path, include
from . import views

urlpatterns = [
    path('', views.index, name='index')
]
Secondly, the views
from django.shortcuts import render
from .models import Flight


# Create your views here.
def index(request):
    return render(request, 'flights/index.html',{
        'flights': Flight.objects.all()
    })
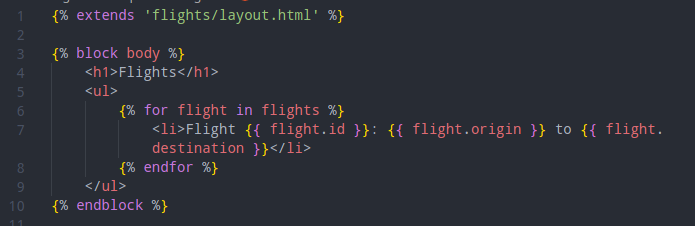
Then, the template
the layout.html:
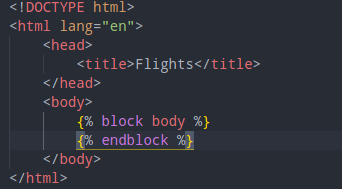
then the actual index.html:
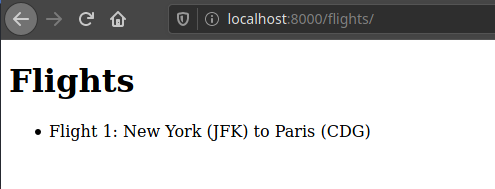
result
Let’s add a new flight
fPython 3.8.3 (default, May 17 2020, 18:15:42)
[GCC 10.1.0] on linux
Type "help", "copyright", "credits" or "license" for more information.
(InteractiveConsole)
>>> from flights.models import *
>>> Airport.objects.all()
<QuerySet [<Airport: New York (JFK)>, <Airport: London (LHR)>, <Airport: Paris (CDG)>, <Airport: Tokia (NRT)>]>
>>> london = Airport.objects.filter(city='London')
>>> london
<QuerySet [<Airport: London (LHR)>]>
>>> london = Airport.objects.get(city='London')
>>> ny = Airport.objects.get(city='New York')
>>> f = Flight(origin=ny, destination=london, duration=200)
>>> f.save()
note:
- The
get()method would throw an error if there are more than one object.
Then, we refresh our page, and BAM:
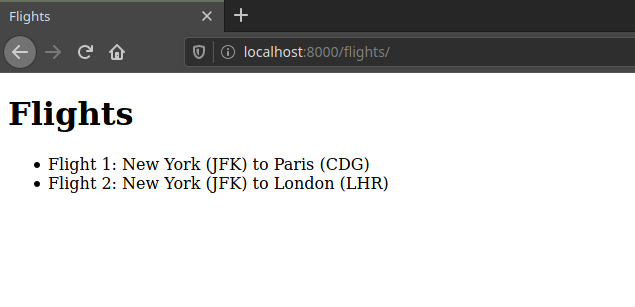
Django Admin
With the knowledge that we have now, if, say we want to build a module to allow our users to add a new flight to the database via the web interface, we could. However, Python Django is built with the principle that programmers should not be repeating codes. Therefore, Django already comes with the entire Django admin app which allows users to manipulate Django Models.
To log into the Admin App, we just need to:
python manage.py createsuperuser
If we go to the Admin page now, we’d only see this:
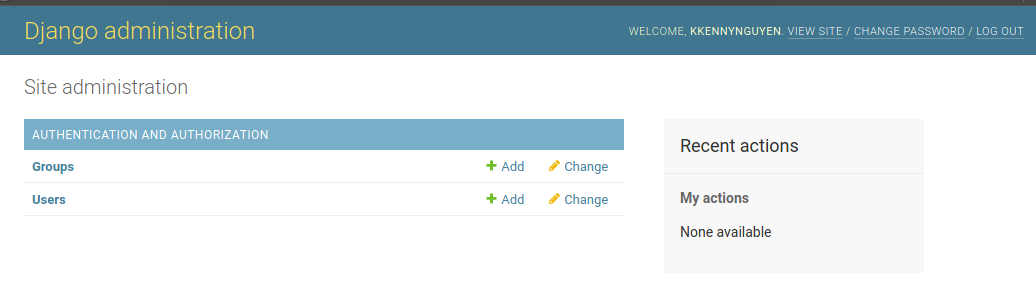
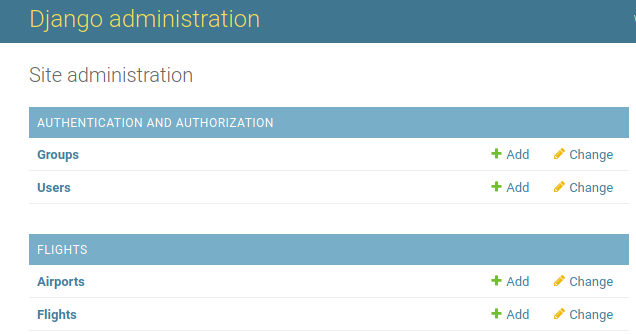
We need to configure our Admin app:
flights/admin.py
from django.contrib import admin
from .models import Flight, Airport
# Register your models here.

admin.site.register(Airport)
admin.site.register(Flight)
With this, we are telling the Django Admin App that “we would like to use the Admin App to manipulate flights and airports.”
Then, if we fresh our admin app:
Fancy up our page
See individual flight
flights/urls.py
from django.contrib import admin
from django.urls import path, include
from . import views

urlpatterns = [
    path('', views.index, name='index'),
    path('<int:flight_id', views.flight, name='flight')
]
flights/views.py:
from django.shortcuts import render
from .models import Flight


def index(request):
    return render(request, 'flights/index.html',{
        'flights': Flight.objects.all()
    })

def flight(request, flight_id):
    flight = Flight.objects.get(id=flight_id) # We can also do "pk="
    return render(request, 'flights/flight.html', {
        'flight': flight
    })
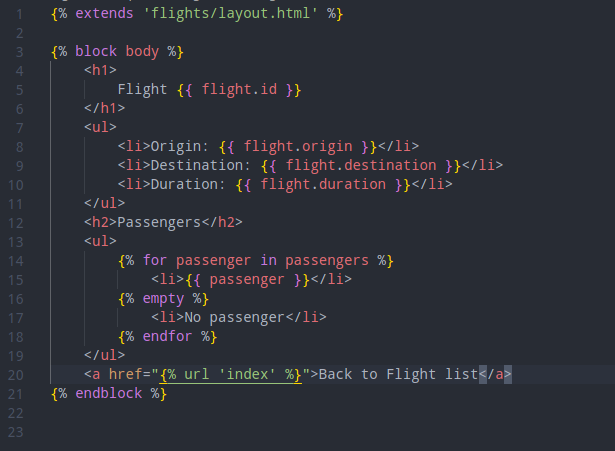
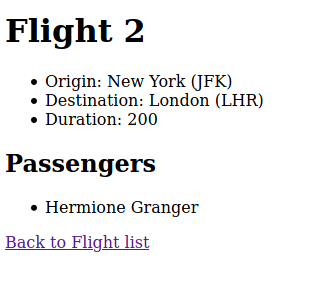
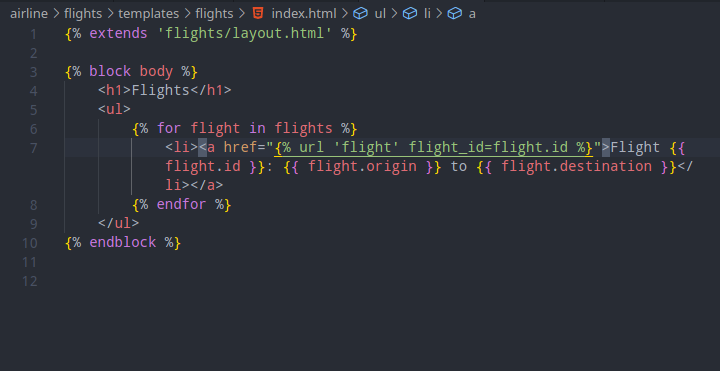
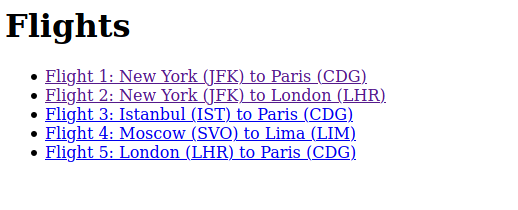
and then the template templates/flights/flight.html:
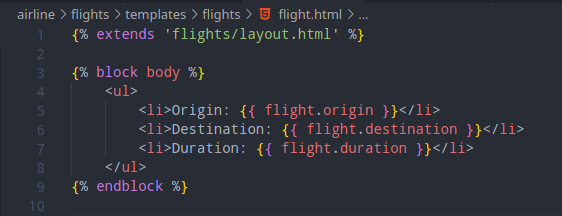
We can verify that the page is working:
Add Passenger
Relationship between Passenter and Flights is many-to-many.
We add this class to the flights/models.py file
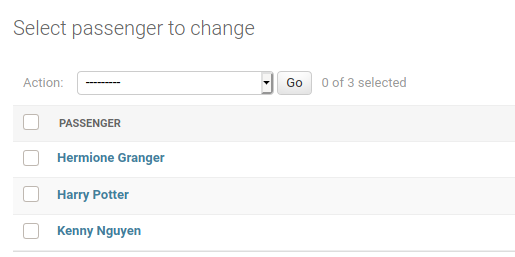
class Passenger(models.Model):
    first = models.CharField(max_length=64)
    last = models.CharField(max_length=64)
    flights = models.ManyToManyField(Flight, blank=True, related_name="passenger")

    def __str__(self):
        return f"{self.first} {self.last}"
The related_name is for “I have a flight, show me all passengers that board this flight”.
[airline] python manage.py makemigrations
Migrations for 'flights':
  flights/migrations/0003_passenger.py
    - Create model Passenger

[airline] python manage.py migrate
Operations to perform:
  Apply all migrations: admin, auth, contenttypes, flights, sessions
Running migrations:
  Applying flights.0003_passenger... OK
We then register our Passenger to the Admin site and add a few passenger objects:
from django.contrib import admin
from .models import *
# Register your models here.

admin.site.register(Airport)
admin.site.register(Flight)
admin.site.register(Passenger)
Then, now, we want to show all passengers on any given flight..
We need to add passenger to the context that we pass to the template. Note that we can do this using the related_name field:
flights/views.py
from django.shortcuts import render
from .models import Flight


def index(request):
    return render(request, 'flights/index.html',{
        'flights': Flight.objects.all()
    })

def flight(request, flight_id):
    flight = Flight.objects.get(id=flight_id) # We can also do "pk="
    return render(request, 'flights/flight.html', {
        'flight': flight,
        'passengers': flight.passenger.all()
    })
then we update our templates/flights/flight.html
last is to configure our index page:
Lecture 5 - JavaScript
General JS
General
JavaScript enables us to write client-side codes. It enables us to write codes that are run inside the client’s browser application. JS gives us the ability to directly manipulate the DOM, which is the representation of the webpage that the user is looking at. This gives us more power to create an interactive webpage.
In order for us to enable Javascript in a HTML file, we only need to add some <script></script> tags. These are often located inside the HTML file.
For example, if we have these code:
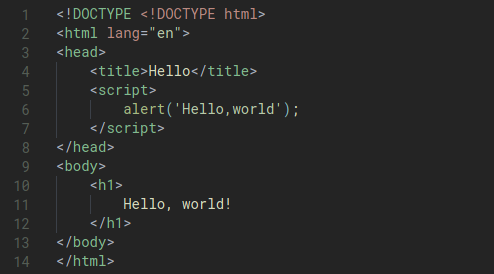
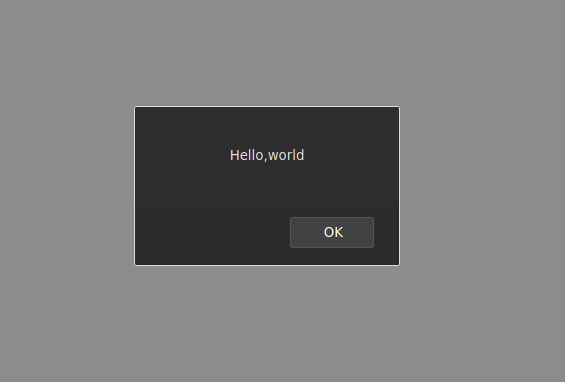
When we open the the html file, we’d see:
Event-Driven programming
In order to understand the true power of Javascript, we need to understand the concept of event-driven programming, which is a programming paradigm in which the flow of the program is determined by events such as user actions (key presses, mouse clicks, onload, onblur, onmouseover..etc). This is the key dominant paradigm used in graphical user interfacts and web applications.
In an event-driven application, there is generally a main loop that listens for events, then triggers a callback function when one of those events is detected.
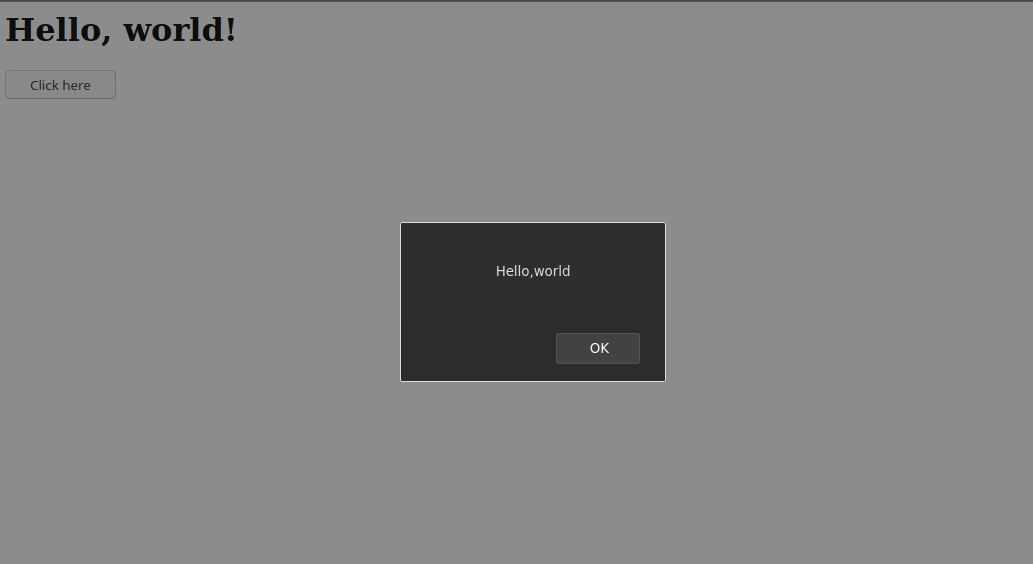
In the below example, we have:
- Created a function
hello()that display the alert when called. - We added a button on our page. We also add an attribute to this button attribute called onclick that adds an onclick handler to the button.

Variables
We can create a simple webpage that has a counter function like the below. In this example we use a variable called counter. In this example, we’ll write a simple page that increments the counter variable and display to us the value of this counter.


let vs var
The difference is in scoping rules.
A variable defined using a var statement is known throughout the function it’s defined in, i.e it is scoped to the immediate function body.
A variable defined using a let statement is onlw known through the block it’s defined in, i.e it’s scoped to the imemdiate enclosing block denoted by { }.
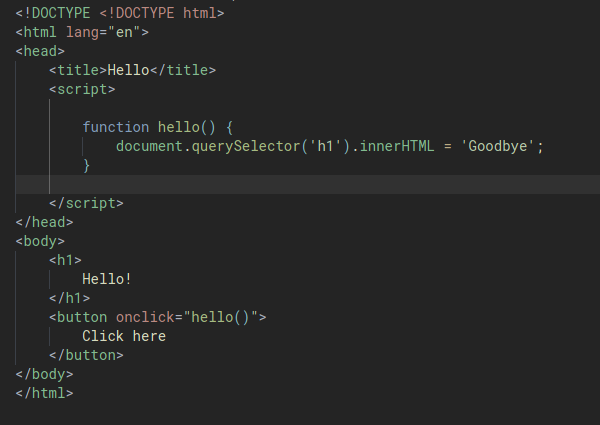
Manipulating the DOM
It would be fairly annoying if the only way that we can interact with the user is by displaying an alert. What would be powerful is if we can update the content of the webpage dynamically by manipulating the DOM.
In the below example, we’ll be using a function called document.querySelector() which gives us the ability to look through a HTML document and to extract an element out of it, so that we can manipulate the element with JavaScript. This function only returns one elements so the first matched element will be returned.
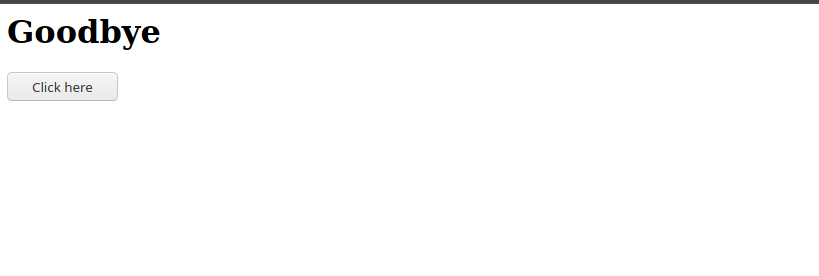
We then manipulate the content of the h1 element by using innerHTML to update the inner HTML property to ‘Goodbye’:
When we open the page, it’ll look like this:

After we click on the button:
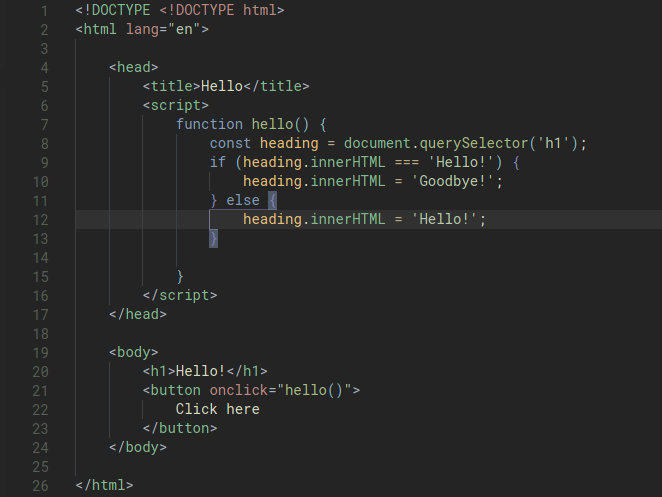
Conditions
We can also update our code so that the HTML property is “toggled” back and forth using JavaScript conditions.
In JavaScript, we need to use tripple equal (===) to check for strict equality, which means that a property has the same value as well as data type.
 function hello() {
     const heading = document.querySelector('h1');
     if (heading.innerHTML === 'Hello!') {
         heading.innerHTML = 'Goodbye!';
     } else {
         heading.innerHTML = 'Hello!';
     }

 }
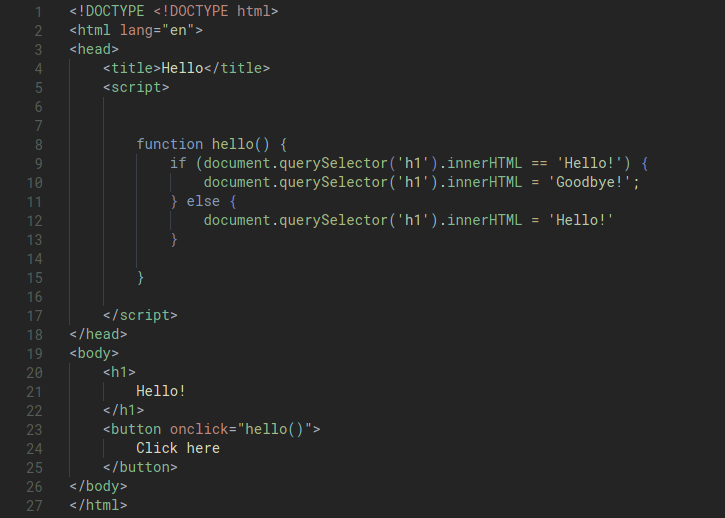
Our code right now looks OK but still a bit clunky because we repeat the document.querySelector() bit three times. We can improve it by storing this value in a variable
If we have a variable that we know we won’t ever be changing, instead of using let we can change it to const. This tell JS that we’ll never be changing the value of the variable to anything else.
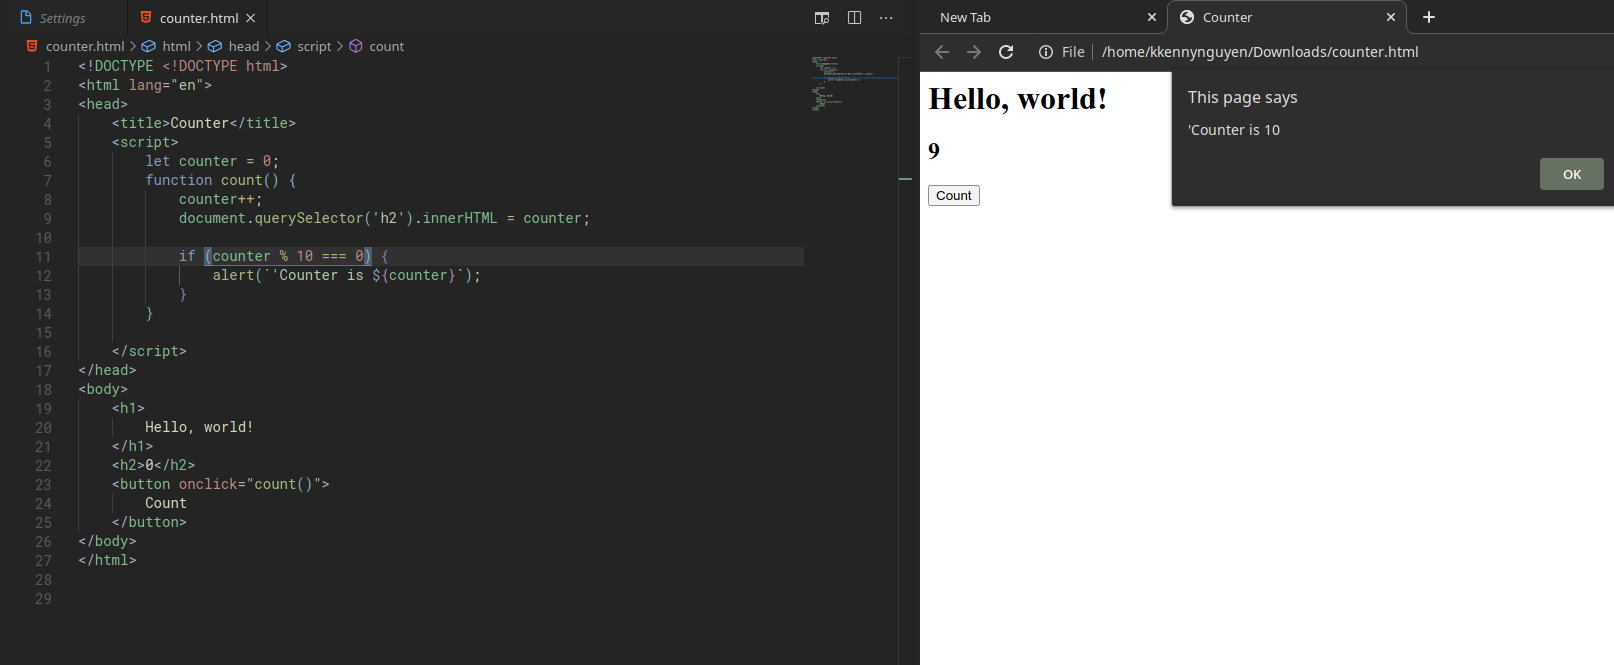
We can update our counter html page so that instead of just displaying the alert, we’ll update the value of a h2 property to display the counter.
We can also fancy up the page by incorporating a logic that displays a message that includes a string and the counter variable when the counter is a multiple of 10.
In order to write a string with a variable/ constant inside it, we wrap the string within two back ticks (```). This is equivalent to the formatted string in Python. The actual variable also needs to be wrapped in curly braces with a dollar sign in front of it.
Separating the JavaScript from the HTML using Event Listener
We often don’t want to inter-mingling the content of our HTML and our JavaScript codes. Similarly to how we manage CSS, we often want to separate our JS code from the HTML content of our page.
Instead of hard-coding the onclick property in the button element, we can instead add an event listener inside our script block, like this:
document.querySelector('button').onclick = count;
/(set the value of the onclick property of the button to count)/
Notice that we are not calling the function and there is no parentheses. We are simply setting onclick to the count function. This way, the count() function is only called, when onclick happens.
The practice of passing functions around in variables like this is the concept of functional programming where we can treat functions like values that can be passed around and manipulated.
addEventListener() and 'DOMContentLoaded'
Let’s say we have this:
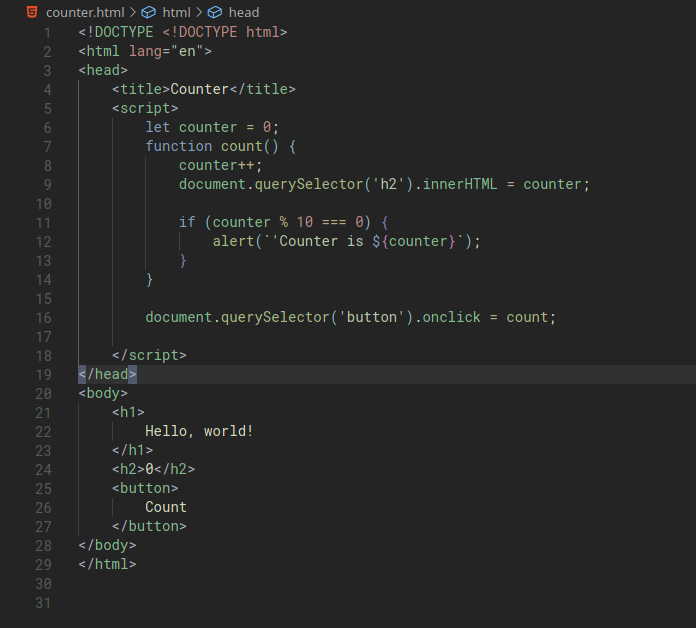
When we open our page and click on the Count button, we’d realise that it does not work and the Count button does not do anything at all. When we run into problems like this, we can inspect the page and look at the Console to investigate the error. For example, if we inspect the console of our counter.html page, we’d see this:
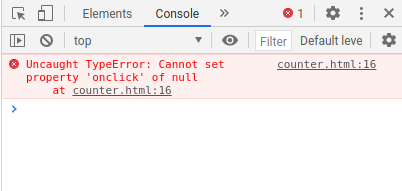
If we look at line 16 of our code:
document.querySelector('button').onclick = count;
It seems like the Console was telling us that document.querySelector('button') equates to Null. This normally happens when the querySelector function could not find the element.
Why does this happen? It’s because the body of our HTML is read and executed by our browser top-down. When our browser reads line 16, the button element has not appeared yet.
There are a few solutions that we can use:
- Move the script tag to the bottom of the page. or
- Add another event listener to refer to the entire HTML document.
To do this, we’d use the addEventListener() function that takes two arguments.
- The first argument is “what event I want to listen for”, this can be a click, a scroll..etc..
- The second argument is “what function to run after the event happens”.
For our example, we’ll do:
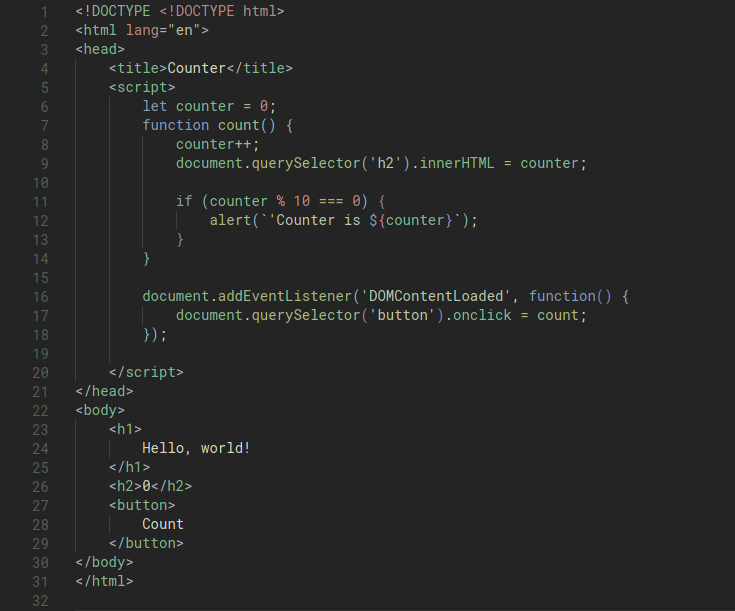
 let counter = 0;
 function count() {
     counter++;
     document.querySelector('h2').innerHTML = counter;

     if (counter % 10 === 0) {
         alert(`'Counter is ${counter}`);
     }
 }

 document.addEventListener('DOMContentLoaded', function() {
     document.querySelector('button').onclick = count;
 });
Note:
- The
'DOMContentLoaded'event is a special event that is only going to be fired or triggered when all the DOM content of the page is done loading. - The
function()is what we call an anonymous function where we don’t want to define a name for the function because it doesn’t need a name, because we don’t need to re-use the funtion. - We can also use the
addEventListenerto set the button onclick to the count function. These two following lines can be used interchangably. They both mean “when the click event happen, run the count function”. The first version is shorter and simpler so we’ll use it instead.document.querySelector('button').onclick = count;
document.querySelector('button').addEventListener('click',count);
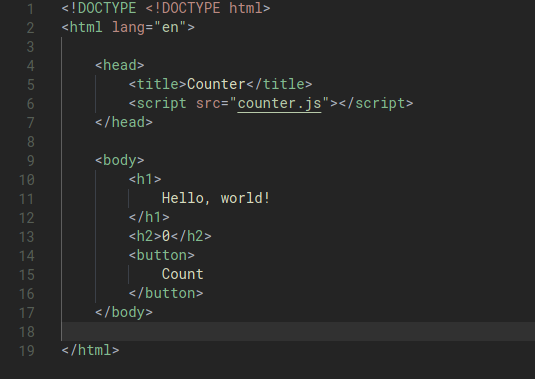
Moving JS into a separate file
The way we do this is very similar to how we put our CSS in a separate file for styling.
- Move all our JavaScript code in a separate file ending in
.js - Add a
srcattribute to the<script>tag that points to this file.
For our counter example, we’d do it like this:
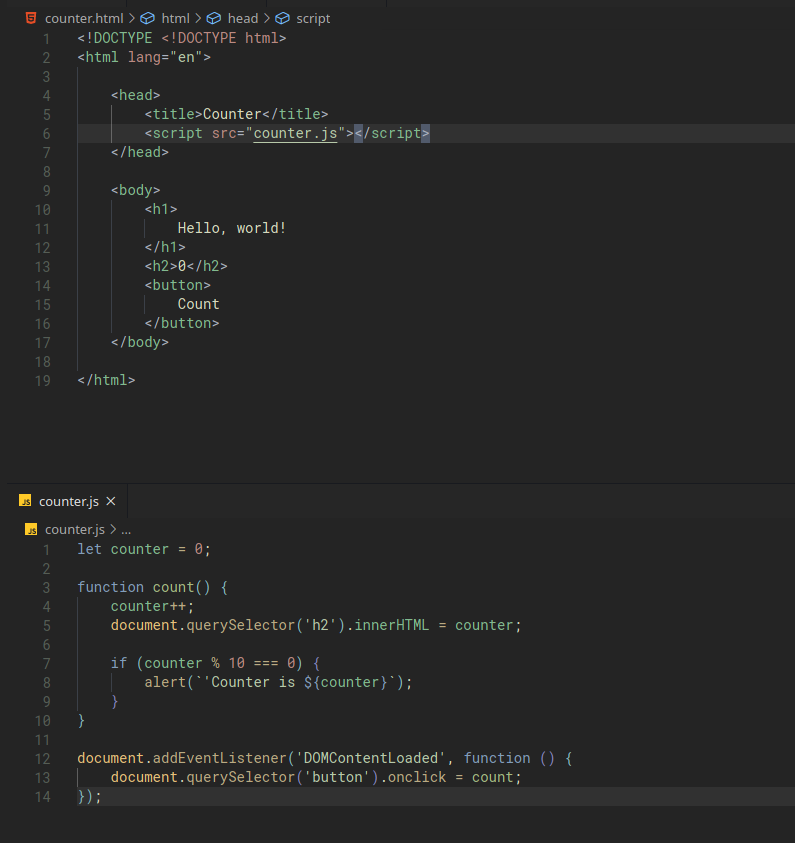
This way out HTML file looks a bit simpler and more readable that the JS codes are separate in a different file.
Another benefits of having our JS separate from our HTML is that we can have multiple HTML files that all share the same JavaScript. We can then have JavaScript libraries that we use for our HTML pages. An example of this is the Bootstrap library.
Slightly advanced JS
Advanced Interactive Page by reading form input
Let’s start making another example of a page that can be more interactive in that the user can interact with a page via a form.
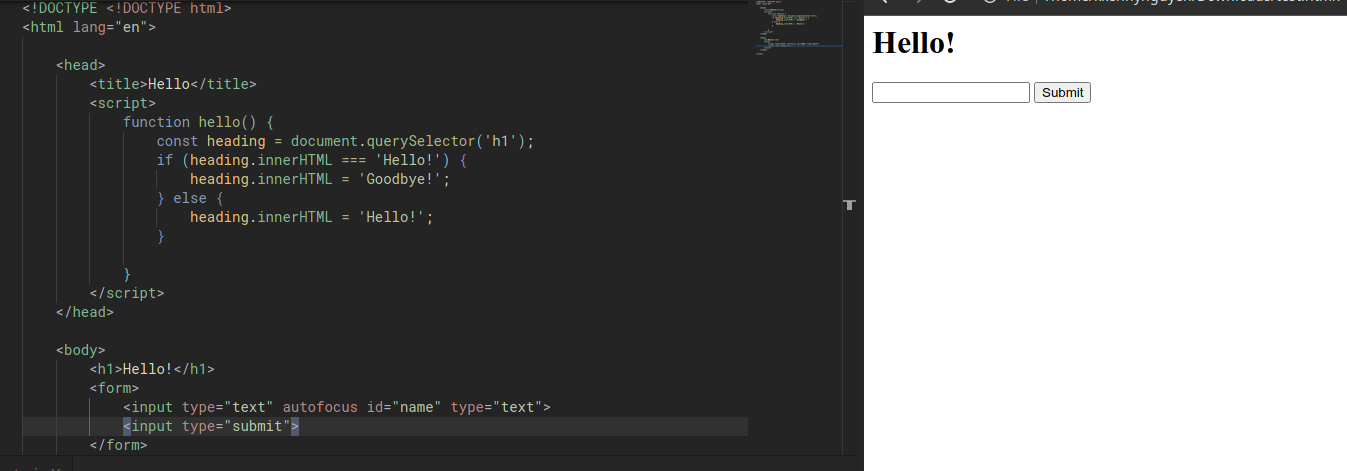
Now, inside of our JS, we’ll remove the hello() function to instead write a simple function that will say Hello to us in an alert box, after we submit our name. The js will look like this. Note that the document.addEventListener('DOMContentLoaded', function ().... bit is something that we’ll see very often.
 document.addEventListener('DOMContentLoaded', function () {
     document.querySelector('form').onsubmit = function () {
         const name = document.querySelector('#name').value;
         alert(`Hello, ${name}!`);
     };
 })
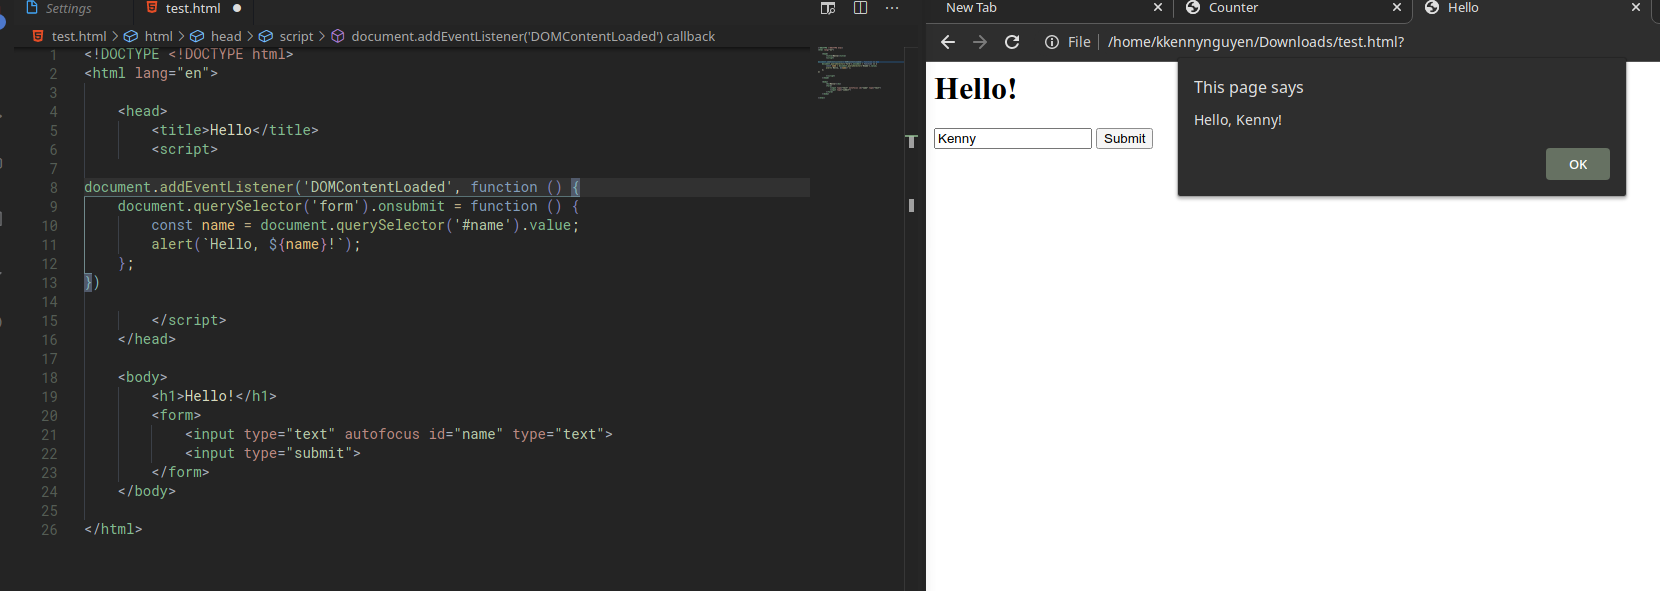
Note:
- We use
constinstead ofletfor the name variable since we know that we wouldn’t be changing the variable. - We used the
autofocusfield in thenameinput to indicate that the cursor should automatically be set inside the input as soon as the page is loaded. - We use #name inside the
document.querySelector()fucntion to find an element using itsid. We can use the same selector syntax in this function as we could in CSS, to look for specific element in our page. - We can use the
valueattribute of an input field to find what is currently typed in.
Changing the Style of HTML document
Not only that we can change the content of our HTML page, we can also interact with the styles of our page as well.
Let’s start with a simple HTML page with three buttons:
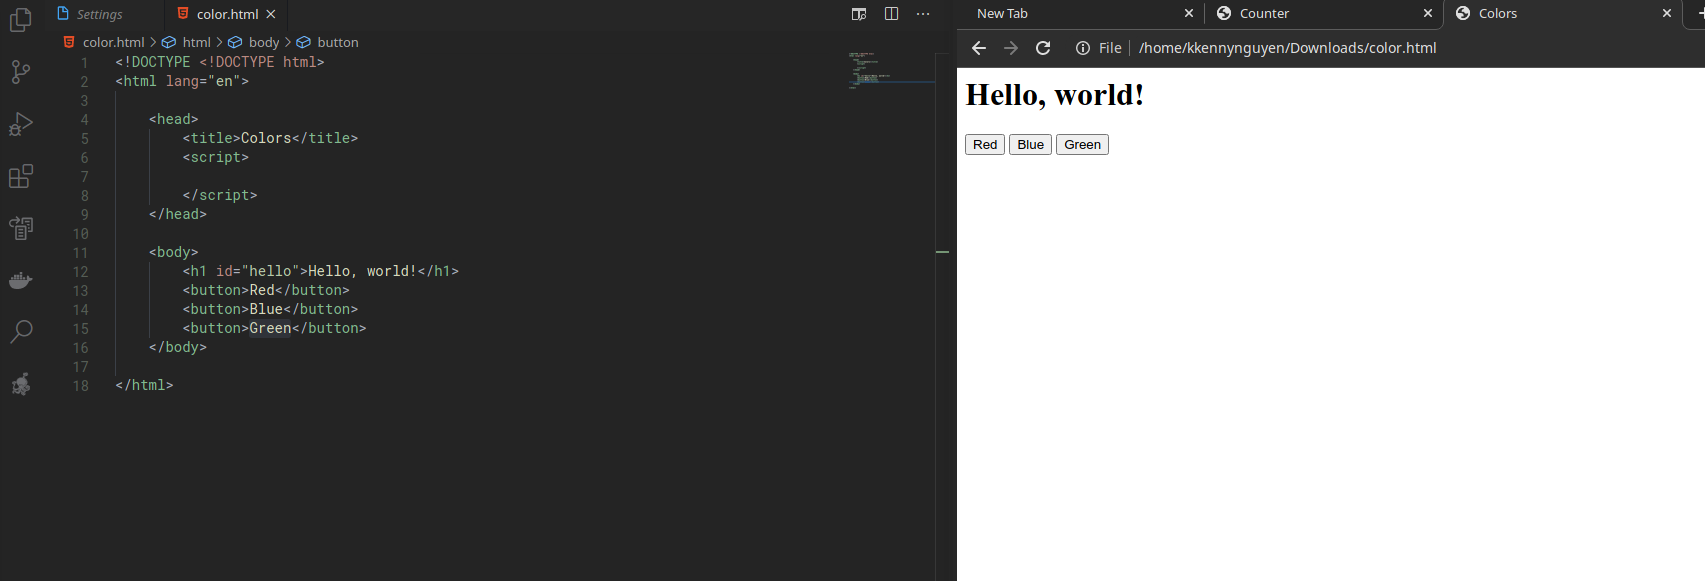
Let’s get the button to work by using JavaSript.
First, we need a way to identify these individual buttons. We do this by adding an attribute to each of the button:
         <h1 id="hello">Hello, world!</h1>
         <button id ="red">Red</button>
         <button id ="blue">Blue</button>
         <button id ="green">Green</button>
Then, we write out JS:
 document.addEventListener('DOMContentLoaded', function () {
     // Change font color to red
     document.querySelector('#red').onclick = function () {
         document.querySelector('#hello').style.color = 'red';
     }

     // Change font color to blue
     document.querySelector('#blue').onclick = function () {
         document.querySelector('#hello').style.color = 'blue';
     }

     // Change font color to red
     document.querySelector('#green').onclick = function () {
         document.querySelector('#hello').style.color = 'green';
     }
 })
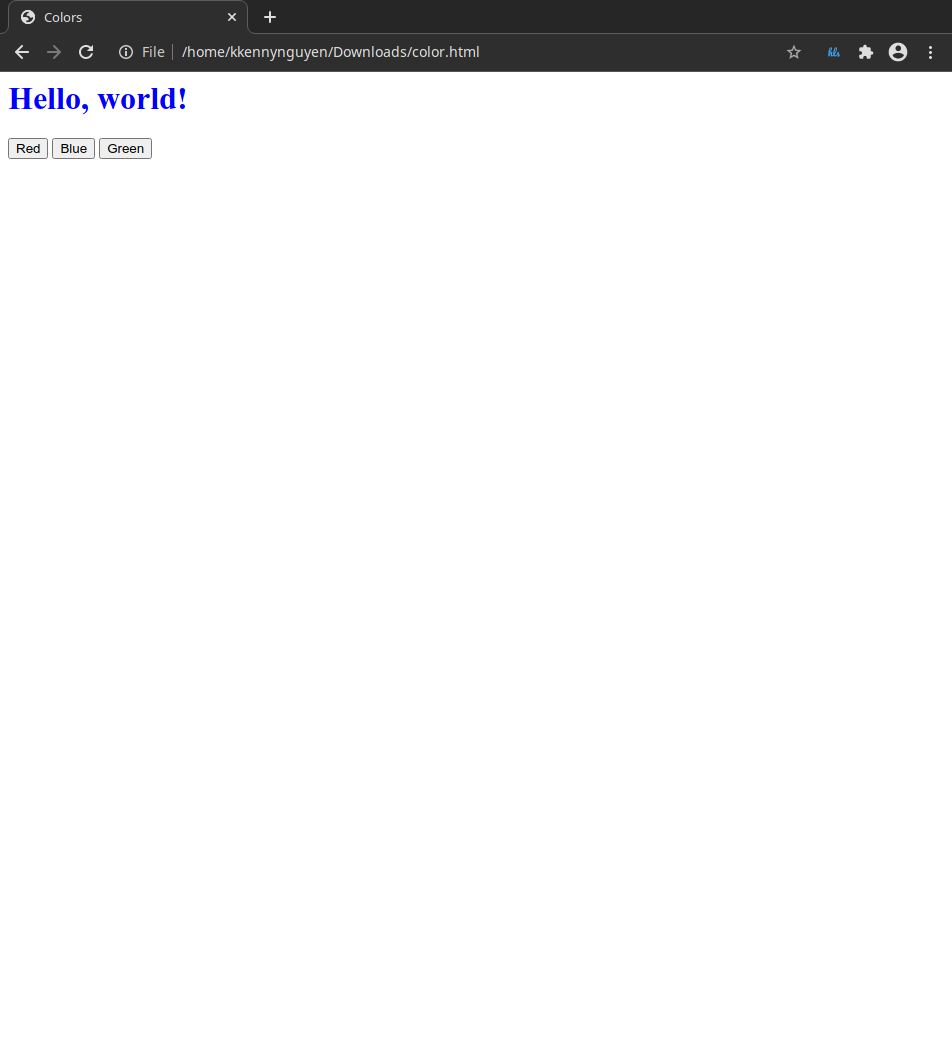
We’d then have our page with the functional buttons that changes the ‘Hello, world!’ text color.
document.querySelectorAll() and forEach()
Our page right now is functional, however the JavaScript text is kind of ugly. Imagine if we have more than three colors, it would be terrible to write.
Moreover, when programming, if we a copy and pasting something, it generally means that there is a better way to do it.
In this scenario, we should think of a way to consolidate our event listener into a single function that handles the color changing. However, if we do it, it’s not clear how the button should change color and what color it should change to.
For that to happen, we need to add an additional attribute to our button. We can use the data attribute. This is how we can associate data with our HTML element.
For our example, we’ll use the data attribute to store the color data that we’ll be using to update our HTML element’s color. So, we’ll update our HTML body to this:
 <body>
     <h1 id="hello">Hello, world!</h1>
     <button data-color="red">Red</button>
     <button data-color="blue">Blue</button>
     <button data-color="green">Green</button>
 </body>
For our JS, instead of using document.querySelector() which only returns a single element that matches our query, we’ll switch to document.querySelectorAll() which will return an array of all elements that match the query.
To demonstrate this, we can actually utilize the console within our web browser, notice how only the first button is picked up:
document.querySelector()
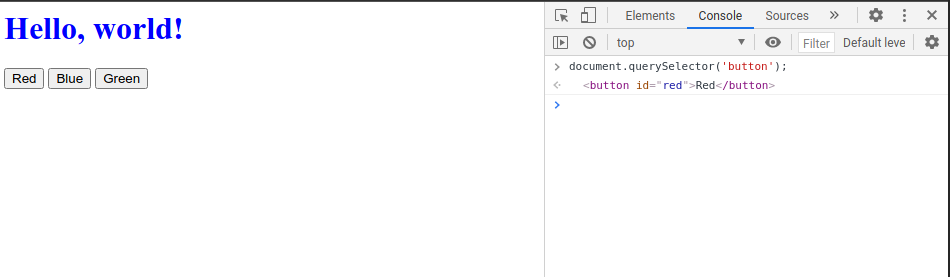
document.querySelectorAll()
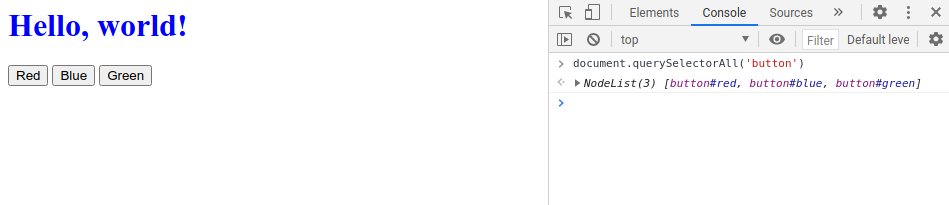 /(A NodeList object is a collection of document nodes which is an array-like list of object.)/
Now that we have our list of all the button elements, we’d like to add an event listener that deal with each button individually. We can use a property called forEach(). This function accepts another function as its argument. What it does is: for each of these element, perform this function.
 document.addEventListener('DOMContentLoaded', function () {
     document.querySelectorAll('button').forEach(function(button) {
         button.onclick = function() {
             document.querySelector('#hello').style.color = button.dataset.color;
         }
     });
 });
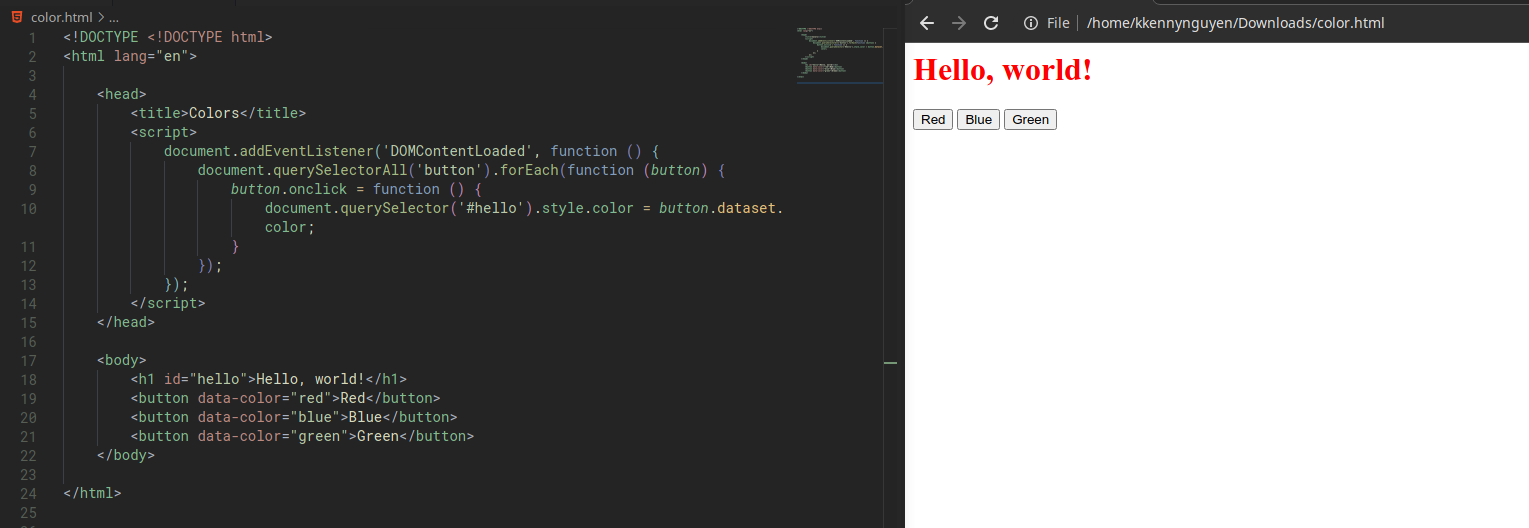
Note:
- The anonymous function that we pass to the
forEach()function takes an argument: button. This way we’ll access the individual button as our function iterates through three buttons. - The styling change is done using the
style.SOMETHINGattribute. - Within the buttons, we use
data-SOMETHINGto assign data to the HTML element. These are then accessed by the JavaScript using the element’sdatasetproperty.
Arrow Functions
In recent version of JavaScript, a new notation has been introduced which is the arrow notation for function. This notation allows us to write shorter function syntax
Before:
 hello = function() {
	 return "Hello world!";
 }
with arrow function:
 hello = () => {
	 return "Hello world!";
 }
If the function has only one statement, we can event do:
hello = () => "Hello world!";
Instead of:
forEach(function (button) {
We can user:
forEach(button => {
In the above example, we have an input (button) which is passed to a function using the arrow notation =>. In cases where we don’t have any input, we can use blank parentheses.
Let’s review the changes:
BEFORE: without arrow notation:
 document.addEventListener('DOMContentLoaded', function () {
     document.querySelectorAll('button').forEach(function (button) {
         button.onclick = function () {
             document.querySelector('#hello').style.color = button.dataset.color;
         }
     });
 });
AFTER: with arrow notation:
 document.addEventListener('DOMContentLoaded', () => {
     document.querySelectorAll('button').forEach(button => {
         button.onclick = function () {
             document.querySelector('#hello').style.color = button.dataset.color;
         }
     });
 });
BEFORE: without arrow notation:
 function count() {
     counter++;
     document.querySelector('h2').innerHTML = counter;

     if (counter % 10 === 0) {
         alert(`'Counter is ${counter}`);
     }
 }
AFTER: with arrow notation:
 count = () => {
     counter++;
     document.querySelector('h2').innerHTML = counter;

     if (counter % 10 === 0) {
         alert(`'Counter is ${counter}`);
     }
 }
#onchange# event and the #this# value
In the above example, we have been using the onclick event listener which listens to mouse click event, as well as the 'DOMContentLoaded' event when the full DOM has been loaded.
Let’s say we want to change our page, from three buttons to a dropdown list using the <select> tag, like this:
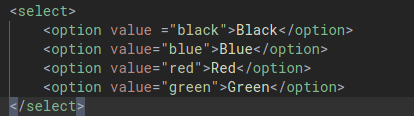
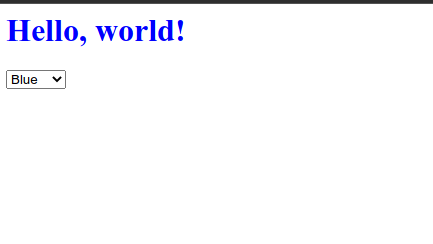
We can use a new event listener called onchange, which apply to things like select drop-down menu. When the user changes their selection, that event will be picked up by the onchange event listener.
BEFORE:
 document.addEventListener('DOMContentLoaded', () => {
     document.querySelectorAll('button').forEach(button => {
         button.onclick = function () {
             document.querySelector('#hello').style.color = button.dataset.color;
         }
     });
 });
AFTER:
 document.addEventListener('DOMContentLoaded', () => {

     document.querySelector('select').onchange = function() {
         document.querySelector('#hello').style.color = this.value;
     };

 });
Note:
this, in an event listener function, refers to the drop-down menu, which is the element that received the event. In the above example specifically, it means “get the value of the drop-down menu that received the eventonchange”.
There are also many other [[https://www.w3schools.com/js/js_events.asp][events]] that can be used in JavaScript to create an interactive webpage
More about this object
The this object has a special meaning in JavaScript and its meaning varies based on the context where it was used. It is the object that is executing the current function.
In a method, this refers to the owner object.
Alone, this refers to the global object.
In a function, this refers to the global object.
In a function in strict mode, this is undefined.
In an event, this refers to the element that received the event.
Methods like call() and apply() can refer this to any object.
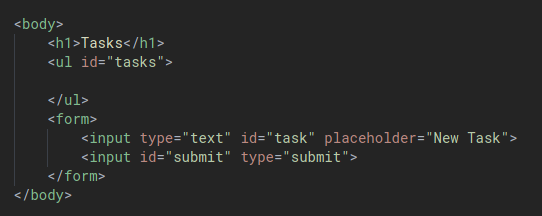
Building a TODO List
In the Django lesson, we built a TODO list with a webserver logic, however, we can actually build one with just javascript.
Let’s start with a simple HTML:
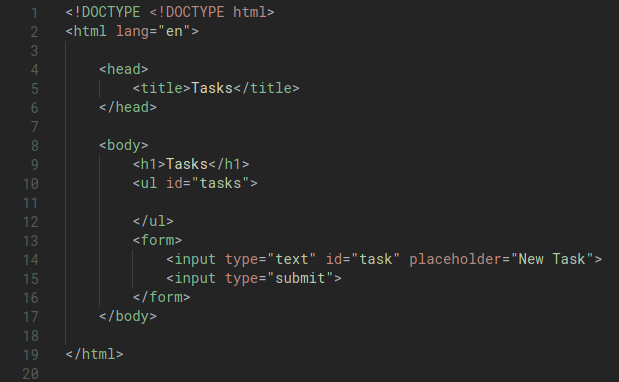
Technically, we have an unordered list within our page, however there is nothing in it yet.
Handling the Submit input
Let’s add some JavaScript so that we can actually have a working Submit button. We’d like it to do something, when the user hits the Submit button.
Before we do this, let’s try to instead print out the Task input first by using the console.log() function that will print out the value onto the console. This is an approach that we can use to debug our program.
In the below code, we have also added return false. We want our form to stop from submit so that everything that happens is retained within the browser.
document.addEventListener('DOMContentLoaded', function () {
    document.querySelector('form').onsubmit = () => {
        const task = document.querySelector('#task').value;
        console.log(task);

        // Stop form from submitting
        return false;
    }
});
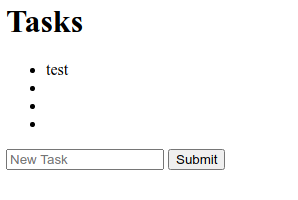
However, this is not all that we want. What we are wanting to happen is to add an element into the <ul> tag. This item will be wrapped in <li>.
This is how we do it:
document.addEventListener('DOMContentLoaded', function () {
    document.querySelector('form').onsubmit = () => {

        const task = document.querySelector('#task').value;
        const li =  document.createElement('li');
        li.innerHTML = task;

        document.querySelector('#tasks').append(li);

        document.querySelector('#task').value = '';

        // Stop form from submitting
        return false;
    }
});
Note:
- We create a new element
'li'bycreateElement()and then fill its innerHTML with thetaskvariable. The addition of this new element to the unordered list is done using theappend()method. - We clear out the task input text field so that the text is not retained after user has submited the data.
However, we’ll have a small bug at this point, even if the user hits the submit button when the text field is empty, that empty string would still be added to the list:
What we want to do is to disable the submit button until the user has actually typed something into the text field. We can do this by JavaScript. To do this, we’d also need to id our submit button:
For this, we’ll also be using a new event called onkeyup. This is when the user a key is lifted up from the keyboard.
We also need to add a few logic including:
- If the input field is empty, submit button should be disabled.
- After user add a new task, submit button should be disabled.
document.addEventListener('DOMContentLoaded', function () {

    // By default, submit button should be disabled
    document.querySelector('#submit').disabled = true;

    // on keyup event from input #task, submit button should be enabled
    // if the task input field isn't empty
    document.querySelector('#task').onkeyup = () => {
        if (document.querySelector('#task').value.length > 0) {
            document.querySelector('#submit').disabled = false;
        } else {
            document.querySelector('#submit').disabled = true;
        }

    };

    document.querySelector('form').onsubmit = () => {

        // Hold on the user input
        const task = document.querySelector('#task').value;

        // Create new li element with user input as inner HTML
        const li =  document.createElement('li');
        li.innerHTML = task;

        // Add new element to unordered list tasks
        document.querySelector('#tasks').append(li);

        // Clear out the task input text field
        document.querySelector('#task').value = '';

        // after task is added, disable the submit button
        document.querySelector('#submit').disabled = true;

        // Stop form from submitting
        return false;
    }
});
Intervals
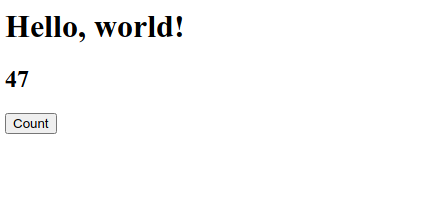
In addition to dealing with events that are triggered by users, we can also set functions to run after a set amount of time.
For example, let’s return to our counter page an add an interval tso that even if the user doesn’t click on anything, the counter increments every second.
For this, we’ll use the setInterval() function. In it, the first argument is the function to be run, and the second argument is the time (in miliseconds).
This is our HTML:
This is our js:
let counter = 0;

count = () => {
    counter++;
    document.querySelector('h2').innerHTML = counter;

}

document.addEventListener('DOMContentLoaded', function () {
    document.querySelector('button').onclick = count;

    setInterval(count,1000);
});
The count function will run on itself:
Local Storage
So far, all the information on our pages are lost when we reload the page. This is because JavaScript does not return any information about your browser session.
In the counter example above, when we reload the page, the counter would go back to zero. A lot of the times this is intended, however sometimes we’ll want to be able to store information that we can use when a user returns to the site later.
This can be done using Local Storage. It allows us to store information inside of our web browser that can be accessed later. This information is stored as a set of key-value pairs, almost like a dictionary.
Two key functions that we’ll need to utilize are:
localStorage.getItem(key)searches for an entry in local storage with a given key, return the values associated with that key.localStorage.setItem(key, value)sets an entry in local storage by associating the key with a new value.
Let’s employ this to retain our counter value.
Here is our HTML:
BEFORE:
let counter = 0;

count = () => {
    counter++;
    document.querySelector('h2').innerHTML = counter;

    if (counter % 10 === 0) {
        alert(`'Counter is ${counter}`);
    }
}

document.addEventListener('DOMContentLoaded', function () {
    document.querySelector('button').onclick = count;

    setInterval(count,1000);
});
AFTER:
if (!localStorage.getItem('counter')) {
    localStorage.setItem('counter', 0);
};

count = () => {
    let counter = localStorage.getItem('counter');
    counter++;
    document.querySelector('h2').innerHTML = counter;
    localStorage.setItem('counter', counter);
}

document.addEventListener('DOMContentLoaded', function () {
    document.querySelector('h2').innerHTML = localStorage.getItem('counter');
    document.querySelector('button').onclick = count;
});
Now, our counter value is retained on the page.
APIs Introduction
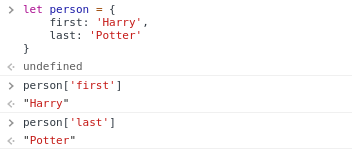
One of the most useful datatype inside JavaScript is JavaScript Object. A JavaScript object is very similar to a Python dictionary as it also allows us to store key-value pairs.
Example:
let person = {
	first: 'Harry',
	last: 'Potter',
}
One way in which JavaScript Objects are really useful is in transferring data from one site to another, particularly when using APIs. APIs, in the context of web application are structured form communication between two different applciations.
APIs are used to transfer data between two applications using a well-structured format. This format happens to be JSON, which stands for JavaScript Objects Notation.
Example:
{
    "origin": {
        "city": "New York",
        "code": "JFK"
    },
    "destination": {
        "city": "London",
        "code": "LHR"
    },
    "duration": 415
}
JSON offers a very convenient representation of data that can be used for writing and consuming APIs.
JSON standard requires *double quotes* and does not accept single quotes.
Currency Exchange
Intro & fetching the data asynchronously
Let’s work on building an application where we can find exchange rates between two currencies. For this example, we’ll be using the European Central Bank’s Exchange Rate API (https://exchangeratesapi.io/). By visting their website, we can see the API documentation which shows us how to use the API.
For example, we can visit https://api.exchangeratesapi.io/latest?base=USD to see exchange rates with base = USD:
{
  "rates": {
    "CAD": 1.3184315051,
    "HKD": 7.7501056368,
	...
  },
  "base": "USD",
  "date": "2020-09-18"
}
For this example, we’ll also be looking at Ajax which is asynchronous JavaScript and XML. The idea is even after a page has loaded, using JavaScript we can continue to make additional web requests, to our own web servers or some third party web servers to get additional data.
We’ll start with retrieving the data using an asynchronous call with fetch() and print the data to console:
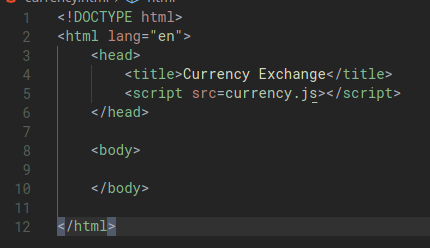
document.addEventListener('DOMContentLoaded', function () {

    fetch('https://api.exchangeratesapi.io/latest?base=USD')
    .then(response = function(response) {
        return response.json()
    })
    .then(data => {
        console.log(data);
    })
});
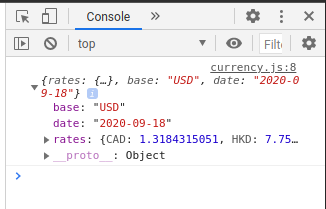
Note:
- The return of the
fetch()function is something that is known in JavaScript as a promise. A promise is a way of representing the idea that “something is coming back, but it may not come back immediately”. We’d then need to add a second line that starts with.then()which is to say “when this comes back, do this”. In the above example, we want to convert the response into a json.
We can shortened our code to:
document.addEventListener('DOMContentLoaded', function () {

    fetch('https://api.exchangeratesapi.io/latest?base=USD')
    .then(response => response.json())
    .then(data => {
        console.log(data);
    })
});
Start using the data
We can access the data and display it to the body of our page:
document.addEventListener('DOMContentLoaded', function () {
    fetch('https://api.exchangeratesapi.io/latest?base=USD')
    .then(response => response.json())
    .then(data => {
        const rate = data.rates.EUR;
        document.querySelector('body').innerHTML = `1 USD is equal to ${rate.toFixed(3)}`;
    })

});
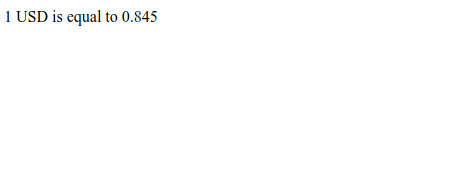
Making an interactive page
We will start by altering our HTML content to allow the user tp input a currency.

document.addEventListener('DOMContentLoaded', function () {

    document.querySelector('form').onsubmit = function () {

        fetch('https://api.exchangeratesapi.io/latest?base=USD')
        .then(response => response.json())
        .then(data => {
            const currency = document.querySelector('#currency').value;
            const rate = data.rates[currency];

            // Handling invalid currency input
            if (rate !== undefined) {
                document.querySelector('#result').innerHTML = `1 USD is equal to ${rate.toFixed(3)}`;
            } else {
                document.querySelector('#result').innerHTML = 'Invalid Curency';
            }

        })

        // Don't submit the form
        return false;
    }

});
With a valid currency:
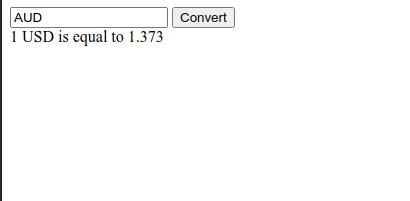
Without a valid currency:
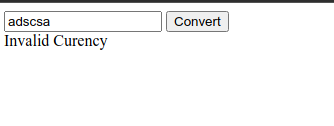
Small improvements
- Handle lowercase input (eur -> EUR)
- Handle events where API is down (when the fetch promise is nor delivered). This is good practice. We should always catch the error. In this example, we’ll just log the error to the console so we can debug it.
document.addEventListener('DOMContentLoaded', function () {

    document.querySelector('form').onsubmit = function () {

        fetch('https://api.exchangeratesapi.io/latest?base=USD')
        .then(response => response.json())
        .then(data => {
            const currency = document.querySelector('#currency').value.toUpperCase();
            const rate = data.rates[currency];

            // Handling invalid currency input
            if (rate !== undefined) {
                document.querySelector('#result').innerHTML = `1 USD is equal to ${rate.toFixed(3)} ${currency}`;
            } else {
                document.querySelector('#result').innerHTML = 'Invalid Curency';
            }

        })
        .catch(error => {
            console.log('Error:', error);
        });

        // Don't submit the form
        return false;
    }

});
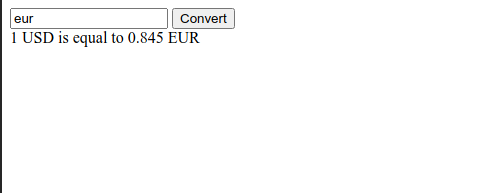
Lecture 6 - User Interfaces
In Lecture 5 we learned how to use JavaScript to make web pages more interactive by accessing and manipulating the DOM and listening to events.
In this lecture we will be continuing the discussion by looking at common paradigms in User Interface design, using the combination of JavaScript and CSS to make our sites even more user-friendly.
One of the common paradigms that is used more nowadays is Single-Page Application.
Intro
Using JavaScript, we can create an application that consists of a single HTML page.
Let’s start with a HTML page that has three div elements that are hidden using CSS.
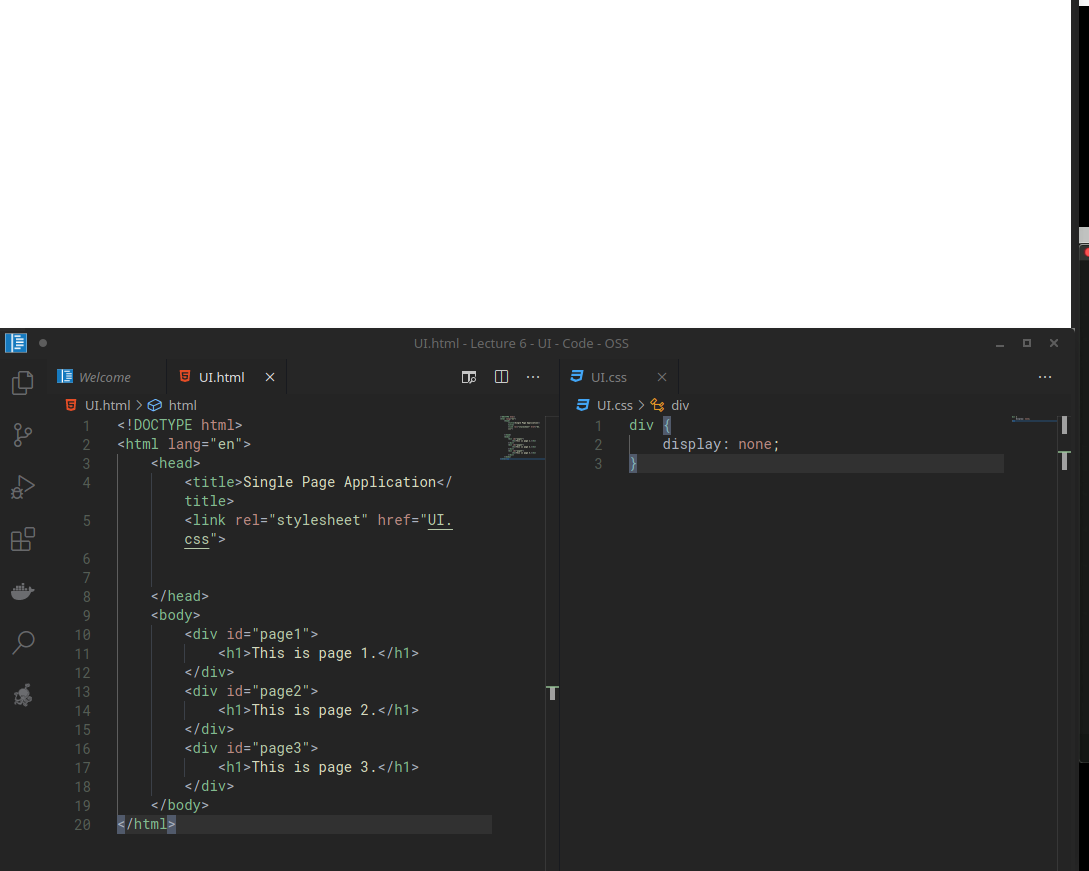
Let’s add some buttons that will allow us to toggle these three elements on and off.
- Add three buttons to the HTML page
- Add some data attribute to the buttons to store custom data
- Add javascript file
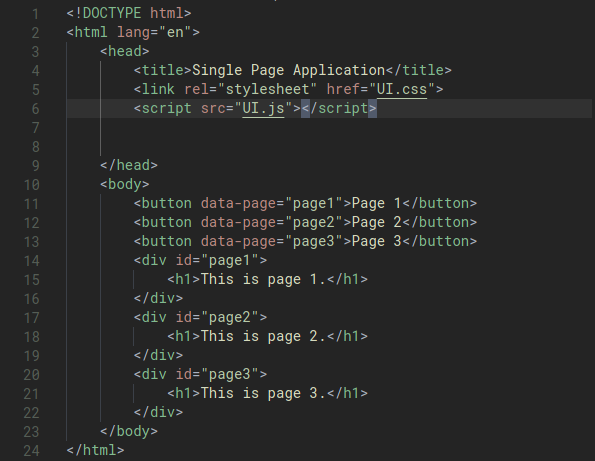
Let’s start with this simple js:
UI.js
function showPage(page) {
    document.querySelector(`#${page}`).style.display = 'block';
}
Introducing showPage() function
The buttons won’t do anything yet, however we can use the Console to test them:
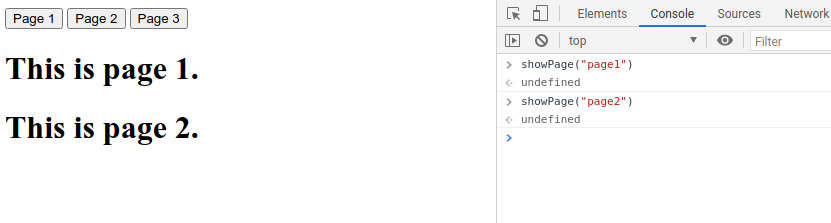
This introduces a small logical error, we don’t want to display more than one elements at once. Instead, let’s add some logic so that before any new div opens, all other divs close:
function showPage(page) {
    // first, hide all other pages
    document.querySelectorAll('div').forEach(div => {
        div.style.display = 'none';
    });
    document.querySelector(`#${page}`).style.display = 'block';
}
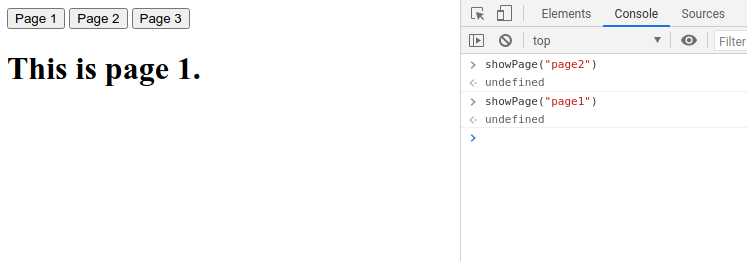
Make the buttons work by attaching showPage()
Now, let’s move on to making the buttons work. We will create an EventListener for DOMContentLoaded. Within this block, we’ll add an onclick event listener to each of the button elements so that each time the button is clicked, we’ll execute showPage() with the argument being the data attribute of the button element. To get the data value, we’ll take advantage of the this notation:
function showPage(page) {
    // first, hide all other pages
    document.querySelectorAll('div').forEach(div => {
        div.style.display = 'none';
    });

    document.querySelector(`#${page}`).style.display = 'block';
}

document.addEventListener('DOMContentLoaded', () => {
    document.querySelectorAll('button').forEach(button =>{
        button.onclick = function() {
            showPage(this.dataset.page)
        }
    });
});
The buttons should all work now. What we have done is that we have simulate the idea of having multiple pages in a single page without the need for multiple pages, or a server logic.
Taking advange of AJAX
In many cases, it is an inefficient practice to load the entire contents of every page when we first visit a site. This is why a server is normally needed to access new data.
However, we can also enable this by implementing a similar strategy to the one we use while loading the currency exchange application written in Lecture 5. Rather than loading the entire HTML content, we’ll just load the building blocks and see what else needs to be loaded based on what changes happen on the page.
If we were using a Django server, our urls.py file would look something like this:
urlpatterns = [
    path("", views.index, name="index"),
    path("sections/<int:num>", views.section, name="section")
]
/(Each pages can be loaded by going to http://localhost/sections/{pagenumber}.)/
We of course have a function to handle this in our views.py file:
from django.http import Http404, HttpResponse
from django.shortcuts import render

# Create your views here. def index(request):
    return render(request, "singlepage/index.html")

# The texts are much longer in reality, but have # been shortened here to save space texts = ["Text 1", "Text 2", "Text 3"]

def section(request, num):
    if 1 <= num <= 3:
        return HttpResponse(texts[num - 1])
    else:
        raise Http404("No such section")
Let’s mimic this behaviour, using just HTML & JS. We can do this by taking advantage of AJAX. We’ll use fetch() to load the content from our own webserver and this is wrapped within the showPage() function. The fetch is only done when our buttons receive the onclick event and the function is called.
function showSection(section) {

    // Find section text from server
    fetch(`/sections/${section}`)
    .then(response => response.text())
    .then(text => {
        // Log text and display on page
        console.log(text);
        document.querySelector('#content').innerHTML = text;
    });
}

document.addEventListener('DOMContentLoaded', function() {
    // Add button functionality
    document.querySelectorAll('button').forEach(button => {
        button.onclick = function() {
            showSection(this.dataset.section);
        };
    });
});
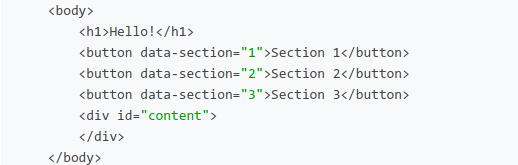
Manipulating the URL
One of the disadvantage with this is that the URL is now less informative. The URL address bar will never change.
There’s a way in JS that we can manipulate the URL, using the JavaScript History API. We’ll add some code into our existing JS:
// When back arrow is clicked, show previous section
window.onpopstate = function(event) {
    console.log(event.state.section);
    showSection(event.state.section);
}

function showSection(section) {
    fetch(`/sections/${section}`)
    .then(response => response.text())
    .then(text => {
        console.log(text);
        document.querySelector('#content').innerHTML = text;
    });

}

document.addEventListener('DOMContentLoaded', function() {
    document.querySelectorAll('button').forEach(button => {
        button.onclick = function() {
            const section = this.dataset.section;

            // Add the current state to the history
            history.pushState({section: section}, "", `section${section}`);
            showSection(section);
        };
    });
});
Note:
- The
history.pushState()function adds a new element to the browsing history. The data will be stored in a JavaScript object.- First argument: any data associated with the state in key-value pair notation.
- Second argument: A title parameter that can be just an empty string. Most browsers ignore this.
- Third argument: What should go in the URL.
- The
window.onpopstate()means “when I pop something in the history”.The popstate event is only triggered by performing a browser action, such as clicking on the back button (or calling history. back() in JavaScript), when navigating between two history entries for the same document.
When we open our single page and click on any of the buttons, not only that we’ll see the content being updated, we’ll also see the URL address being changed.
If we dive into the console, we’d also see the console log that prints the section content. This is used when the user click the back arrow button.
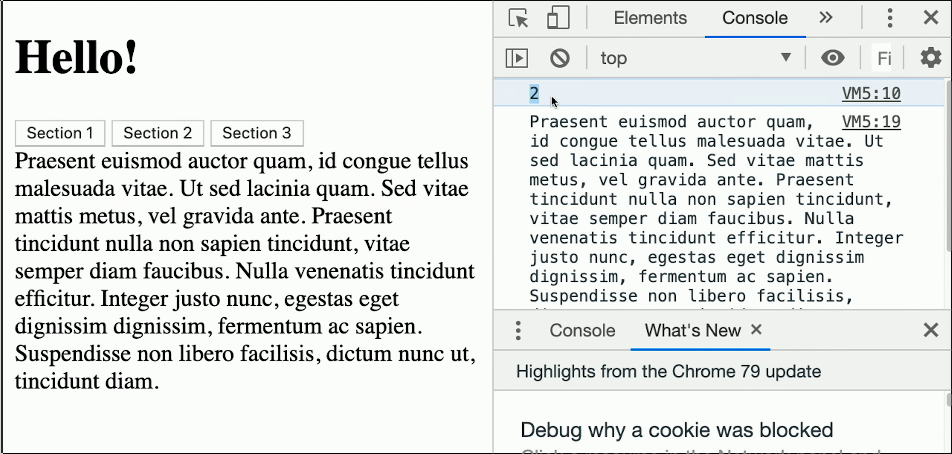
window, document and interacting with scrolling
In the previous section we deal with the window object. Turns out this object is quite powerful. There are some other properties of this object that we can use to make our sites look nicer.
For example:
window.innerWidthcan be used to find out how wide the window is.window.innerHeight
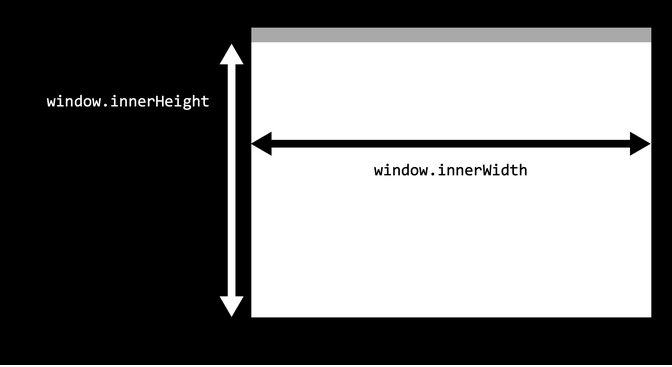
Whereas the window represents what is visible to the user, we can also use the document object which refers to the entire web page and is often much larger than the window.
When the webpage is long, we’ll not be able to fit everything into the window, forcing the user to scroll up and down to see the content.
window.scrollYis a variable that can be used to find out how many pixels we have scrolled from the top of the page.document.body.offsetHeightrepresents the height in pixels of the entire documents.
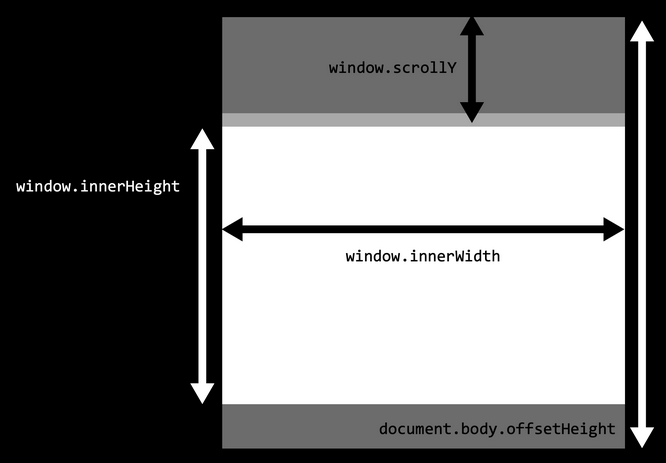
We can use the above measures to determine whether or not the user has scrolled to the end of the page using the combination window.scrollY + window.innerHeight >= document.body.offsetHeight.
In the below example, we’ll change the background color to green when we reach the bottom of the page:
// Event listener for scrolling
window.onscroll = () => {

    // Check if we're at the bottom
    if (window.innerHeight + window.scrollY >= document.body.offsetHeight) {

        // Change color to green
        document.querySelector('body').style.background = 'green';
    } else {

        // Change color to white
        document.querySelector('body').style.background = 'white';
    }

};
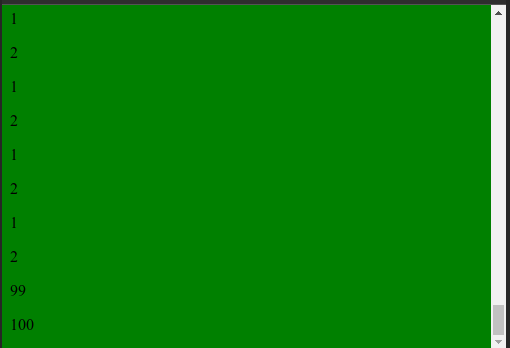
Infinite Scroll
This idea is used a lot in social media web applications as well as news websites where infinite-scroll is needed. They normally involve:
- The ability to detect when user is at the end of page.
- The ability to fetch new information and append it to the content section of the DOM.
This can be created using Django
urls.py
urlpatterns = [
    path("", views.index, name="index"),
    path("posts", views.posts, name="posts")
]
views.py
import time

from django.http import JsonResponse
from django.shortcuts import render

# Create your views here.
def index(request):
    return render(request, "posts/index.html")

def posts(request):

    # Get start and end points
	start = int(request.GET.get("start") or 0)
    end = int(request.GET.get("end") or (start + 9))

    # Generate list of posts
	data = []
    for i in range(start, end + 1):
        data.append(f"Post #{i}")

    # Artificially delay speed of response
	time.sleep(1)

    # Return list of posts
	return JsonResponse({
        "posts": data
    })
note:
- The
postsview requires two arguments:statandendpoints. In this view, we also create an API which returns a javascript object that returns postxtox+9. If we go to localhost:8000/posts?start=10&end=15, we’d see the following JSON:{ "posts": [ "Post #10", "Post #11", "Post #12", "Post #13", "Post #14", "Post #15" ] }
Now, we look into the index.html template. We’ll start out with only an empty div in the body and some styling.
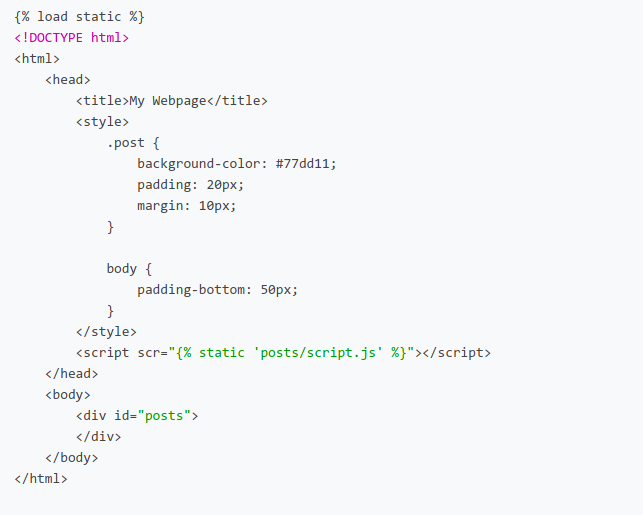
now, using JavaScript, we’ll wait until the user scrolls to the end of the page and the nload more posts using our API:
// Start with first post
let counter = 1;

// Load posts 20 at a time
const quantity = 20;

// When DOM loads, render the first 20 posts
document.addEventListener('DOMContentLoaded', load);

// If scrolled to bottom, load the next 20 posts
window.onscroll = () => {
    if (window.innerHeight + window.scrollY >= document.body.offsetHeight) {
        load();
    }
};

// Load next set of posts
function load() {

    // Set start and end post numbers, and update counter
    const start = counter;
    const end = start + quantity - 1;
    counter = end + 1;

    // Get new posts and add posts
    fetch(`/posts?start=${start}&end=${end}`)
    .then(response => response.json())
    .then(data => {
        data.posts.forEach(add_post);
    })
};

// Add a new post with given contents to DOM
function add_post(contents) {

    // Create new post
    const post = document.createElement('div');
    post.className = 'post';
    post.innerHTML = contents;

    // Add post to DOM
    document.querySelector('#posts').append(post);
};
With this, we have created a site with infinite scroll:

Animation
Grow
Animation is another way that we can make our web pages more interactive and interesting to our users.
It turns out that CSS has support for animation. In addition to styling, it also makes it easy for us to animate HTML elements.
In the below example, we will be using the CSS @keyframe rule that specifies animation code. During the animation we can change the set of CSS styles many times.
We can specify the change that will happen in percentage, or with keywords “from” and “to” which is the same as 0% and 100% where 0% is the begin of the animation.
This is our simple HTML page:
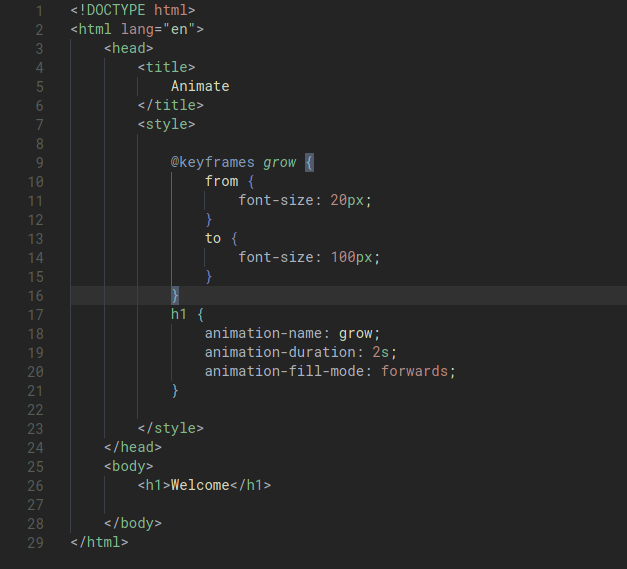
If we go to our page, the Welcome text will grow from 20px to 100px during 2 seconds.
Move
We can also have a move animation
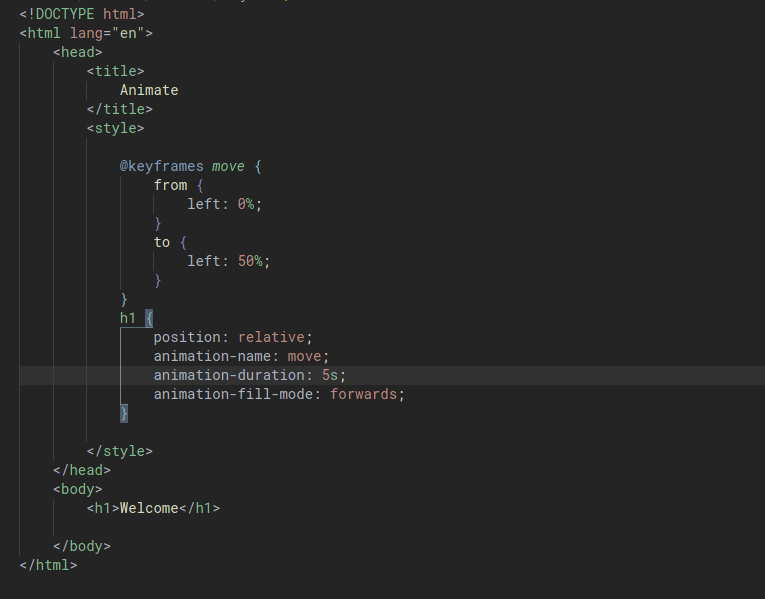
Instead of specifying only two points, start and finish, we can also specify various different keyframes with different set of CSS properties. Let’s implement this to have our text instead bounce from left to right, and back to left.
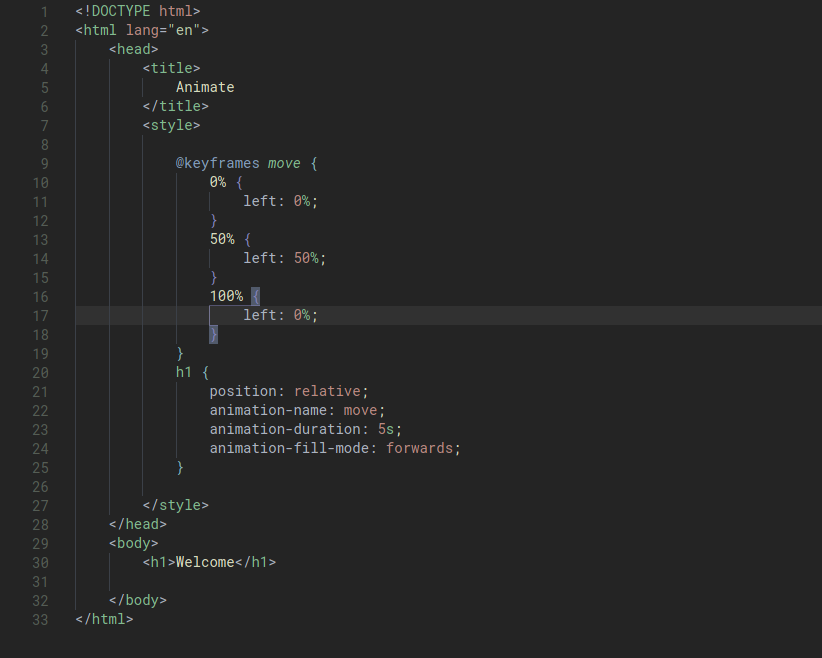
We can also add the animation-iteration-count property to specify how many iterations of animation we would like to run.
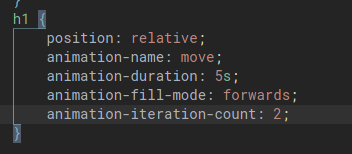
We can also set animation-iteration-count to infinite to have the animation run forever without stop.
What we’ll work on now is to add a button that can control the animation. We’ll do this by working with the animationPlayState property of the animation style.
hide
Let’s say we want an ability to hide things on webpage once we have finished reading it. We can do this by:
// If hide button is clicked, delete the post
document.addEventListener('click', event => {

    // Find what was clicked on
    const element = event.target;

    // Check if the user clicked on a hide button
    if (element.className === 'hide') {
        element.parentElement.remove()
    }

});
When anyone clicks on the document as a whole, we’ll ask ourself “if the element has class = “hide””, remove the element.
In the above example we use a very useful function of JavaScript that is available to event listener function. We passed in the event itself (event) as the optional argument. This object contains information about the event itself, which we use later, to acccess the target property.
This is now working, however it does not look good and the animation isn’t very obvious to the eyes that the post has gone away. This is the time that we can employ some animation to “slow down” or “fade” the animation of fading.
We’ll add this to the CSS to define the animation within the post element:
.post {
    background-color: #77dd11;
    padding: 20px;
    margin-bottom: 10px;
    animation-name: hide;
    animation-duration: 2s;
    animation-fill-mode: forwards;
    animation-play-state: paused;
}
We also need to add the animation itself:
@keyframes hide {
    0% {
        opacity: 1;
        height: 100%;
        line-height: 100%;
        padding: 20px;
        margin-bottom: 10px;
    }
    75% {
        opacity: 0;
        height: 100%;
        line-height: 100%;
        padding: 20px;
        margin-bottom: 10px;
    }
    100% {
        opacity: 0;
        height: 0px;
        line-height: 0px;
        padding: 0px;
        margin-bottom: 0px;
    }
}
We’ll also update our javascript to use the animation:
- Instead of removing the parentElement immediately, play the
@keyframe hideanimation, -
then hide the parentElement. ```js // If hide button is clicked, delete the post document.addEventListener(‘click’, event => {
// Find what was clicked on const element = event.target;
// Check if the user clicked on a hide button if (element.className === ‘hide’) { element.parentElement.style.animationPlayState =’running’; element.parentElement.addEventListener(‘animationend’, () => { element.parentElement.remove(); }); }
});
## React

At this point, we can see that for a complicated web page, we'd need to write a lot of JavaScript code and it would be quite a nightmare to work on and especially maintain it. This is why in recent years a lot of these JavaScript codes have been turned into *libraries* that allow us to efficiently and reactively create user-interactive web pages.

One of the most popular JavaScript framework is a library called *React*.

React is based on the idea of *declarative programming*, which is different to the imperative programming paradigm that we have been using. In imperative programming, we give the computer a set of statements to execute, a.k.a telling the computer *how* to do things.

In declarative programming, we simply write code explaining what we *wish* to display and not worry about *how* we display it.

### Imperative vs Declarative Programming

*IMPERATIVE PROGRAMMING example*:

View:
<img class="mx-auto w-1/2" src="/assets/img/orgNotesImages/CS50W.org_20200921_234144_0zGB8Z.png">

Logic:
```js
let num = parseInt(document.querySelector('h1'.innerHTML);
num += 1;
document.querySelector('h1').innerHTML = num;
DECLARATIVE PROGRAMMING example:
View:
Logic:
num +=1;
As we can see, with declative programming, the amount of code we needed to use is much smaller. We didn’t have to worry about how to explicitly explain how we want to do things. We simply just say: “I’d like to see this!”.
Creating a React application
The React framework is built around the idea of components where a component is something similar to the {num} object above. Each of these components can have an underlying state.
A component would be something that can be seen on a webpage like a post or a navigation bar. A state is a set of variables associated with the component.
With React, we’ll interact with the underlying state and manipulate them so that the component changes automatically.
There are a number of ways to use React, including the popular create-react-app that was published by Facebook. The simplest is to include these three JS packages in our webpage:
React: defines component and their behaviour.ReactDOM: Takes React components and inserts them into the DOM.Babel: Translates code from one language to another. When we use React, we are not actually writing JavaScript but an extension to JS which is JSX. JSX looks a lot like JavaScript but with some additional features. Our web browser doesn’t read JSX so we’ll need Babel to translate the code into plain JavaScript so our browser can understand.
This is how we start our HTML header:
<head>
    <script crossorigin src="https://unpkg.com/react@16/umd/react.development.js"></script>
    <script crossorigin src="https://unpkg.com/react-dom@16/umd/react-dom.development.js"></script>
    <script src="https://unpkg.com/babel-standalone@6.15.0/babel.min.js"></script>
</head>
We’ll leave the app id element empty so that we can use React later to put a component in there.
Additionally, since React code is written in JSX, our script tag needs to be: <script type="text/babel"> so that the code will go through translation using Babel. Ultimately in practice, this compilation should be done before our page is rendered for our user.
In React, components are represented as JavaScript classes, which are similar to other OOP language like Python. We’ll create our App component that extends React.Component. This allows us to start creating a component without rewriting a lot of code included in the React.Component class definition.
Inside of every React component, we need a function or method render. Whatever is returned within this function will be added to the DOM.
The last line of our script, we should employ the ReactDOM.render function which takes two arguments: a component to render and an element in the DOM, inside of which the component should be rendered. In the example, we want to render the App component and put it into the #app element of our DOM.
<script type="text/babel">

    class App extends React.Component {


    render() {
        return (
            <div>
                Hello!
            </div>
        );
    }
    }

    ReactDOM.render(<App />, document.querySelector('#app'));


</script>
Layering React components
A very useful feature of React is the ability to render components within other components. Let’s play with this by adding a new class:
class Hello extends React.Component {
    render() {
        return (
            <h1>Hello</h1>
        );
    }
}
then, we can add the Hello component that we just created multiple times within the App class:
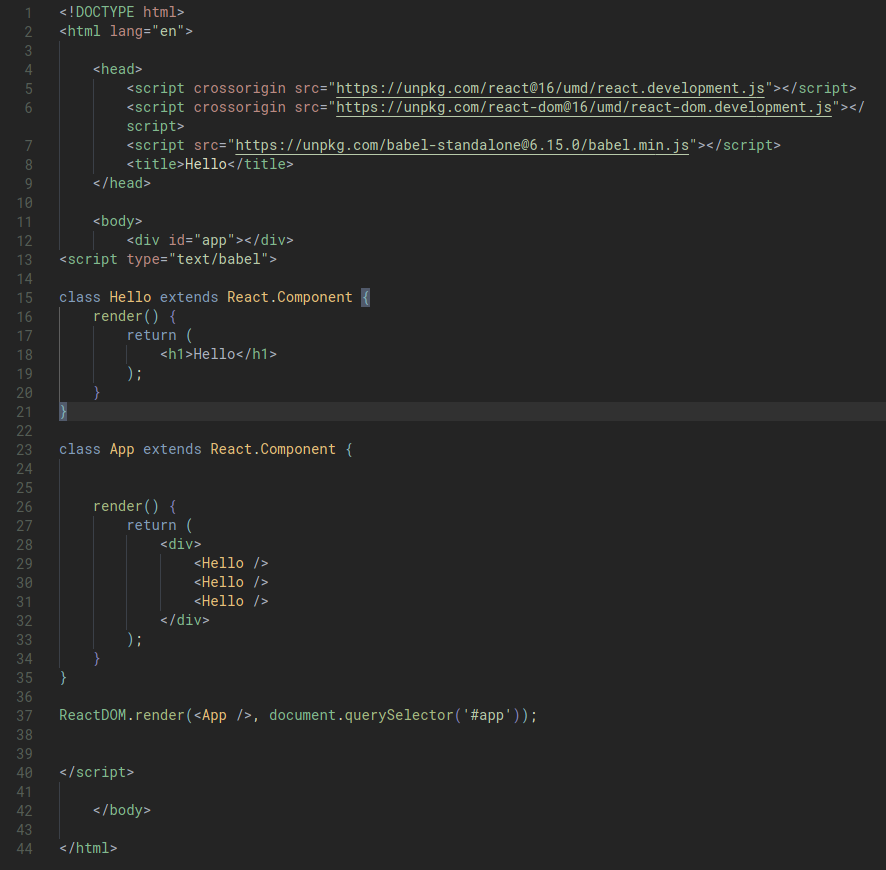
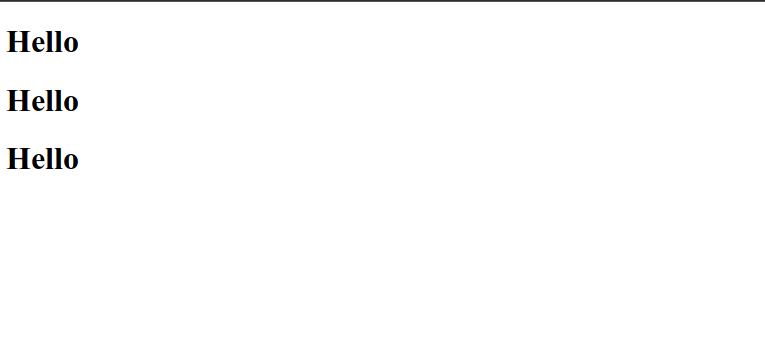
Using React props to add additional properties
The three above components aren’t super interesting as they are all exactly the same. We can make these components more flexible by adding additional properties, so called props in React terms to them.
Let’s try to pass additional information to the components to say Hello to different people.
First, in our App component, we pass an additional property called name into each of the three Hello components. These names are provided in a method that looks similar to HTML tags:
class App extends React.Component {


    render() {
        return (
            <div>
                <Hello name="Harry"/>
                <Hello name="Ron"/>
                <Hello name="Hermione"/>
            </div>
        );
    }
}
then, we can access the “props” using this.props.PROP_NAME where this represents the current object. The variables are wrapped around curly braces.
class Hello extends React.Component {
    render() {
        return (
            <h1>Hello, {this.props.name}</h1>
        );
    }
}
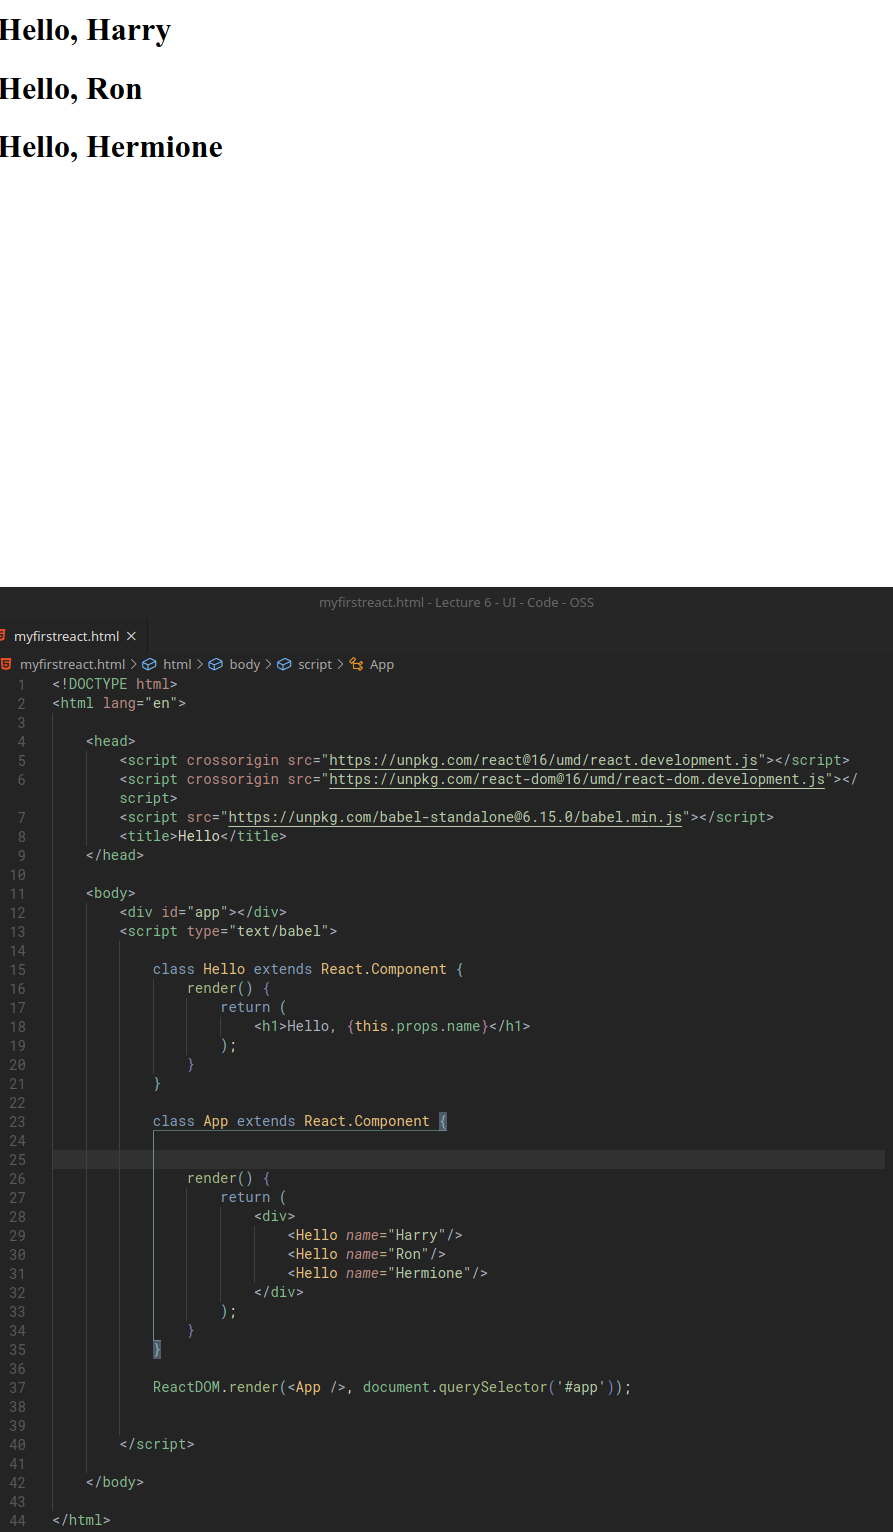
Using State
Where components can start to get more powerful is when we begin to express states inside the components.
We’ll do this by re-creating the counter program using React. Previously we were able to do this by using pure JavaScript and separately maintain a variable called counter as well as manipulate the DOM. That starts to get tedious if we have more components.
We’ll include a constructor method that is called when the component is first created. This constructor method will always take props as an argument. The first line will always be super(props);, which essentially just mean “OK make sure this method is properly set up and initialized”.
Next, we initialize the state of the component, which is a JS object that stores information about the component. Let’s just set the count to 0.
class App extends React.Component {

    constructor(props) {
        super(props);
        this.state = {
            count: 0
        };
    }

    render() {
        return (
            <div>
                <h1>{this.state.count}</h1>
                <button>count</button>
            </div>
        );
    }
}

ReactDOM.render(<App />, document.querySelector('#app'));
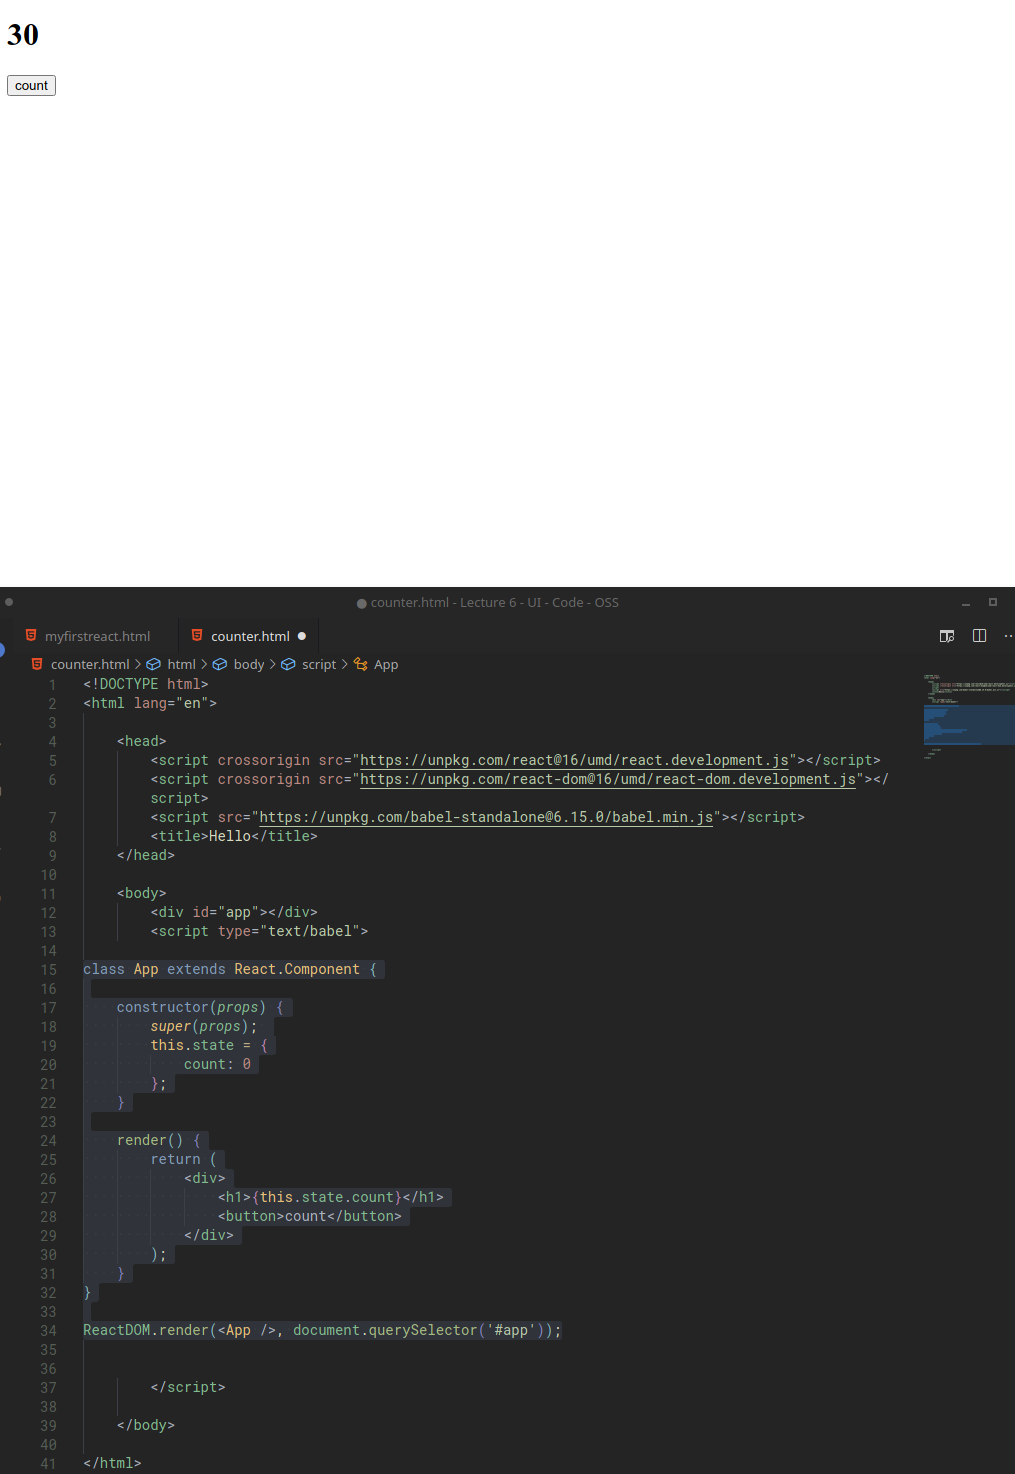
Now, let’s add functionality to the count button. Note, in React, we need to use onClick instead of onclick.
For the button element, we’ll add onClick={this.count} which means “when this button is clicked, call the count function”.
In the count function, we define it using setState so that it takes the initial state (state), then generate (=>) the new state by updating the state.count attribute. This is the standard syntax for setState where it take the inital state, and the final desired state.
class App extends React.Component {

    constructor(props) {
        super(props);
        this.state = {
            count: 0
        };
    }

    render() {
        return (
            <div>
                <h1>{this.state.count}</h1>
                <button onClick={this.count}>Count</button>
            </div>
        );
    }

    count = () => {
        this.setState(state => ({
            count: state.count +1
        }));
    }
}


ReactDOM.render(<App />, document.querySelector('#app'));
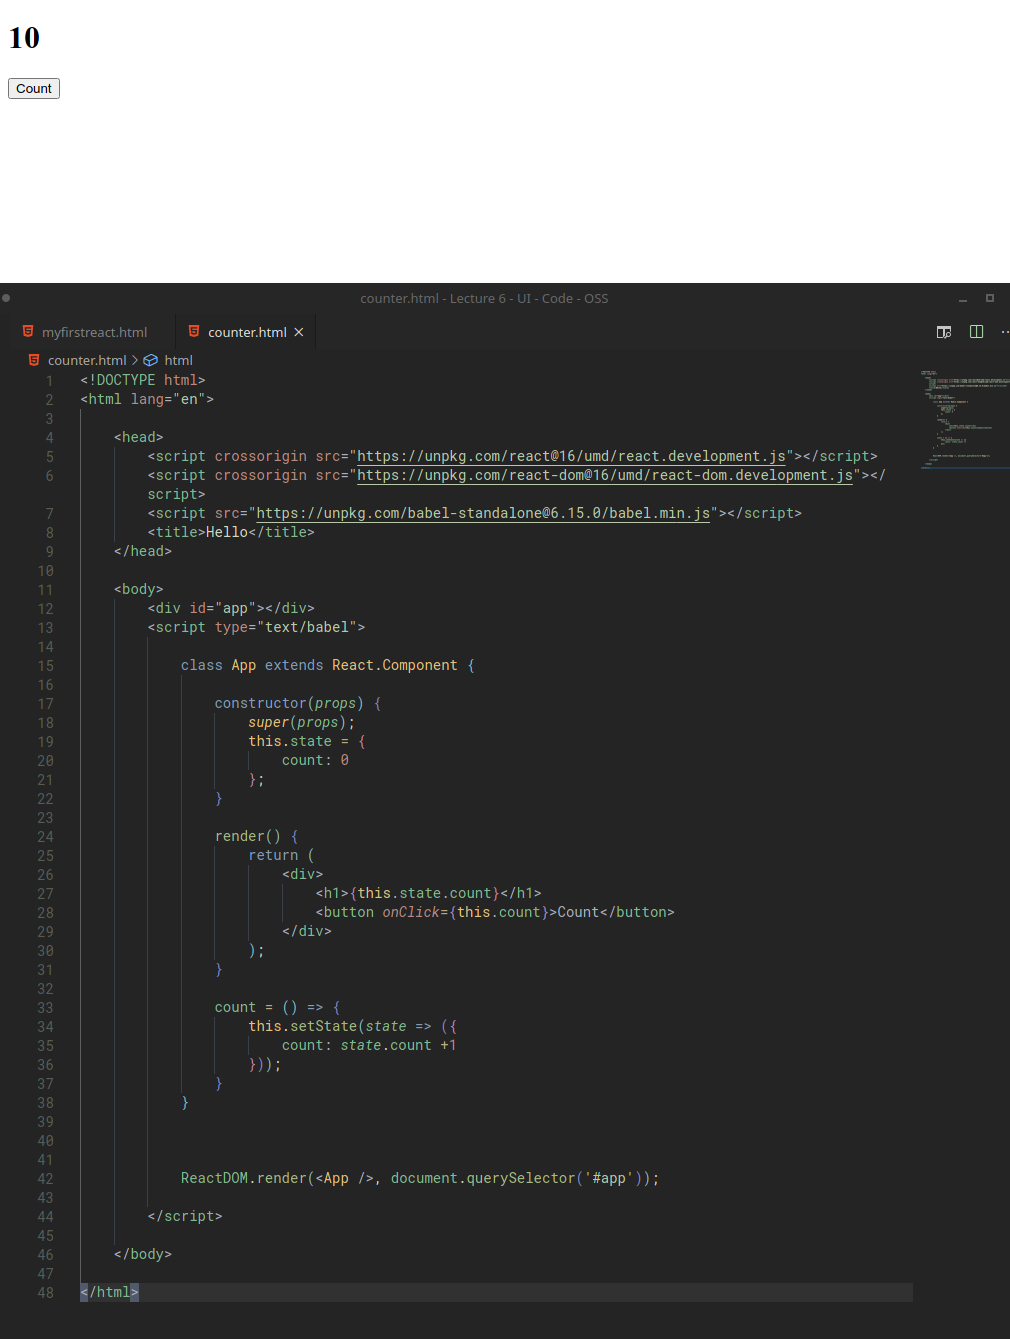
Building an Addition Game
Putting all the pieces together and taking advantages of React declartive programming, let’s build simple addition game.
We can keep the same boilerplate code body from counter.html before:
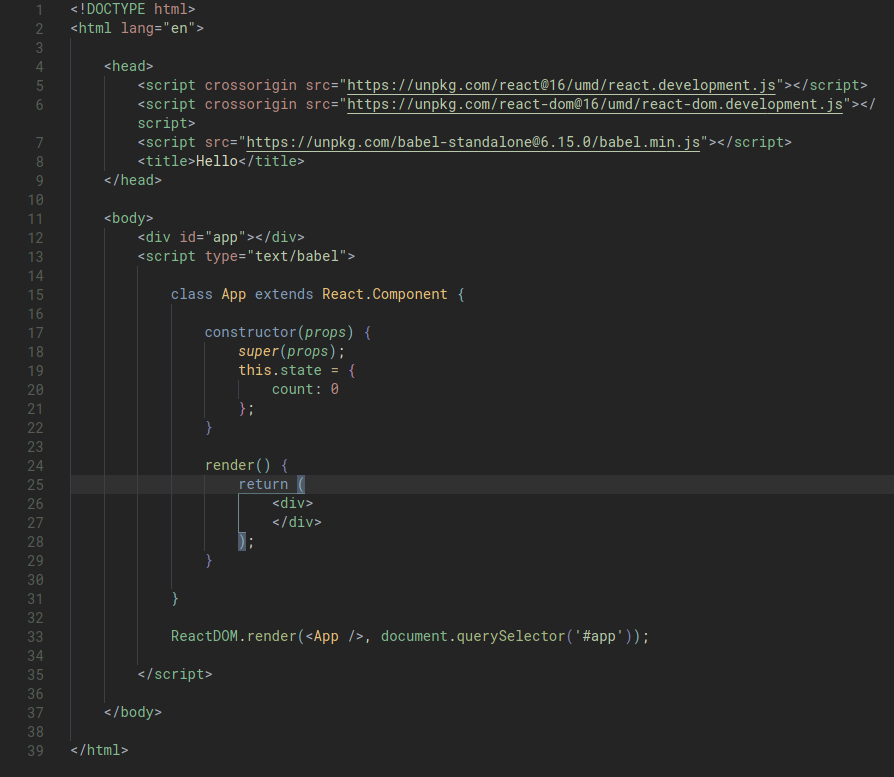
When we use React or any form of declarative programming, the most important thing to think about is what are the things that we should include inside the state of the application? What need to change in the application?
For our simple addition app, these are:
- The score
- The two numbers that we’ll user to ask user to perform the addition
- The content of the user input is also what we are interested in. Even though this value will just be blank initially, we’ll use it to keep track of the user in put. In order to allow user to change the
this.state.responsevalue on our page, we’d also need to addonChange={this.updateResponse}so that whenever the input is changed, we’d also update the component. We’d then define theupdateResponsefunction so that the state (ofthis) changes (bysetState) whenever an event (onChange) happens.
Here is our React block now:
class App extends React.Component {

    constructor(props) {
        super(props);
        this.state = {
            num1: 1,
            num2: 1,
            response: "",
            score: 0
        };
    }

    render() {
        return (
            <div>
                <div>{this.state.num1} + {this.state.num2}</div>
                <input onChange={this.updateResponse} value={this.state.response}/>
                <div>{this.state.score}</div>
            </div>
        );
    }

    updateResponse = (event) => {
        this.setState({
            response: event.target.value
        });
    }

}

ReactDOM.render(<App />, document.querySelector('#app'));
Now, lets implement some logic to detect whether a response is correct. We add an event listener for onKeyPress to check. The logic that we’ll implement will only be called after use has hit the ENTER key. Turns out, this is doable for a KeyPress event, which we can access the property key from.
We’ll also need to use parseInt() to convert the response string to a response integer.
class App extends React.Component {

    constructor(props) {
        super(props);
        this.state = {
            num1: 1,
            num2: 1,
            response: "",
            score: 0
        };
    }

    render() {
        return (
            <div>
                <div>{this.state.num1} + {this.state.num2}</div>
                <input onKeyPress={this.inputKeyPress} onChange={this.updateResponse} value={this.state.response}/>
                <div>{this.state.score}</div>
             </div>
        );
    }

    inputKeyPress = (event) => {
        if (event.key === 'Enter') {
            const answer = parseInt(this.state.response);
            if (answer === this.state.num1 + this.state.num2) {
                // Correct answer
                this.setState(state => ({
                    score: state.score + 1
                }));
            } else {
                // wrong

            }
        }
    }

    updateResponse = (event) => {
        this.setState({
            response: event.target.value
        });
    }

}
Let’s now implement some logic that changes the question when the user has answered question. We’ll use the Math.random() function for this purpose. This function returns a floating-point pseudo-random number in the range 0-1.
With these, our question will update whenever the user has answered the question.
Let’s add some logic to handle the event when the user has provided an incorrect answer. Let’s deduct their score by one.
Then, for the final touch, we’ll update the response value to an empty string to clear out the input field.
class App extends React.Component {

    constructor(props) {
        super(props);
        this.state = {
            num1: 1,
            num2: 1,
            response: "",
            score: 0
        };
    }

    render() {
        return (
            <div>
                <div>{this.state.num1} + {this.state.num2}</div>
                <input onKeyPress={this.inputKeyPress} onChange={this.updateResponse} value={this.state.response}/>
                <div>{this.state.score}</div>
             </div>
        );
    }

    inputKeyPress = (event) => {
        if (event.key === 'Enter') {
            const answer = parseInt(this.state.response);
            if (answer === this.state.num1 + this.state.num2) {
                // Correct answer
                this.setState(state => ({
                    score: state.score + 1,
                    num1: Math.ceil(Math.random() * 10),
                    num2: Math.ceil(Math.random() * 2),
                    response: ""
                }));
            } else {
                // wrong
                this.setState(state => ({
                    score: state.score - 1,
                    response: ""
                }))

            }
        }
    }

    updateResponse = (event) => {
        this.setState({
            response: event.target.value
        });
    }

}

ReactDOM.render(<App />, document.querySelector('#app'));
We are pretty much done with the logic of our addition game, however, last be a bit ambitous and implement a “winning” logic, i.e when the user has won the game.
Up to this point, the render() function of our App React Component only returns one element. However we can add some javascript logic as well.
OLD:
    render() {
        return (
            <div>
                <div>{this.state.num1} + {this.state.num2}</div>
                <input onKeyPress={this.inputKeyPress} onChange={this.updateResponse} value={this.state.response}/>
                <div>{this.state.score}</div>
             </div>
        );
    }
NEW:
    render() {

        if (this.state.score === 10) {
            return(
                <div>
                    You won!
                </div>
            )
        }

        return (
            <div>
                <div id="problem">{this.state.num1} + {this.state.num2}</div>
                <input onKeyPress={this.inputKeyPress} onChange={this.updateResponse} value={this.state.response}/>
                <div>{this.state.score}</div>
             </div>
        );
    }
Last but not least, some styling.
#app {
    text-align: center;
    font-family: sans-serif;
}

#problem {
    font-size: 72px;

}

#winner {
    font-size: 100px;
    color: green;
}
The final product

Lecture 7 - Testing and CI/CD
Testing
assert
This is one of the simplest way in Python to test something. The assert command is followed by some expression that should evaluate to True. If the expression is True, nothing will happen and there will be no output at all. If the expression is False, an exception will be thrown.
def square(x):
	return x * x

assert square(10) == 100
Hypothetically, if we have made a mistake in our code, the `assert` statement would help us identify the mistake:

```python
def square(x):
	return x + x

assert square(10) == 100
: Traceback (most recent call last):
:   File "<stdin>", line 1, in <module>
:   File "/tmp/babel-WhsVpO/python-y9mIzc", line 4, in <module>
:     assert square(10) == 100
: AssertionError

Especially when we are working in a large project, it's best to be able to identify the error as early as possible.

### Test-Driven Development

*Test-Driven development* is a practice that teams may want to consider adopting for building larger projects.

This is a development style where everytime we fix a bug, we add a test that checks for that bug to a growing set of tests that are run every time we make changes. This way, we'll be able to make sure that newly built features do not break nor interfere with existing features.

Example:
```python
import math

def is_prime(n):
	# check whether n is prime or not
	if n < 2:
		return False

	for i in range(2, int(math.sqrt(n))):
		if n % i == 0:
			return False

	return True

def test_is_prime(n, expected):
	if is_prime(n) != expected:
		print(f"Error on is_prime({n}), expected: {expected}.")

test_is_prime(5, True)
test_is_prime(10, False)
test_is_prime(3, True)
test_is_prime(1, False)
test_is_prime(25, False)
: Error on is_prime(25), expected: False.

In the above codeblock, we have a function `is_prime()` that checks whether the input is a prime number or not. Then, we'll also have a function to test whether the `is_prime()` function is working as expected.

From the testing result, we can see that there was some issue when the input was `25` and that it was incorrectly identified as a prime number. Before we look at the actual issue, let's look at one way by which we can automate our testing by using a *shell script*.

This can be achieved by a shell script that contains the following. In this test script, we'll use the `-c` optional argument with `python` to indicate that we want to write a command.

```sh
python3 -c "from tests0 import test_prime; test_prime(1, False)"
python3 -c "from tests0 import test_prime; test_prime(2, True)"
python3 -c "from tests0 import test_prime; test_prime(8, False)"
python3 -c "from tests0 import test_prime; test_prime(11, True)"
python3 -c "from tests0 import test_prime; test_prime(25, False)"
python3 -c "from tests0 import test_prime; test_prime(28, False)"
ERROR on is_prime(8), expected False
ERROR on is_prime(25), expected False
The above is an example where we can implement our automated testing, however we may still want to avoid having to write out each of those tests. There are Python libraries that can help us with this, one of them being unittest.
Unit Testing
Using the unittest library, we’ll be able to write automated test for complicated function. Let’s try to translate our above testing to the unittest version:
Note: in a real-world example, we should write tests separately from the functions that are being tested, i.e import is_prime from prime. However to make it easier to demonstrate I have copied them both into one.
import unittest
import math

def is_prime(n):
	# check whether n is prime or not
	if n < 2:
		return False

	for i in range(2, int(math.sqrt(n))):
		if n % i == 0:
			return False

	return True


class Tests(unittest.TestCase):

    def test_1(self):
        """Check that 1 is not prime."""
        self.assertFalse(is_prime(1))

    def test_2(self):
        """Check that 2 is prime."""
        self.assertTrue(is_prime(2))

    def test_8(self):
        """Check that 8 is not prime."""
        self.assertFalse(is_prime(8))

    def test_11(self):
        """Check that 11 is prime."""
        self.assertTrue(is_prime(11))

    def test_25(self):
        """Check that 25 is not prime."""
        self.assertFalse(is_prime(25))

    def test_28(self):
        """Check that 28 is not prime."""
        self.assertFalse(is_prime(28))

if __name__ == "__main__":
    unittest.main()
Note:
- The name of each function has to begin with
test_. This is necessary for the functions to be run automatically with the call tounittest.main(). - Each test function takes a
selfargument. This is Python standard practice when defining function within classes. - The docstrings within all the test functions are not just for readability. These will be displayed as a description of the test, if it fails.
- The next line of each function contains an assertion in the form of
self.assertSOMETHING. There are many different types includingself.assertTrue,self.assertFalse,self.assertEqual,self.assertGreater.
When we run the above code, the output will be:
...F.F
======================================================================
FAIL: test_25 (__main__.Tests)
Check that 25 is not prime.
----------------------------------------------------------------------
Traceback (most recent call last):
  File "tests1.py", line 26, in test_25
    self.assertFalse(is_prime(25))
AssertionError: True is not false

======================================================================
FAIL: test_8 (__main__.Tests)
Check that 8 is not prime.
----------------------------------------------------------------------
Traceback (most recent call last):
  File "tests1.py", line 18, in test_8
    self.assertFalse(is_prime(8))
AssertionError: True is not false

----------------------------------------------------------------------
Ran 6 tests in 0.001s

FAILED (failures=2)
As we can see, there were two failures. The docstrings were used to display the result of the testing along with the description of each failed test.
The solution for the bug in our code was that we needed to test one additional number in the for loop. For example, if the input is 25, the square root is 5, however the loop terminates at 4. Therefore, we’d need to update our code to:
import math

def is_prime(n):
	# check whether n is prime or not
	if n < 2:
		return False

	for i in range(2, int(math.sqrt(n)+1)):
		if n % i == 0:
			return False

	return True
If we run our unittest function again, we’d see:
......
----------------------------------------------------------------------
Ran 6 tests in 0.000s

OK
These automated testing will become even more useful when we begin to optimize our function more.
#Django Testing#
Unit testing for mathematical functions are all cool and hip. Let’s check how we can implement these practices for a web-application like Django.
We’ll refer to the flights project that we first created back in Lecture 4.
This is our models.py defintion for the Flight class.
class Flight(models.Model):
    origin = models.ForeignKey(Airport, on_delete=models.CASCADE, related_name='departures')
    destination = models.ForeignKey(Airport, on_delete=models.CASCADE, related_name='arrivals')
    duration = models.IntegerField()

    def __str__(self):
        return f"{self.id}: {self.origin} to {self.destination}"
Let’s say we want to validate that a flight is a valid flight, that:
- The origin is not the same as destination.
- The duration has to be greater than 0 minutes.
We just need to write a simple method:
class Flight(models.Model):
    origin = models.ForeignKey(Airport, on_delete=models.CASCADE, related_name="departures")
    destination = models.ForeignKey(Airport, on_delete=models.CASCADE, related_name="arrivals")
    duration = models.IntegerField()

    def __str__(self):
        return f"{self.id}: {self.origin} to {self.destination}"

    def is_valid_flight(self):
        return self.origin != self.destination or self.duration > 0
So how do we make sure the test methods are actually excuted?
In Django, in order to make sure that our applications work as expected, after we init an app, we are automatically given a test.py file, which initially just contains:
from django.test import TestCase

# Create your tests here.
What this file is supposed to be used for is for the execution of our unit tests.
To use this file, we first need to create a Class that extends the original TestCase class that is imported. Within this class, we’ll need to define a setUp function that will be run at the start of the testing process. This setUp function will be used to create dummy/sample test data (in a seperate database from production) to be used just for our testing purposes.
Here is how our test class looks, just with the setUp function:
from django.test import TestCase
from .models import Flight, Airport, Passenger

# Create your tests here.
class FlightTestCase(TestCase):

    def setUp(self):

        # Create airports.
        a1 = Airport.objects.create(code="AAA", city="City A")
        a2 = Airport.objects.create(code="BBB", city="City B")

        # Create flights.
        Flight.objects.create(origin=a1, destination=a2, duration=100)
        Flight.objects.create(origin=a1, destination=a1, duration=200)
        Flight.objects.create(origin=a1, destination=a2, duration=-100)
Now that we have some sample test data, let’s add some functions to this class to perform some tests.
def test_departures_count(self):
	# Test departure count from AAA, there should be three from our sample data
    a = Airport.objects.get(code="AAA")
    self.assertEqual(a.departures.count(), 3)

def test_arrivals_count(self):
	# Test arival count to AAA, there should be one from our sample data
    a = Airport.objects.get(code="AAA")
    self.assertEqual(a.arrivals.count(), 1)
We can also use the is_valid_flight() function that we added to our Flight model:
def test_valid_flight(self):
    a1 = Airport.objects.get(code="AAA")
    a2 = Airport.objects.get(code="BBB")
    f = Flight.objects.get(origin=a1, destination=a2, duration=100)
    self.assertTrue(f.is_valid_flight())

def test_invalid_flight_destination(self):
    a1 = Airport.objects.get(code="AAA")
    f = Flight.objects.get(origin=a1, destination=a1)
    self.assertFalse(f.is_valid_flight())

def test_invalid_flight_duration(self):
    a1 = Airport.objects.get(code="AAA")
    a2 = Airport.objects.get(code="BBB")
    f = Flight.objects.get(origin=a1, destination=a2, duration=-100)
    self.assertFalse(f.is_valid_flight())
With these codes in our test class in tests.py, when we run python manage.py test, the tests will be run. The output of this is almost identical to the output we saw from unittest, with the addition of this line, which just reminds us that a dummy database was created for the purpose of testing.
Destroying test database for alias 'default'...
The full output is:
Creating test database for alias 'default'...
System check identified no issues (0 silenced).
..FF.
======================================================================
FAIL: test_invalid_flight_destination (flights.tests.FlightTestCase)
----------------------------------------------------------------------
Traceback (most recent call last):
  File "/home/kkennynguyen/Documents/EDX - CS50/CS50W/Lecture 4/airline/flights/tests.py", line 35, in test_invalid_flight_destination
    self.assertFalse(f.is_valid_flight())
AssertionError: True is not false

======================================================================
FAIL: test_invalid_flight_duration (flights.tests.FlightTestCase)
----------------------------------------------------------------------
Traceback (most recent call last):
  File "/home/kkennynguyen/Documents/EDX - CS50/CS50W/Lecture 4/airline/flights/tests.py", line 41, in test_invalid_flight_duration
    self.assertFalse(f.is_valid_flight())
AssertionError: True is not false

----------------------------------------------------------------------
Ran 5 tests in 0.013s

FAILED (failures=2)
Destroying test database for alias 'default'...
It seems that 2 of our tests failed. Why? It’s because the definition of our is_valid_flight() is incorrect, we should not be using or operator, like this:
class Flight(models.Model):
    origin = models.ForeignKey(Airport, on_delete=models.CASCADE, related_name='departures')
    destination = models.ForeignKey(Airport, on_delete=models.CASCADE, related_name='arrivals')
    duration = models.IntegerField()

    def __str__(self):
        return f"{self.id}: {self.origin} to {self.destination}"

    def is_valid_flight(self):
        return self.origin != self.destination or self.duration > 0
but rather, use and:
class Flight(models.Model):
    origin = models.ForeignKey(Airport, on_delete=models.CASCADE, related_name='departures')
    destination = models.ForeignKey(Airport, on_delete=models.CASCADE, related_name='arrivals')
    duration = models.IntegerField()

    def __str__(self):
        return f"{self.id}: {self.origin} to {self.destination}"

    def is_valid_flight(self):
        return self.origin != self.destination and self.duration > 0
Now, if we run python manage.py test again, we’ll see a happy result:
Creating test database for alias 'default'...
System check identified no issues (0 silenced).
.....
----------------------------------------------------------------------
Ran 5 tests in 0.012s

OK
Destroying test database for alias 'default'...
Client Testing
When we create web applications, we’ll need to check both of the following:
- Specific functions should work as expected and
- Individual web pages load as intended.
In Django, we can do this by utilizing the Client object in our testing class. Then we can make requests using this object. To do this, we first need to import this class in our tests.py file:
from django.test import TestCase, Client
Now, we can add a test that makes sure we get an HTTP Response code of 200 and that all three of our flights are added to the context of our response. We’ll do this by adding the following method in our FlightTestCase(TestCase) class:
def test_index(self):

    # Set up client to make requests
	c = Client()

    # Send get request to index page and store response
	response = c.get("/flights/")

    # Make sure status code is 200
	self.assertEqual(response.status_code, 200)

    # Make sure three flights are returned in the context
    self.assertEqual(response.context["flights"].count(), 3)
Note:
- The
contextproperty can be called from theresponseobject for us to test the context data that is passed in our view function.
We can also test to make sure that we get a valid response code for a valid flight page. We’d also want an invalid response code for a flight page that doesn’t exist.
def test_valid_flight_page(self):
	# test that user should be able to access flight page for a dummy flight id
    a1 = Airport.objects.get(code="AAA")
    f = Flight.objects.get(origin=a1, destination=a1)

    c = Client()
    response = c.get(f"/flights/{f.id}")
    self.assertEqual(response.status_code, 200)

def test_invalid_flight_page(self):
	# Test that client should get invalid response when trying to retrieve
	# a flight that doesn't exist
    max_id = Flight.objects.all().aggregate(Max("id"))["id__max"]

    c = Client()
    response = c.get(f"/flights/{max_id + 1}")
    self.assertEqual(response.status_code, 404)
Note:
- The
Max()function was used to find the maximumid. We need to impor this in ourtests.pyfile byfrom django.db.models import Max.
Finally, we can also add some testing to make sure that passengers and non-passengers lists are being generated as expected.
def test_flight_page_passengers(self):
	# Test that passenger list is passed in context data OK
    f = Flight.objects.get(pk=1)
    p = Passenger.objects.create(first="Alice", last="Adams")
    f.passengers.add(p)

    c = Client()
    response = c.get(f"/flights/{f.id}")
    self.assertEqual(response.status_code, 200)
    self.assertEqual(response.context["passengers"].count(), 1)

def test_flight_page_non_passengers(self):
	# Test that
    f = Flight.objects.get(pk=1)
    p = Passenger.objects.create(first="Alice", last="Adams")

    c = Client()
    response = c.get(f"/flights/{f.id}")
    self.assertEqual(response.status_code, 200)
    self.assertEqual(response.context["non_passengers"].count(), 1)
The end product tests.py
tests.py
from django.test import TestCase, Client
from .models import Flight, Airport, Passenger
from django.db.models import Max

# Create your tests here.
class FlightTestCase(TestCase):

    def setUp(self):

        # Create airports.
        a1 = Airport.objects.create(code="AAA", city="City A")
        a2 = Airport.objects.create(code="BBB", city="City B")

        # Create flights.
        Flight.objects.create(origin=a1, destination=a2, duration=100)
        Flight.objects.create(origin=a1, destination=a1, duration=200)
        Flight.objects.create(origin=a1, destination=a2, duration=-100)

    def test_departures_count(self):
        a = Airport.objects.get(code="AAA")
        self.assertEqual(a.departures.count(), 3)

    def test_arrivals_count(self):
        a = Airport.objects.get(code="AAA")
        self.assertEqual(a.arrivals.count(), 1)

    def test_valid_flight(self):
        a1 = Airport.objects.get(code="AAA")
        a2 = Airport.objects.get(code="BBB")
        f = Flight.objects.get(origin=a1, destination=a2, duration=100)
        self.assertTrue(f.is_valid_flight())

    def test_invalid_flight_destination(self):
        a1 = Airport.objects.get(code="AAA")
        f = Flight.objects.get(origin=a1, destination=a1)
        self.assertFalse(f.is_valid_flight())

    def test_invalid_flight_duration(self):
        a1 = Airport.objects.get(code="AAA")
        a2 = Airport.objects.get(code="BBB")
        f = Flight.objects.get(origin=a1, destination=a2, duration=-100)
        self.assertFalse(f.is_valid_flight())

    def test_index(self):

        # Set up client to make requests
        c = Client()

        # Send get request to index page and store response
        response = c.get("/flights/")

        # Make sure status code is 200
        self.assertEqual(response.status_code, 200)

        # Make sure three flights are returned in the context
        self.assertEqual(response.context["flights"].count(), 3)

    def test_valid_flight_page(self):
        # test that user should be able to access flight page for a dummy flight id
        a1 = Airport.objects.get(code="AAA")
        f = Flight.objects.get(origin=a1, destination=a1)

        c = Client()
        response = c.get(f"/flights/{f.id}")
        self.assertEqual(response.status_code, 200)

    def test_invalid_flight_page(self):
        # Test that client should get invalid response when trying to retrieve
        # a flight that doesn't exist
        max_id = Flight.objects.all().aggregate(Max("id"))["id__max"]

        c = Client()
        response = c.get(f"/flights/{max_id + 1}")
        self.assertEqual(response.status_code, 404)

    def test_flight_page_passengers(self):
        # Test that passenger list is passed in context data OK
        f = Flight.objects.get(pk=1)
        p = Passenger.objects.create(first="Alice", last="Adams")
        f.passengers.add(p)

        c = Client()
        response = c.get(f"/flights/{f.id}")
        self.assertEqual(response.status_code, 200)
        self.assertEqual(response.context["passengers"].count(), 1)

    def test_flight_page_non_passengers(self):
        # Test that
        f = Flight.objects.get(pk=1)
        p = Passenger.objects.create(first="Alice", last="Adams")

        c = Client()
        response = c.get(f"/flights/{f.id}")
        self.assertEqual(response.status_code, 200)
        self.assertEqual(response.context["non_passengers"].count(), 1)
python manage.py test
Creating test database for alias 'default'...
System check identified no issues (0 silenced).
..........
----------------------------------------------------------------------
Ran 10 tests in 0.048s

OK
Destroying test database for alias 'default'...
Selenium
So far, what we have been able to do is test server-side code and logic. As we build our application, we’ll need to create tests for our client-side code as well. Selenium can be used to mimick client-side behaviour such as user navigating our web app.
For this section, we’ll need the following packages:
pip install chromedriver-py selenium
Let’s say we have a simple web application counter.html and we want to test the code.
Here is counter.html:
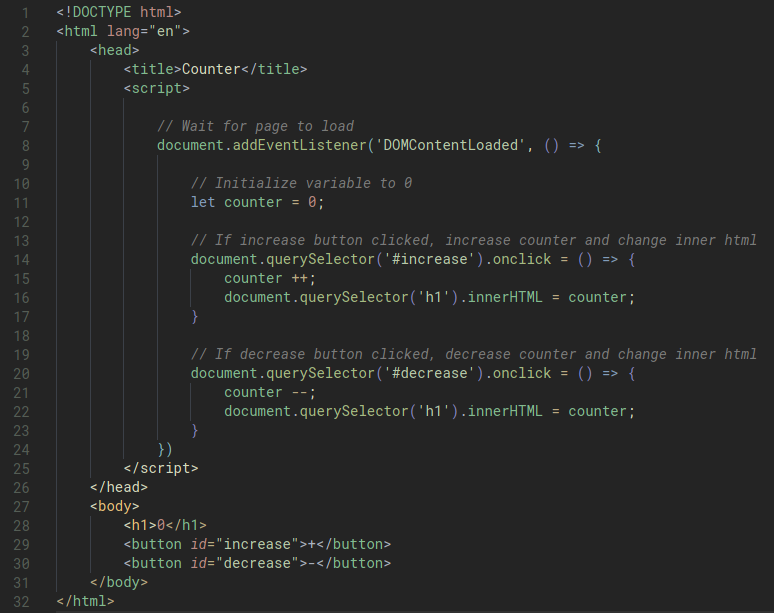
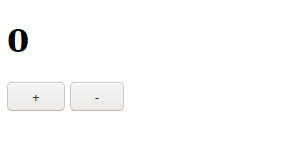
We can of course test our code by opening the page with our web browser and interact with the buttons. However, this gets very tedious as we write larger and larger single page application.
This is where Selenium comes in.
With Selenium, we’ll be able to define a testing file in Python where we can simulate user interactivity with our web application. The main tool that we’ll be needing to use is a Web Driver, which just opens up a browser on our computer. The Web Driver can be used by us to write Python codes to control the behaviours of a web browser instance.
This is the basic setup of our python testing code: test.py
import os
import pathlib
import unittest

from selenium import webdriver

# Finds the Uniform Resourse Identifier of a file
def file_uri(filename):
    return pathlib.Path(os.path.abspath(filename)).as_uri()

# Sets up web driver using Google chrome
driver = webdriver.Chrome()
Note:
- In order to open a specific page, we need the page’s Uniform Resource Identifier or
URIwhich is a string to identify our webpage.
then, we can play around with Selenium using a Python shell interface, like this:
First, we run the following, which will init the driver object and open up a Chrome web driver interface.
from test import *

- Find the URI of the file:
uri = file_uri('counter.html') - Go to the URI:
driver.get(uri)
See the title:
driver.title
: 'Counter'

See the full source:
```python
driver.page_source
: '<html lang="en"><head>\n <title>Counter</title>\n <script>\n \n // Wait for page to load\n document.addEventListener(\'DOMContentLoaded\', () => {\n\n // Initialize variable to 0\n let counter = 0;\n\n // If increase button clicked, increase counter and change inner html\n document.querySelector(\'#increase\').onclick = () => {\n counter ++;\n document.querySelector(\'h1\').innerHTML = counter;\n }\n\n // If decrease button clicked, decrease counter and change inner html\n document.querySelector(\'#decrease\').onclick = () => {\n counter --;\n document.querySelector(\'h1\').innerHTML = counter;\n }\n })\n </script>\n </head>\n <body>\n <h1>0</h1>\n <button id="increase">+</button>\n <button id="decrease">-</button>\n \n</body></html>'

Find and store the increase and decrease buttons:
```python
increase = driver.find_element_by_id("increase")
decrease = driver.find_element_by_id("decrease")
then, simulate the user behaviour with the buttons:
increase.click()
decrease.click()
even, click 25 times:
for i in range(25):
    increase.click()
Now, let’s use Selenium to create automated testing for our page. This is the full test.py file:
import os
import pathlib
import unittest

from selenium import webdriver

# Finds the Uniform Resourse Identifier of a file
def file_uri(filename):
    return pathlib.Path(os.path.abspath(filename)).as_uri()

# Sets up web driver using Google chrome
driver = webdriver.Chrome()

class WebpageTests(unittest.TestCase):

    def test_title(self):
        """Make sure title is correct"""
        driver.get(file_uri("counter.html"))
        self.assertEqual(driver.title, "Counter")

    def test_increase(self):
        """Make sure header updated to 1 after 1 click of increase button"""
        driver.get(file_uri("counter.html"))
        increase = driver.find_element_by_id("increase")
        increase.click()
        self.assertEqual(driver.find_element_by_tag_name("h1").text, "1")

    def test_decrease(self):
        """Make sure header updated to -1 after 1 click of decrease button"""
        driver.get(file_uri("counter.html"))
        decrease = driver.find_element_by_id("decrease")
        decrease.click()
        self.assertEqual(driver.find_element_by_tag_name("h1").text, "-1")

    def test_multiple_increase(self):
        """Make sure header updated to 3 after 3 clicks of increase button"""
        driver.get(file_uri("counter.html"))
        increase = driver.find_element_by_id("increase")
        for i in range(3):
            increase.click()
        self.assertEqual(driver.find_element_by_tag_name("h1").text, "3")

if __name__ == "__main__":
    unittest.main()
Then we can run our test.py:
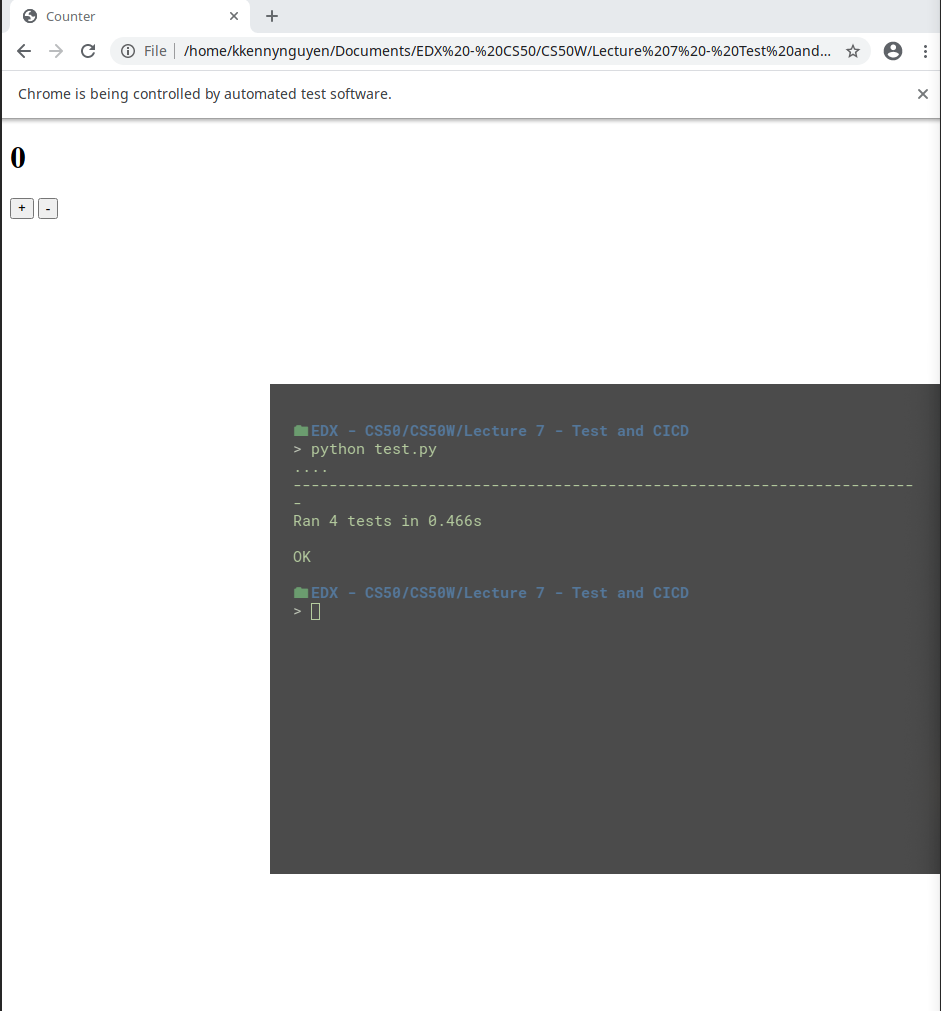 One key thing that we should notice is that Selenium test the web page incredibly fast.
CI/CD
CI/CD, which stands for Continuous Integration and Continuous Delivery is a set of software development best practice that dictates how a group of software developers can write code, and how that code is later delivered to users of the application. CI/CD consists of two primary ideas:
Continuous Integration:
- Frequent merges to the main/ master branch
- Automated unit testing with each marge
Continuous Delivery:
- Short release schedules, new versions are released frequently.
CD can also refer to Continous Deployment which is the practice of completely automated deployment.
GitHub Actions
Github Actions is one of the popular tools that can be used to help with continuous integration.
Github Actions allows us to create workflows where we can specify certain actions to be performed/ enforced every time someone pushes to a git respository. For example, we might want to check that every push adheres to a style guide, or a set of unit test is passed.
In order to use Github Actions, we need to use the configuration language YAML. Simialrly to JSON, YAML structures data around key-value pair.
Example:
key1: value1
key2: value2
key3:
    - item1
    - item2
    - item3
Let’s create some Github workflow in action, for this, I have downloaded the source code files from the lecture. The source code contains Python code for the airline Django project. It looks like this:
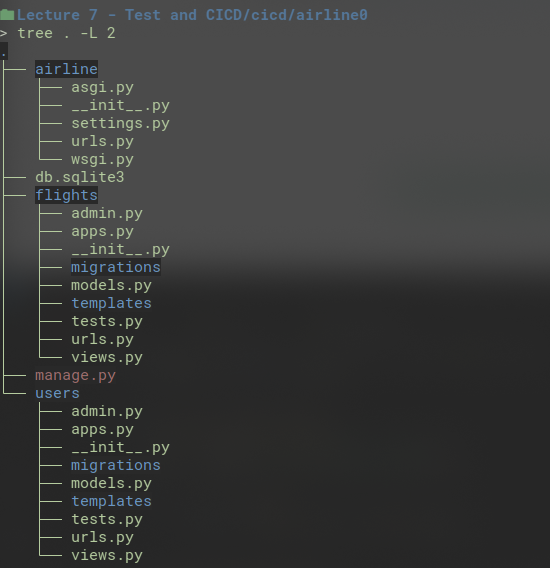
Within the project, we need a directory named .github, then a directory workflow within it. Then, within the workflow folder, we’ll need to create the ci.yml file that will contain the configuration for our github action.
This is the content of that file:
name: Testing
on: push

jobs:
  test_project:
    runs-on: ubuntu-latest
    steps:
    - uses: actions/checkout@v2
    - name: Run Django unit tests
      run: |
        pip3 install --user django
        python3 manage.py test
Notes:
name:Testingspecify the name of the workflow.on:pushspecifies when we want the workflow to run. In this example, it means “run the workflow whenver someone pushes”.- The jobs that need to happen are specified under
jobs:test-projectis the name of the first jobruns-onspecifies the virtual machine which our code will run onstepspecifies the steps of the job.uses: actions/checkout@v2is a special GitHub Action that will checkout the code from the branch where the commit was pushed to.- after the
runkey, we type the commands we want to run on the virtual machine.
Now, let’s look at running this on GitHub. Note that we’ll run it first with the bug in models.py, on this line:
    def is_valid_flight(self):
        return self.origin != self.destination or self.duration >= 0
This is the repo: https://github.com/akhsiM/cs50w-cicd-airline
With the erroneous logic in our code, it was destined to fail. And it did!:
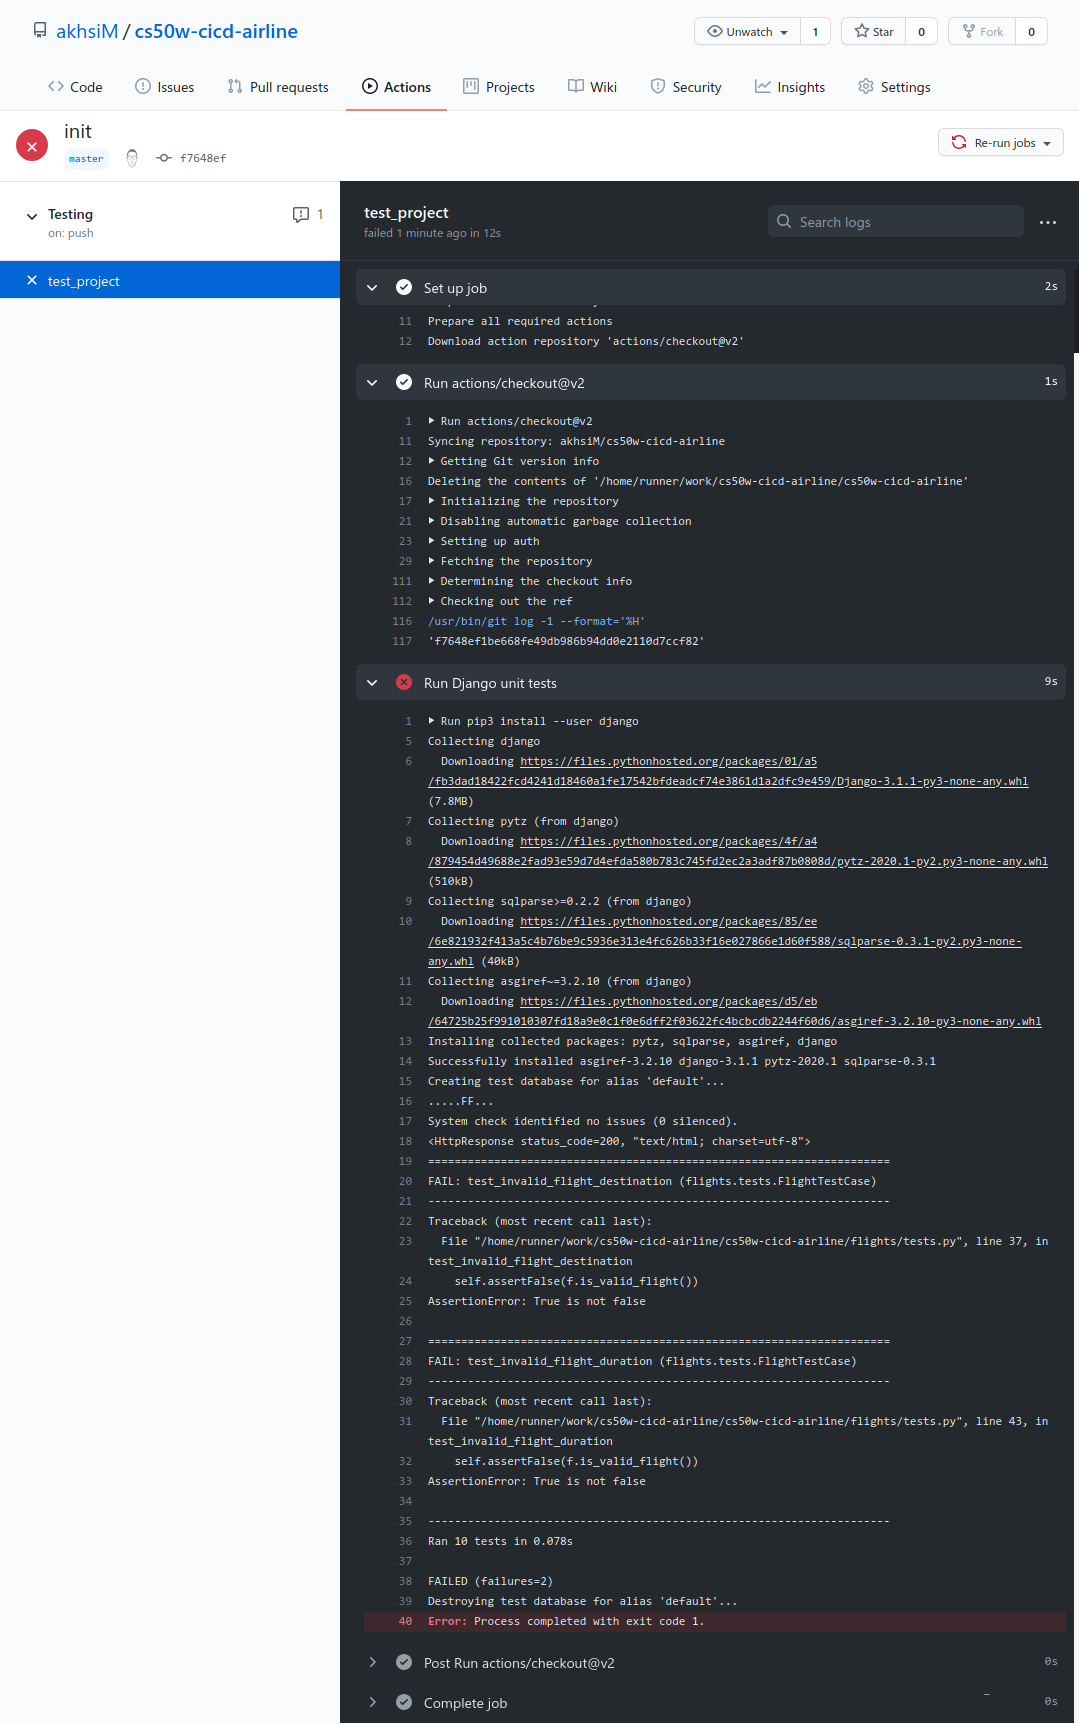
In the above image, we could see that the test_project job failed within the workflow Testing:
and that the step that failed was Run Django unit tests:

and it failed because the execution of our unit test failed:
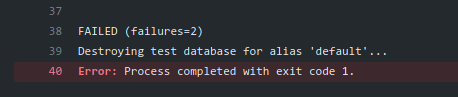
Let’s fix our code now and commit again. We’ll notice in the Actions tab that an action is running after the push was done:
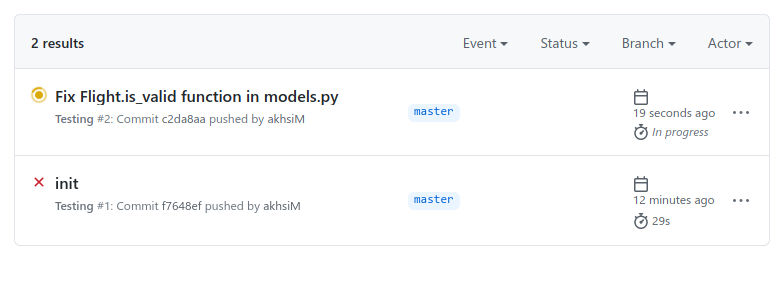
I also cheekily added an extra step 'Hello World' in our test_project` job:
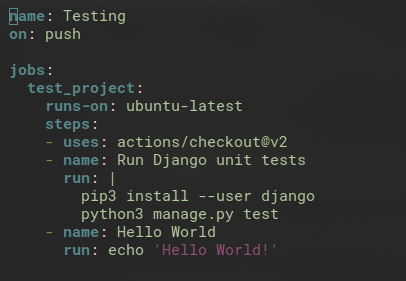
And VOILA!
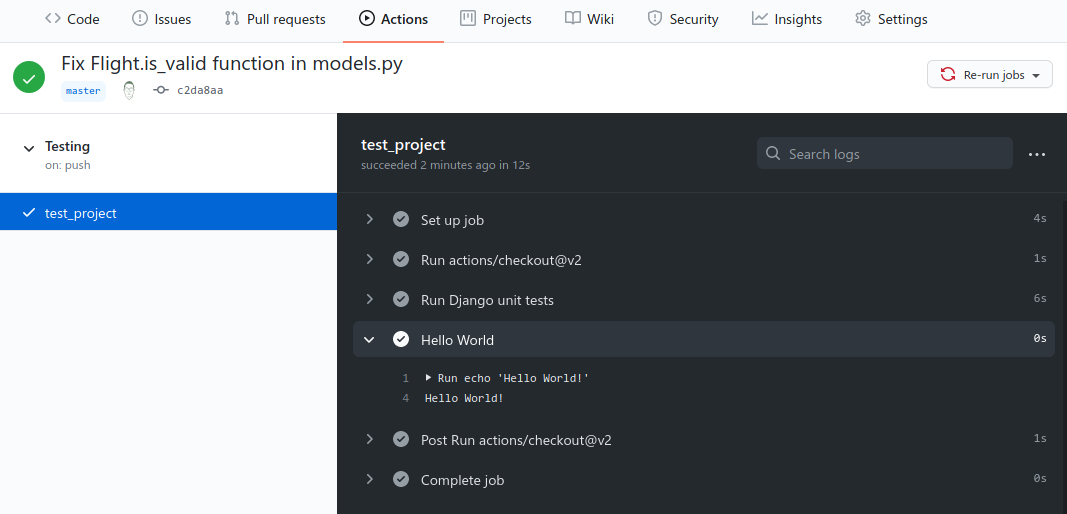
Docker
What it is
Problems can arise in the world of software development when the configuration on our computer is different than the one our application is being run on, or the environment where the other developers work on the application.
Docker was born to help address these problems by containerising the project using the same environment. Instead of just running the application inside someone’s computer environment, we’ll run it within a Docker container to make sure that with the right instructions to set up the container image, we’ll have a standardized and consistent environment within which the application will always run. A Docker is similar to a Virtual Machine however it takes less space by setting up a container within an existing computer environment and utilising existing resource and infrastructure.
Dockerfile
An example Dockerfile lookes like:
FROM python:3
COPY . /usr/src/app
WORKDIR /usr/src/app
RUN pip install -r requirements.txt
CMD ["python3", "manage.py", "runserver", "0.0.0.0:8000"]
Note:
FROM python3: this shows that we are basing this image off of a standard image in which Python 3 is installed. This is fairly common when writing a Docker File, as it allows you to avoid the work of re-defining the same basic setup with each new image.COPY . /usr/src/app: This shows that we wish to copy everything from our current directory (.) and store it in the /usr/src/app directory in our new container.WORKDIR /usr/src/app: This sets up where we will run commands within the container. (A bit like cd on the terminal) RUN pip install -r requirements.txt: In this line, assuming you’ve included all of your requirements to a file called requirements.txt, they will all be installed within the container.CMD ["python3", "manage.py", "runserver", "0.0.0.0:8000"]: Finally, we specify the command that should be run when we start up the container.
docker-compose.yml
Docker Compose can be used to run multiple Docker containers together. This allows two (or more) different servers to run in two (or more) seperate containers but also be able to communicate with one another.
I’m not going to repeat what I have learned in here: https://akhsim.github.io/learning/Docker.html#orgdc5e386..
Lecture 8 - Scalability and Security
In a production environment, we won’t be using our local computer to host our applications. Instead, we will eventually want to launch our sites so they can be accessed by anyone on the internet.
In order to do this, we’d need to run our site/ application on servers. Servers can be on-premise or on the cloud. There are pros and cons to each:
- Customization: Hosting our own server gives us the power to customize everything exactly the way it works.
- Expertise: It is much easier to host an application on the cloud than to maintain our own server.
- Cost: Start-up cost of on-premise server can be high. Ongoing cost of cloud hosting can be expensive.
- Scalability: Scaling is typically easier when hosting on the cloud. Most cloud hosting services also allow us to rent server space flexibly, paying based on how much action our site sees.
Scaling
A single server can handle only so many requests at once, forcing us to plan in advance about what to do when our one server is overworked. Whether we decide to host on premise or on the cloud, we have to determine how many requets a server can handle without crashing. This can be done using a number of benchmarking tools.
Once we have some upper limit on how many requests our server can handle at any given time, we can begin to think about how we want to handle the scaling of our application. There are two different approaches to scaling:
-
Vertical Scaling: When our server is overwhelmed, we simply buy/ build a larger server. Limitation is the upperlimit of a single server.
-
Horizontal Scaling: When our server is overwhelmed, we buy our build more servers and split the requests among out multiple servers.
Load Balancing
Horitzontal scaling leads us to an additional problem that need to be solved. That problem is /’How can we decide which servers are assigned to which requests?’./
This question is answered by employing a load balancer which is another piece of hardware that intercepts incoming requests and assigns them to one of our servers.
There are a number of methods for deciding which server receives which request. There are a few, and some are listed belo. There is no method of load balacing that is strictly better than all other methods. In practice, there are many used.
- Random
- Round-Robin: In this method the LB will alternate which server receives an incoming request. If we have servers A, B, C, the first would go to A, second to B and third to C then fourth back to A. This is a fairly quick calculation on the LB.
- Fewest Connections: In this method, the LB looks for the server that is currently least busy i.e currently handling the fewest requests. This allows us to prevent overworking one particular server. However it also takes longer for the LB to calculate the number of requests each server is handling, i.e the computation cost is considered high.
Another problem that we’d need to think about is user sessions. When our client requests are assigned to more than one server, what happens to the session data that is stored on one server but not the other? We don’t want to ask our users to re-enter information just because the LB pushes their subsequent requests to another server. Similarly to many problems with scalability, there are multiple approaches to solving the problem of sessions:
- Sticky Session: Once a user visits a website, the LB remembers which server they were sent to first, and makes sure to send them to the same one. One big problem with this approach is that we may have a large number of active user connection to a single server, causing it to crash.
- Database Session: All sessions are stored in a database that all servers have access to. This way, user’s information will be available no matter which server they are assigned to. The drawback here is additional time and computation power to read/write from a database.
- Client-Side Sessions: Rather than storing information on our servers, we can elect to store them locally o the user’s web browsers as cookies. The drawback is that there are security concerns with malicious users creating false cookies to emulate a login activity, and the computation concern of having to transfer cooking information back and forth with every request.
There is no best answer to the sessions problem. We need to make the decisions based on our specific circumstance.
Autoscaling
Autoscaling is a problem we need to look at if our websites are visited much more frequently at certain times. For example, if we build web application that counts down to New Years or Chrismas time, the site would get far more traffic in late December. We don’t want to buy a lot of servers just for them to sit idly during non-busy period.
Autoscaling is not perfect however, as it takes time to determine whether a new server is needed and to launch that server. With autoscaling, there is also the potential problem of more opportunity for a server to fail, when we have more servers running overall.
Scaling Databases
In addition to scaling our servers to process more requests, we’d also want to think of ways to scale our Databases. As we store more and more data, it sometimes make sense to store data in a number of different files or even on a separate server. A problem that would be brought up is that a database server may not be able to handle all of requests coming in. Like other issues of scalability, there are a number of methods we can use to mitigate the scaling databases problem.
Database partition is essentially the practice of splitting our big dataset into multiple small and more manageable datasets.
- Vertical Partitioning: Splitting data into multiple different tables rather than having redundant information in one table. Example: splitting the
flightstable intoflightsandairports. - Horitzontal Partitioning: Storing information in multiple tables with same format but different information. For example: splitting
flightsintodomestic_flightsandinternational_flights. Drawback is that it can be expensive to join multiple tables once they have been split.
Database Replication
Even after we’ve scaled a database, we still have a single point of failure which is our database. For example: if our database server crashes, all of our data would be lost.
Just as we added more servers to avoid a single point of failure, we can add additional copies of our database to make sure the failure of one database does not shutdown the whole application. Similarly to other problems, there are a few methods of database replication:
- Single-Primary Replication: There are multiple databases. However only one is considered the primary database. Only this primary database can be written to. Writebacks to this primary database is updated across the other databases. Drawback: still a single point of failure with writeback activity. If the primary database is down, no update can be made to our database.
- Multi-Primary Replication: All databases can be read from and written to. This solves the problem of single point of failure however the tradeoff is the challenge with keeping all databases up to date and that all of them need to be in sync. This setup also opens up our database to different conflict scenarios:
- Update conflict: more than one user updating the same row.
- Uniqueness conflict: Same identifier being assined to more than one entries.
- Delete conflict: One user deletes a row when another user updates it.
Caching
When we deal with larger databases, we’ll begin to learn that maintaining database servers themselves and interaction to them is costly. Therefore, we need to minimize the the number of calls that are made to our database server.
For example, let’s look at The New York Time website. It may have some database with all of the articles that are required plus some templates that are rendered every time the homepage is loaded. However, if they performed a database read whenever a homepage refresh happens, it would be a complete waste of resources as the articles displayed on the homepage don’t really change much from second to second.
This is when Caching comes in. Caching refers to a whole bunch of ideas and tools that are used to store information in a more accessible location if we anticipate repeated use in the future. The end result is that we’d reduce the load on our server, as well as our database.
Client-Side
One approach is Client-Side Caching. The idea is our web browser application caching information so that it doesn’t have to re-request the information on a page when a certain pages are loaded. One way to do this is by including an additional HTTP Response header in the request:
Cache-Control: max-age=86400
which just means: don’t make any additional request as long as the page has been visited within the last 86400 milliseconds. A drawback of this is that if the page changes within the time window of “no-cache”, the user may be looking at an outdated version of the page unless they perform a “hard refresh”.
This method is used commonly especially for files that are less likely to change over short period of time, such as a CSS file. We can also expand on this method by adding an ETag to the HTTP response header which is a unique sequence of characters that represents the particular versions of the static files. This is useful because future requests can include this tag and compare it against the server-side tag so that the browser only loads the resource if the two version differs.
Server-side
In addition to client-side caching, it can be useful to introduce some caching mechanism on the server side. With this, our backend setup will look a bit like:
Django has an entire cache framework that allows us to leverage this ability to speed up our requests. It offers several ways of implementing a cache:
- Per-View Caching: This allows us to decide that once a specific view has been loaded, that same view can be rendered without going through the function for the next specified amount of time.
- Template-Fragment Caching: This caches specific parts of a template so they do not have to be re-rendered. For example, we may have a navigation bar that rarely changes, meaning we could save time by not reloading it.
- Low-Level Cache API: This allows you to do more flexible caching, essentially storing any information you would like to.
More information on how this can be implemented is on: https://docs.djangoproject.com/en/3.0/topics/cache.
Security
As we built our application and more people start to use it, we need to learn how to make it secure.
With each of the tools that we use, from HTML, CSS, to JavaScript to Git, there are vulnerabilities.
Git vulnerabilities
For example, if we host our code repository on Github which allows open-sourceness and community contribution, it would also open up our code to potentially malicious attackers. We have to be extra careful when we make any commit as we might accidentally include files that contains private credentials like password or an API key.
If ever credentials are exposed on our repository, we need to make sure that the commits need to be wiped out as well so that its history cannot be accessed.
HTML vulnerabilities
There are many attack vectors that arise from using HTML. One of the most common is Phishing Attack which occurs when the end-user thinks that they are going to one page when they are actually taken to another page. This may simple be a <a> element that points to a malicous website.
As HTML is sent to the user as part of the requests, everyone has access to the layout and styles that allows for the page to be rendered. This opens up a lot of possibilities that can be exploited by a malicous attacker. For example, an attacker can copy all the HTML code from a valid page onto their page to make it looks like the valid page.
HTTPS
HTTPS and HTTP are both Internet protocols to transfer data from one computer to another through a series of server.
HTTPS is the protocol that is used more widely these days. It is similar to HTML however data is transferred encrypted. It’s only decrypted for the sender and receiver of the message.
Secret-Key Cryptography
In this approach, the sender and receiver both have access to a secret key that only they know. The private key and the plaintext message are used to generate a Ciphertext which is the encrypted version of the message.
In the context of the internet, this solution is actually not very practical because we’d need a method to communicate and transfer the private key. This would be an avenue of vulnerabilities then. Hence, the sender and recipient may have to meet in-person to exchange a key securely. With the number of websites that we interact with on a daily basis, in-person meetups aren’t an option.
Public-Key Cryptography
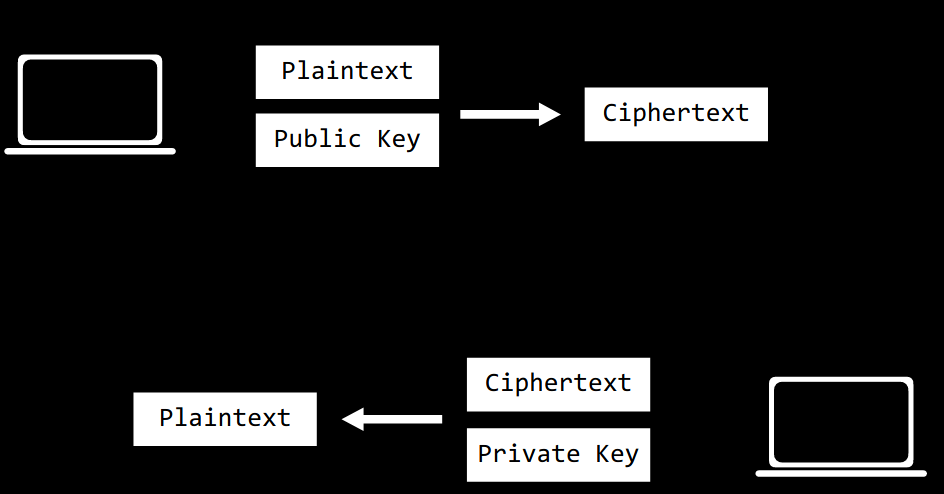
In this approach, one of the key is allowed to be public. We’ll have two keys, one public and one private key.
The public key is OK to share. It is used to encrypt information. The private key, which is mathematically related to the public key, can then be used to decrypt information.
SQL
In addition to our requests and responses, we must also make sure that our databases are secure.
One information that we’d need to store information is our user and password. However we don’t want to store passwords in plain text since this would be vulnerable in the case of database leak. Instead, we’d use a hash function. A hash function that takes an input and outputs a sequence of character that represents the input, a.k.a the “hash”. The important thing to know is that hash function is one-way. Although a password cannot be unhashed, we can use the hashed version of any password to compare it against the hashed version of the user input, so as to allow authentication.
There are a plethora of ways that information can be leaked, with simpler one being the error message that is displayed to user after they have filled up the ‘Forgotten Password’ form. We need to pay attention to these small details. That information leak may not be an issue for sites like Facebook or Google, however if we are running a site for victims of domestic abuse, that could put our user in danger.
We also have to be aware of SQL injection attack when we use straight vanilla SQL in our code. Django of course takes care of this for us.
APIs
APIs are often used in conjunction with JS to build single-page application. In the case where we build our own API, there are a few methods we can use to keep our API secure:
- API Keys
- Rate Limiting: helps against DDOS attack
- Route Authentication: A permission model where specific user can only specific data that is relevant to them.
Environment Variables
We should never be putting secrets inside the sourcecode of our web-application, this includes all passwords and API keys.
A common way to avoid this is to use environment variables, or variables that are stored in the operating system or the server’s environment within which the application is being run. Rather than including the secrets in our code, we can include a reference to the environment variables.
JavaScript
There are a few attack vectors that malicious users may attempt using Java Script. One common example is known as Cross-Site Scripting which is when a user writes their own JS code and runs it on your website.
This is quite similar to SQL injection attack. In any scenario that the user can inject code into the application somehow, we’d need to either detect that or escape that in some way,
Cross-Site Request Forgery
Django is good at prevent CSRF attacks where a request to a website can be faked without the intention of making the request.
Any time that we we create a site that allow state changes, we don’t want to allow that via GET request. Otherwise, attacks like these can happen:

This type of activies should only be done using POST requests. Even then, POST requests can still be forged, e.g. using hidden form input. Example:
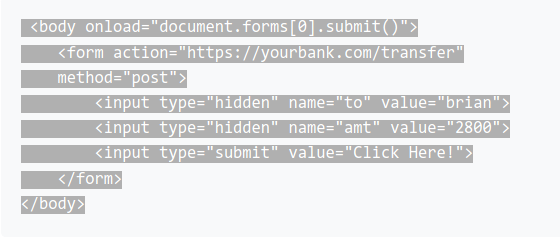
We can use this by using % csrf_token % in our template to make sure that only forms with the csrf token are accepted.