Docker
General
https://www.youtube.com/watch?v=YFl2mCHdv24
Docker is a tool for running our applications in an isolated environment. It’s similar to running applications in a virtual machine. Advantages:
- Our app always runs in the exact same environment without any inconsistency.
- We can also sandbox different projects and avoid conflicts.
- It makes it easy to get things going with somebody else’s project. We don’t have to install additional tools and dependencies. We just spin up the container.
Docker gives us these advantanges without the overhead and hassle with spinning up and managing a virtual machine. Instead we have containers, which is what the code and the environment of our applications is wrapped up within. The diagram below shows the difference between containers and virtual machines:
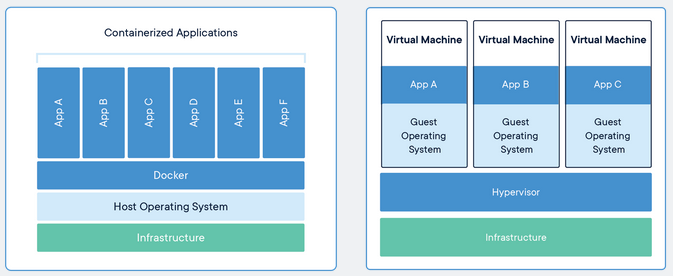
To do this, Docker use special features of the UNIX filesystem to create the isolated environment. As a result, a container can start up in seconds as opposed to minutes and also uses fewer resources, less disk space and less memory.
The image
A container runs an instance of an image which is a template to create the environment we want. It’s like a snapshot of the environment at any particular time.
The image has the OS, the software and the application code all bundled in a file.
Images are defined using a dockerfile which is just a text file with a list of steps to perform to create the image.

Playing around
Dockerfile
Let’s make a simple php page.
Next to it we can have a flat file called Dockerfile. And then we we need to look for our docker image. We should use the official image.
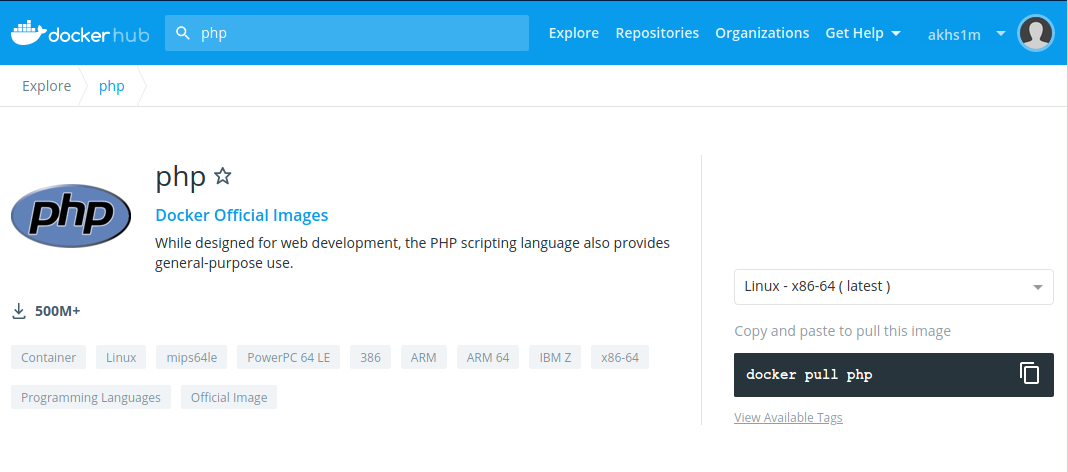
The instructions can be found here:
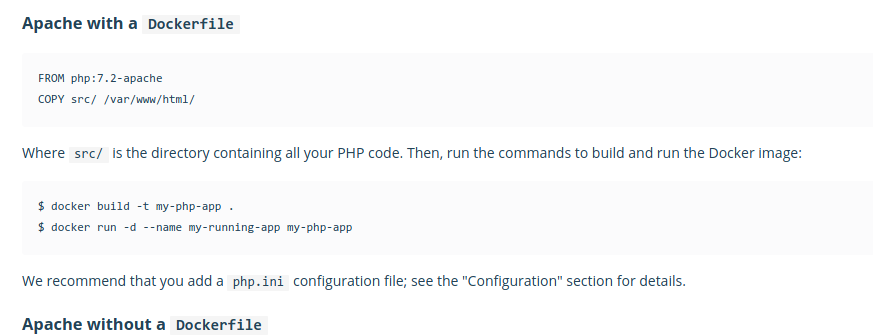
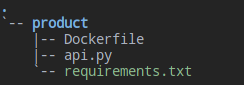
Ok, here is our project:
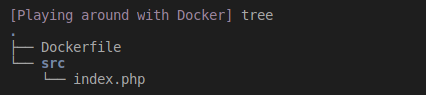
index.php:
<?php

echo "Hello, World";
Dockerfile:
FROM php:7.0-apache
COPY src/ /var/www/html/
EXPOSE 80
Docker ~build~
Then I did this:
docker build -t hello-world .
hello-world is the name of our project that we want to tag with. The ~.~ is because we are sitting at the same dir with the Dockerfile. That argument needs to be pointed to the directory of our Dockerfile.
Sending build context to Docker daemon  3.584kB
Step 1/3 : FROM php:7.0-apache
 ---> aa67a9c9814f
Step 2/3 : COPY src/ /var/w/html/
 ---> 1f46613c71a4
Step 3/3 : EXPOSE 80
 ---> Running in 0dde748d1ab2
Removing intermediate container 0dde748d1ab2
 ---> 4c43c7ebf2e4
Successfully built 4c43c7ebf2e4
Successfully tagged hello-world:latest
Docker ~build~ creates a Docker images from Dockerfiles. An image is basically a snapshot blue-print for an environment to run an application in. This blue-print is used by docker to create completely an isolated instance, so called “container” or “jail” of the application the image represents.
The blue-print includes:
- A full root filesystem including dependencies needed to run the application
- metadata to tell docker runtime on how to launch the application including: environment variables, exposed network ports, exposed volumes, what parameter to pass by default (~CMD~)..
All Docker images have an image identified (a generated 12-character alphanumeric string). They may also be given a name and a tag. If only a name is provided, a default tag of “latest” is used. Image names and tags helps to readily and unambiguously reference specific images.
Docker ~run~
Seems like we are done. Then we can run the application by:
docker run -p 80:80 hello-world
Voila:

Docker ~run~ is used for creating containers. It is important to differentiate ~run~ from ~exec~ which is used to interact with containers that are already running.
We can also start a container to poke around and discard it afterwards. The following command will start a new container, drop into a shell and destroy after exit:
docker run -it --rm someimage:latest bash
- The ~-it~ runs Docker interactively, so that we get a pseudo-TTY with STDIN. It is short for ~–interactive –tty~.
- The ~–rm~ causes Docker to automatically remove the container when it exits.
Docker image
If we need to find Docker images available locally, we can run ~docker images~ or ~docker image ls~.
Volume
When we update the content of our php page, we’d need to rebuild our docker image. This is where volumes come in.
Volumes are the preferred mechanism for persisting data generated by and used by Docker containers. In a nutshell, Docker Volumes are used for data persistence in Docker containers.
Docker Volumes is a way to “plug” either a database or a file directory from our host system to the Docker container. Ongoing changes are also refreshed automatically and synchronously between the two.
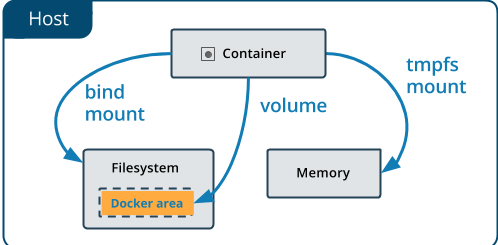
When do we need Volumes? When we have Databases or stateful applications.
Different Type of Volumes
There are three. Usually we create the volume by:
Host Volumes ~docker run -v [host dir]:[container dir]~
Example:
docker run -v /home/mount/data:/var/lib/mysql/data
Anonymous Container Volume ~docker run -v [container dir]~
Just referencing the directory within the contaiener without specifying the host. What happens is the directory is automatically created and mounted by directory. These are called “anonymous” volumes
Example:
docker run -v /var/lib/mysql/data
Named Container Volume ~docker run -v [name]:[container dir]~
This is an improvement on the anonymous container dir method which you can use to assign a name to the container directory. This lets us reference the directory easily with just the name. Example:
docker run -v name:/var/lib/mysql/data
Using the Volume for our small project
```sh docker run -p 80:80 -v /home/kkennynguyen/Documents/Tech\ Notes/Playing\ around\ with\ Docker/src:/var/www/html/ hello-world ```
The path of the volumn needs to be a full directory address, not a relative one.
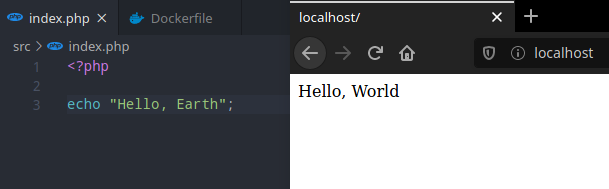
Now, our docker is running a “live” or “dynamic” view of the php.
IMPORTANT NOTE
Volumes is very useful for developments, however we’ll need to re-build our app once we need to ship it to production. Volumes are just a way to access our file on the filesystem, it does not change the image.
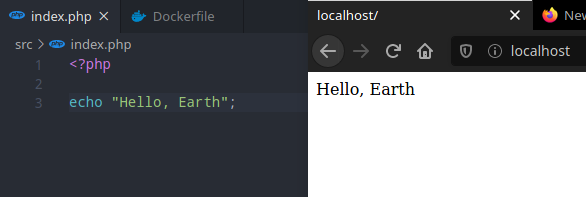
If we re-run our previously built container without the ~-v~ flag:
Docker Compose
General

Following the microservice architecture for building applications, we should only have one service in each independent container. What this means is that these services can be written in different programming languages, howeverthey do need to talk to each other.
Hands on
Let’s build a very simple e-commerce webpage, with two services, isolated within two independent containers, like this:
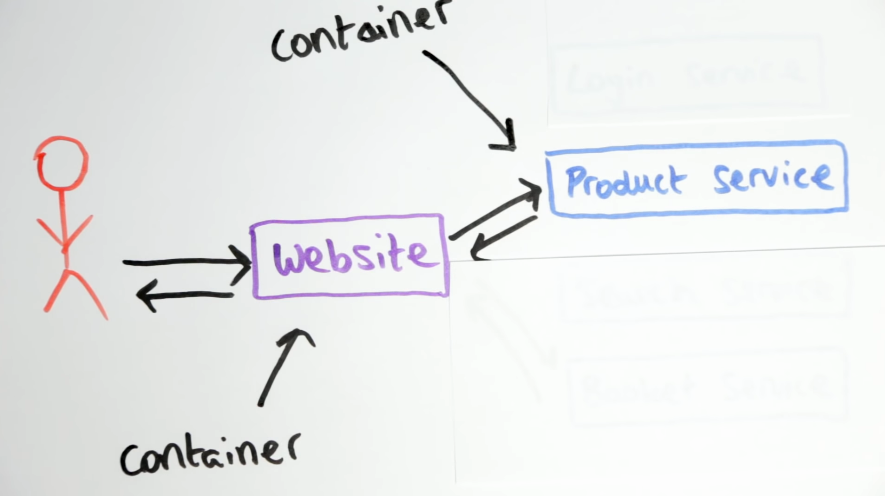
Creating the Product Service
Let’s start by creating a simple production service:
api.py:
# Product Service

from flask import Flask
from flask_restful import Resource, Api

app = Flask(__name__)
api = Api(app)

class Product(Resource):
    def get(self):
        return {
            'products': ['Ice cream',
                        'Chocolate',
                        'Fruit']
        }

api.add_resource(Product, '/')

if __name__ == '__main__':
    app.run(host='0.0.0.0', port=80, debug=True)
Dockerfile:
FROM python:3-onbuild
COPY . /usr/src/app
CMD ["python", "api.py"]
At this point, we already know how to build image and run the container using docker. However it would get a bit tedious as the number of our containers grow. One important point is that we may need to make sure that our containers can communicate fine with each other.
This is where docker compose come in, it lets us define all of our services in a configuration file. With a single command, we can then spin up all our container in one go.
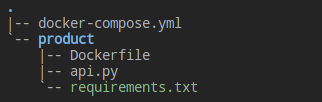
The docker-compose file
The configuration file for docker compose is in a yml format and it should sit one directory up from our service folder, because this configuration will be applied to all services.
version: '3'

services:
  product-services:
    build: ./product
    volumes:
      - ./product:/usr/src/app
    ports:
      - 5001:80
In the docker-compose.yml file, we need to start with the ~version~ of our docker-compose file format. Docker keeps on changing over the years and the format of how docker-compose.yml file should be written has been changing as well. Note that this has no relation to the version of docker-compose that we have to install, just the version of the docker-compose.yml file format. There is really no reason to not use the latest version.
Next, we need to specify our services. The name can be anything. For the ~build~ property, use relative address from where the docker-compose file is.
For the volumes, we can have unlimited number of volumes, each on a line starting with ~-~.
This is pretty much what we’d need to specify in the docker run command, however now it sits nicely in a configuration file.
docker-compose up
To run, we need to do
docker-compose up
as long as we are in the dir as the docker-compose file, it will work.
(For our example, the python onbuild image will pick up the requirements.txt file automatically and install with pip).
Creating network "docker-compose_default" with the default driver
Building product-services
Step 1/3 : FROM python:3-onbuild
3-onbuild: Pulling from library/python
1c7fe136a31e: Downloading [>                                                  ]  527.6kB/54.25MBce825d3308b: Pulling fs layer
1c7fe136a31e: Pull completeece825d3308b: Pull complete06854774e2f3: Pull complete
f0db43b9b8da: Pull complete2d21c767035c: Pull completee10b68fb77e6: Pull completee2c0fb34dff3: Pull complete
e96bc319bce0: Pull complete490280dbcfb7: Pull complete
Digest: sha256:76df62c122c910751d8cd3101f8e3da39efd4ee828686b7ff0b5a5b1d967553f
Status: Downloaded newer image for python:3-onbuild
# Executing 3 build triggers
 ---> Running in 5ba47f14ded0
Collecting Flask==0.12 (from -r requirements.txt (line 1))
  Downloading https://files.pythonhosted.org/packages/0e/e9/37ee66dde483dceefe45bb5e92b387f990d4f097df40c400cf816dcebaa4/Flask-0.12-py2.py3-none-any.whl (82kB)
Collecting flask-restful==0.3.5 (from -r requirements.txt (line 2))
  Downloading https://files.pythonhosted.org/packages/15/2e/41485f3d74103412266f3ce07675adf4bd5b4da16f5f3599b2d114374631/Flask_RESTful-0.3.5-py2.py3-none-any.whl
Collecting click>=2.0 (from Flask==0.12->-r requirements.txt (line 1))
  Downloading https://files.pythonhosted.org/packages/d2/3d/fa76db83bf75c4f8d338c2fd15c8d33fdd7ad23a9b5e57eb6c5de26b430e/click-7.1.2-py2.py3-none-any.whl (82kB)
Collecting Werkzeug>=0.7 (from Flask==0.12->-r requirements.txt (line 1))
  Downloading https://files.pythonhosted.org/packages/cc/94/5f7079a0e00bd6863ef8f1da638721e9da21e5bacee597595b318f71d62e/Werkzeug-1.0.1-py2.py3-none-any.whl (298kB)
Collecting Jinja2>=2.4 (from Flask==0.12->-r requirements.txt (line 1))
  Downloading https://files.pythonhosted.org/packages/30/9e/f663a2aa66a09d838042ae1a2c5659828bb9b41ea3a6efa20a20fd92b121/Jinja2-2.11.2-py2.py3-none-any.whl (125kB)
Collecting itsdangerous>=0.21 (from Flask==0.12->-r requirements.txt (line 1))
  Downloading https://files.pythonhosted.org/packages/76/ae/44b03b253d6fade317f32c24d100b3b35c2239807046a4c953c7b89fa49e/itsdangerous-1.1.0-py2.py3-none-any.whl
Collecting six>=1.3.0 (from flask-restful==0.3.5->-r requirements.txt (line 2))
  Downloading https://files.pythonhosted.org/packages/ee/ff/48bde5c0f013094d729fe4b0316ba2a24774b3ff1c52d924a8a4cb04078a/six-1.15.0-py2.py3-none-any.whl
Collecting pytz (from flask-restful==0.3.5->-r requirements.txt (line 2))
  Downloading https://files.pythonhosted.org/packages/4f/a4/879454d49688e2fad93e59d7d4efda580b783c745fd2ec2a3adf87b0808d/pytz-2020.1-py2.py3-none-any.whl (510kB)
Collecting aniso8601>=0.82 (from flask-restful==0.3.5->-r requirements.txt (line 2))
  Downloading https://files.pythonhosted.org/packages/eb/e4/787e104b58eadc1a710738d4e418d7e599e4e778e52cb8e5d5ef6ddd5833/aniso8601-8.0.0-py2.py3-none-any.whl (43kB)
Collecting MarkupSafe>=0.23 (from Jinja2>=2.4->Flask==0.12->-r requirements.txt (line 1))
  Downloading https://files.pythonhosted.org/packages/b2/5f/23e0023be6bb885d00ffbefad2942bc51a620328ee910f64abe5a8d18dd1/MarkupSafe-1.1.1-cp36-cp36m-manylinux1_x86_64.whl
Installing collected packages: click, Werkzeug, MarkupSafe, Jinja2, itsdangerous, Flask, six, pytz, aniso8601, flask-restful
Successfully installed Flask-0.12 Jinja2-2.11.2 MarkupSafe-1.1.1 Werkzeug-1.0.1 aniso8601-8.0.0 click-7.1.2 flask-restful-0.3.5 itsdangerous-1.1.0 pytz-2020.1 six-1.15.0
You are using pip version 10.0.1, however version 20.2.2 is available.
You should consider upgrading via the 'pip install --upgrade pip' command.
Removing intermediate container 5ba47f14ded0
 ---> 3e2d1b3aa581
Step 2/3 : COPY . /usr/src/app
 ---> 4002461ff61e
Step 3/3 : CMD ["python", "api.py"]
 ---> Running in 728d9ad4c59b
Removing intermediate container 728d9ad4c59b
 ---> add71672d6b8
Successfully built add71672d6b8
Successfully tagged docker-compose_product-services:latest
WARNING: Image for service product-services was built because it did not already exist. To rebuild this image you must use `docker-compose build` or `docker-compose up --build`.
Creating docker-compose_product-services_1 ... done
Attaching to docker-compose_product-services_1
product-services_1  |  * Running on http://0.0.0.0:80/ (Press CTRL+C to quit)
product-services_1  |  * Restarting with stat
product-services_1  |  * Debugger is active!
product-services_1  |  * Debugger PIN: 108-846-926
product-services_1  | 172.19.0.1 - - [04/Sep/2020 03:34:59] "GET / HTTP/1.1" 200 -
Our simple Flask service is up:
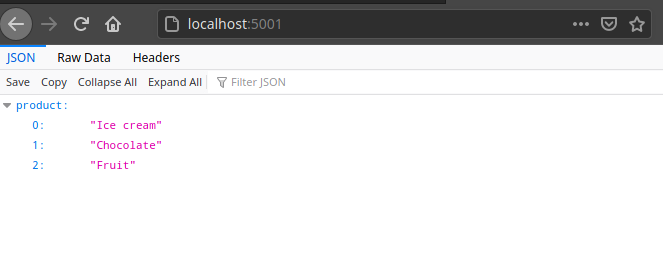
As we have a mounted volume, if we make changes to our source code, the changes should go through after we refresh our page.
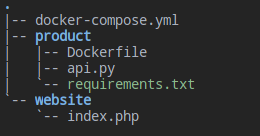
Build website service
Let’s now build a new website service, which will use the product service.
index.php:
<html>

    <head>
        <title>My Shop</title>
    </head>

    <body>
        <h1>Welcome to my shop</h1>
        <ul>
            <?php
    $json = file_get_contents('http://product-service');
    $obj = json_decode($json);

    $products = $obj->products;
    foreach ($products as $product){
        echo "<li>$product</li>"
    }
    ?>
        </ul>
    </body>

</html>
Docker-compose create a virtual network inside the environment for all the containers so that all containers that are defined in the docker-compose file can talk to each other.
docker-compose.yml
version: '3'

services:
  product-services:
    build: ./product
    volumes:
      - ./product:/usr/src/app
    ports:
      - 5001:80

  website:
    image: php:apache
    volumes:
      - ./website:/var/www/html
    ports:
      - 5000:80
    depends_on:
      - product-services
Their hostnames match their service name so we can use ~http://product-services~.
Then we go on and configure this service in the docker-compose file. Instead of specifiying a build directory, what we can do is to specify the image straight from dockerhub.
Then, we run by ~docker-compose up~ and BAM:

Docker-compose in detached mode
We can run our Docker environment in the background by:
docker-compose up -d
then, we can see the docker processes running in the background by:
docker ps

If we want to stop our docker compose, we can do:
docker-compose stop
Stopping docker-compose_website_1 … done Stopping docker-compose_product-services_1 … done ```